This is a guide for current WPML users on how to connect their current WordPress installation to STREAM – TOPPAN Digital Language’s translation workflow management platform.
This guide assumes that your site already has WPML installed. For a complete guide to setting up WPML. Please visit our blog article on WordPress website localisation made easy.
Update WordPress
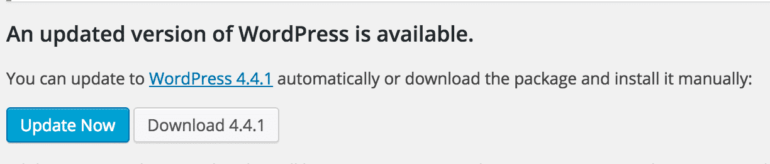
If you’re logged in as an administrator, you should be able to update WordPress by clicking on the ‘Please update now’ link on your WordPress home screen.

Then select ’Update now’ or if you have FTP access and would prefer to do it manually, you can download the latest version of WordPress and upload it by FTP.
Note: We highly recommend that you take a backup of your files and database before proceeding with a WordPress or WPML update. You can back-up your database using plugins like Duplicator, BackupBuddy or by taking a database dump using your hosting control panel.
Once the update is complete, you’ll be redirected back to the home screen and a message presented to thank you for updating to the latest version of WordPress.

Update WPML
For sites that have older versions of WPML (3.1.7 or before), you need to update manually. After this manual update, you can register WPML and receive automated updates to future versions.
Log in to your WPML.org account. Go to the ‘Downloads’ section and download the WPML components that you need. You will receive a ZIP file for each of the components.

Deactivate the current WPML version that you are using. Be sure to deactivate WPML and all its components. Otherwise, the installation files may be locked and not writeable. Don’t worry, your previous translations (if you have any) are not going to be modified or deleted.

Once the plugins have been deactivated, delete the plugins, so that you can install the new versions.

Note: if you cannot delete from inside WordPress, use an FTP program to delete the folders of WPML and its components from wp-content/plugins.
If you have the old WPML ‘Installer’ plugin, deactivate it and remove from the wp-content/plugins directory. The new WPML versions include the automated installer component.
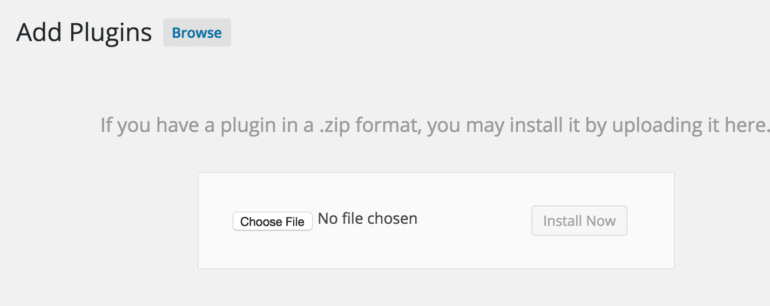
In the WordPress admin, go to Plugins -> Add New -> Upload Plugin.

And upload and install the ZIP files that you’ve previously downloaded.
Repeat this process for the WPML ‘Translation Management’ and ‘String Translation’ plugins. Once these are installed and activated, you should be able to use the ‘Translation Management’ menu to connect your WordPress instance to WPML.

Translation Management
Once all the relevant WPML plugins are installed and updated, you’ll be able to start using the ‘Translation Management’ plugin to connect to TOPPAN Digital Language.
Before you start, you need to sign up for an API key with TOPPAN Digital Language. Once you’ve received your key, simply visit the ‘Translators’ tab within the Translation Management section and click on ‘click here to authenticate’.

You’ll be presented with a popup window where you can enter your username and API key.

Once you’ve successfully authorised your site using the username and API key provided, you’ll be presented with a popup to state that activation has been successful.
And a message will appear on screen to state that you site has been authorised.

Sending content for translation
You’re now ready to send content to TOPPAN Digital Language for translation. To do this, simply visit the ‘Translation Dashboard’ tab within the ‘Translation Management’ section of WPML.
At the bottom of this page you’ll see all of your pages and posts. Next to these, you’ll see the flags related to the languages you’ve set up in the previous steps. Content that has been translated and is up-to-date (i.e. has not changed since the last time it was translated) will show a green tick.
An orange triangle with an exclamation mark will appear against content that has yet to be translated. Here you simply need to select the content that requires translation.

Beneath this table, you’ll receive an estimated word count and more options to allow you to specify which languages you’d like to translate your content into.

Once your languages have been selected, simply ‘Add to translation basket’ and these items will appear in the ‘Translation Basket’ tab. You can keep adding items to the basket as you see fit until you’re ready to send all the content for translation.
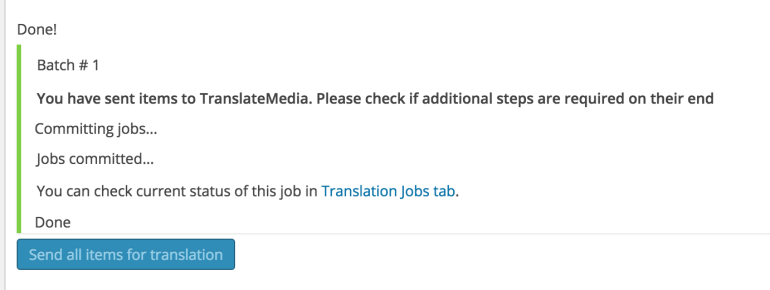
Below this you’re presented with some additional translation options such as the ability to alter the batch name and select local translators for some of the languages. When you’re ready to send the content for translation – simply click ‘Send all items for translation’.

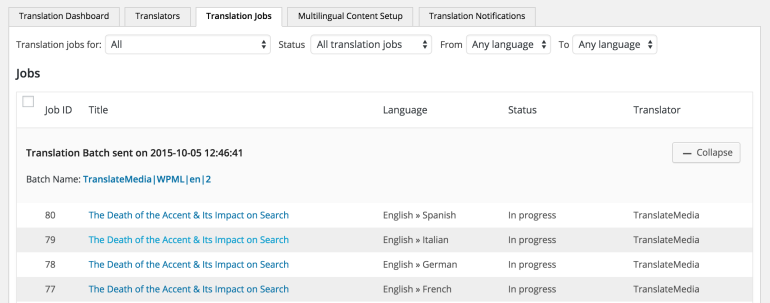
If the delivery has been successful, you’ll receive a confirmation message to state that the batch has been delivered. Within the message you’ll see a link to the ‘Translation jobs‘ tab from where you can check all the jobs which have been sent for translation.
Finally, by clicking on the ‘Batch Name’ link just below the date stamp as shown below you’re redirected to TOPPAN Digital Language’s STREAM translation management portal where you can receive a quote, submit the project for translation and check the progress of your live translation jobs.
Receiving a quote and estimated turnaround time
Once you’ve submitted your content for translation, it will be sent to STREAM and you’ll be able to obtain costs and turnaround times for each batch of content. By logging into your STREAM account and visiting your dashboard, you’ll be able to see all the jobs sent for translation along with a button labelled ‘Obtain Quote’ allowing you obtain a quote.

The system will automatically identify the content sent, source and target languages. By clicking on ‘Get Quote’ you’re able to check pricing, view any translation memory discounts for content that has previously been translated and get turnaround times for translation services.

The next page will display the costs for different types of translation and show any translation memory discounts to be applied due to repetition from previously translated work. Once you’ve selected the appropriate translation service you can press ‘Proceed‘.

The next page will display the cost and turnaround times for your translation job. If you’re happy with the costs and turnaround times then you can launch the job by clicking on ‘Submit Request’ on the next page.

Submitting content for translation
All your quotes will be presented in the WPML request manager for you to check the prices and turnaround times so that the relevant person can approve or reject the quote by simply clicking on ‘Approve’ or ‘Reject’.

You can now monitor the progress of your translation job in real time by visiting the ‘Job History’ tab in STREAM.

And once your translation is complete, you’ll be notified on the ‘Job History’ screen and be allowed to ‘Download’ your translated content to check it before importing it into WordPress.

Importing translated content back into WordPress
Depending on your configuration, WPML either delivers the translations automatically or you must fetch them manually.
To check your configuration, open the WPML->Translation Management and switch to the ‘Multilingual Content Setup‘ tab. Locate the ‘Translation pickup mode‘ section and check the appropriate option for the delivery method.
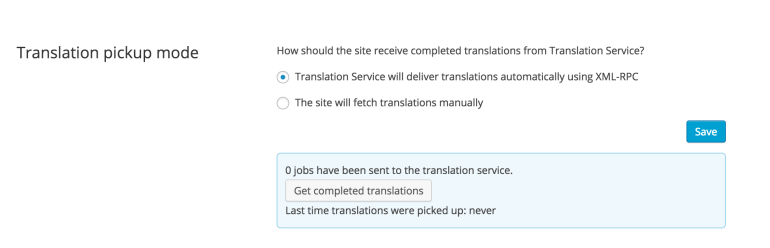
If you have selected the option ‘Translation Service will deliver translations automatically using XML-RPC‘ when the translation is ready in TOPPAN Digital Language, it will be delivered to your website automatically. This means you are not required to click anything, simply wait until the translation is complete.
If you have selected the option The site will fetch translations manually, each time you want to download translations you must first open Translation Dashboard (WPML->Translation Management), then scroll down and click the ‘Get completed translations‘ button.

Once the translation has been completed, you’ll receive a message by email to state that the translation has been completed.
You’ll then see green ticks for each target language that has been completed next to the relevant item in the ‘Translation Management’ dashboard.
![]()
By hovering over the relevant post or page and selecting edit and then selecting the appropriate language from the right-hand menu, you’re able to see the translated article before it’s published.

Once published your page or post will go live and be accessible from the main content by selecting the appropriate language in the language switcher. If you’ve hidden the language then this will only be available to logged in WordPress administrators.
Translating menus
If your site already has a menu implemented, once the pages that are featured in your menu are translated, these will automatically appear against the appropriate language in the menus section of WordPress.

If you’d like to add additional pages to the menu in an alternative language, you can simply drag and drop these into position and similarly, if you need to remove any, these can simply be deleted without affecting the menu structure in the source language. Therefore, each language can contain it’s own menu – with the pages that are most relevant for local audiences.
Translating static text
Anything that isn’t a post, page or taxonomy element is translatable via the ‘String Translation‘ plugin. This includes the site’s tagline, general texts in admin screens, widget titles, call-to-actions, error and confirmation messages and many other types of text available on your site’s front end.
These strings can be added to a translation basket and sent for translation in much the same way as your static pages and posts.
Simply visit the ‘String Translation’ page in WPML->String Translation and select the items you’d like to translate.

Once selected, you can choose to translate them into any of the languages you’ve set up in the previous steps.

These will appear in your translation basket, ready for you to approve and deliver to TOPPAN Digital Language for translation.
And once translated, you’ll be notified and the items will be available against your source language text on the ‘String Translation‘ page, ready for you to approve and publish to your site.

Once all of your content has been translated for each language, you can simply unhide the relevant language in the ‘Hide Languages‘ section in WPML -> Languages and your multi-language content will go live on your website.
What about SEO?
WPML integrates fully with the Yoast SEO plugin for WordPress which provides a full range of international SEO capabilities including everything from a snippet preview and page analysis functionality that helps you optimise your pages content, images titles, meta descriptions and more to XML sitemaps and loads of optimisation options in between.
If you’re using the All in One SEO Pack, this is also fully compatible with WPML – allowing you to optimise pages on your site for users of international search engines.
Compatibility with other plugins
WPML is fully compatible with a huge range of other popular WordPress plugins – including WooCommerce, Visual Composer, Events Manager, Relevanssi, WPtouch Pro and lots of others. This page provides a complete list of fully compatible plugins. So, there are endless possibilities for how you can integrate your site with TOPPAN Digital Language to engage users in various regions around the world.