STREAM IP User Guide

STREAM IP is a digital patent management portal, designed to make patent translation and filing easier, faster, and more organised.
Account Registration
Login page
Contact us
Account Management - Personal Info
Account Management - Preferences
Account Management - Filing Jurisdiction
Account Management- Notifications
Account Management- Questions
Get New Quote - EP
Get New Quote - PCT
Get New Quote- Direct Filing
View Saved Quotes
Orders
FAQs

STREAM IP is a digital patent management portal, designed to make patent translation and filing easier, faster, and more organised. It uses AI to help you get accurate quotes and place orders quickly. STREAM IP connects with STREAM’s translation tools, reducing costs and improving turnaround times. Your portfolio is built and maintained for you, showing upcoming actions and deadlines in one place, so you can stay on top of what needs to be done, without the hassle of manual tracking.

Getting quotes is simple- just enter your patent number. You can adjust the quote by adding or removing filing states. It’s all interactive, so you can explore different options before placing your order.

Ready to move away from manual processes and into a more streamlined way of managing your filings? This guide will walk you through setting up your STREAM IP account and show you how to navigate the platform step by step.
Account Registration
This section will guide you through the process of creating a new STREAM IP account.
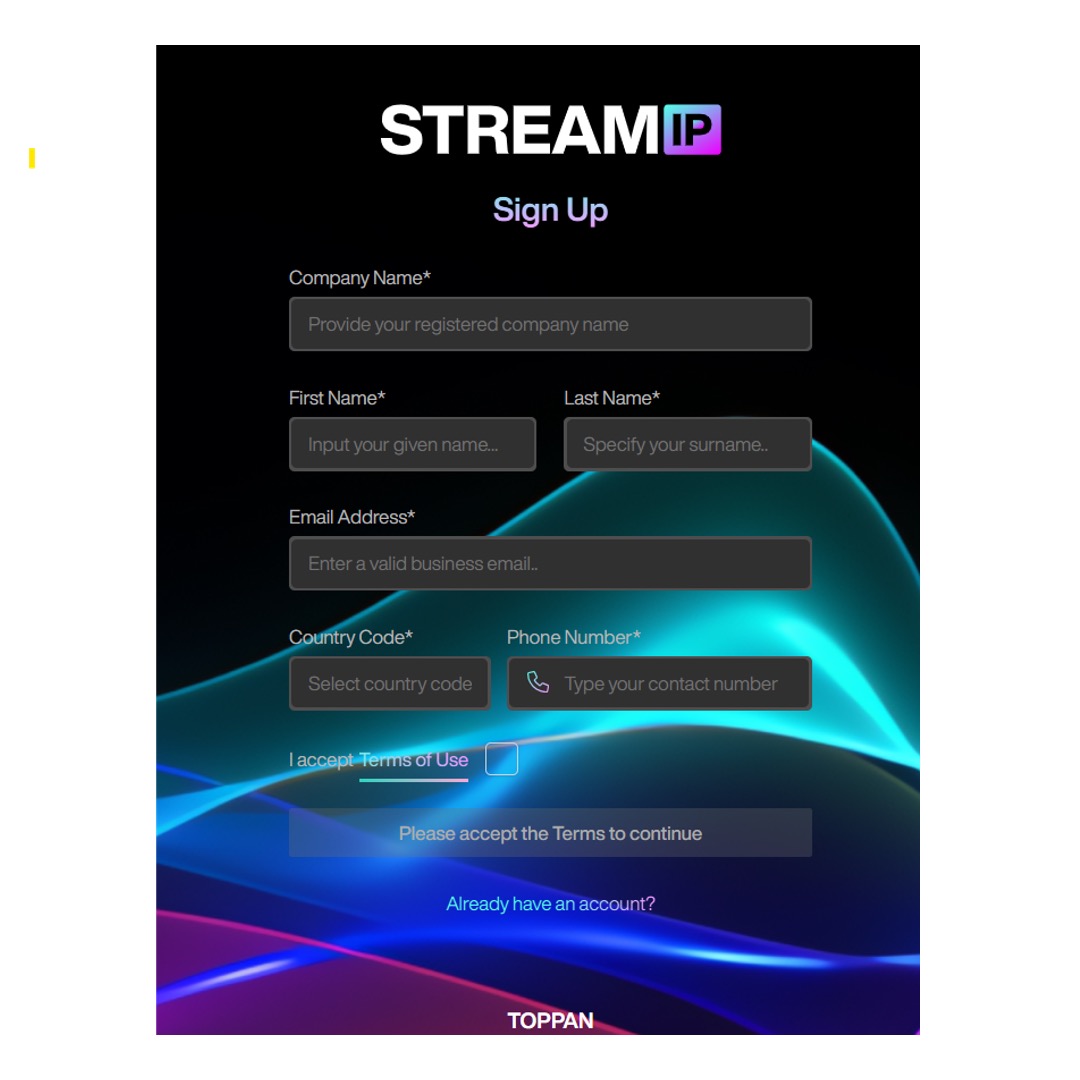
Go to STREAM IP Sign-up Page
- Navigate to the Sign-Up Page of STREAM IP.
- If you are on the Login page, click the Looking to Register button.
- Your screen will display this page.
Enter Your Details
- Enter your company’s name, your first and last name, your business email address, and your country code and phone number.
- Read and accept the Terms of Use.
- Click Register.
- You will receive a verification link via email. Open this link to finish setting up your account.
- Alternatively, you can set up an account by contacting one of our representatives at TDIP@toppandigital.com.
Log In
This section will guide you through the process of logging into your account on the STREAM IP platform.
Logging In
- In the Email field, enter your registered company email address.
-
In the Password field, type your password.
- Click the eye icon to show or hide your password entry.
- If you have forgotten your password, click Forgot Password, or refer to the Reset Password section of this guide for more guidance.
- Check Remember Me if you want to stay signed in on this device.
- Click Sign In to access your account.
- If you haven’t registered yet, click Looking to register to create a new account.
Resetting Password
- Click Forgot Password.
- On the reset screen, enter your email and click Send Reset Link.
- Open the email you receive and follow the link to set a new password.
- Once logged into STREAM IP, you can update your password at any time by going to Account Management > Personal Info, then scrolling down to the Change Password section.
Contact Us
If you need assistance or have questions, you can reach out to our support team in two ways:
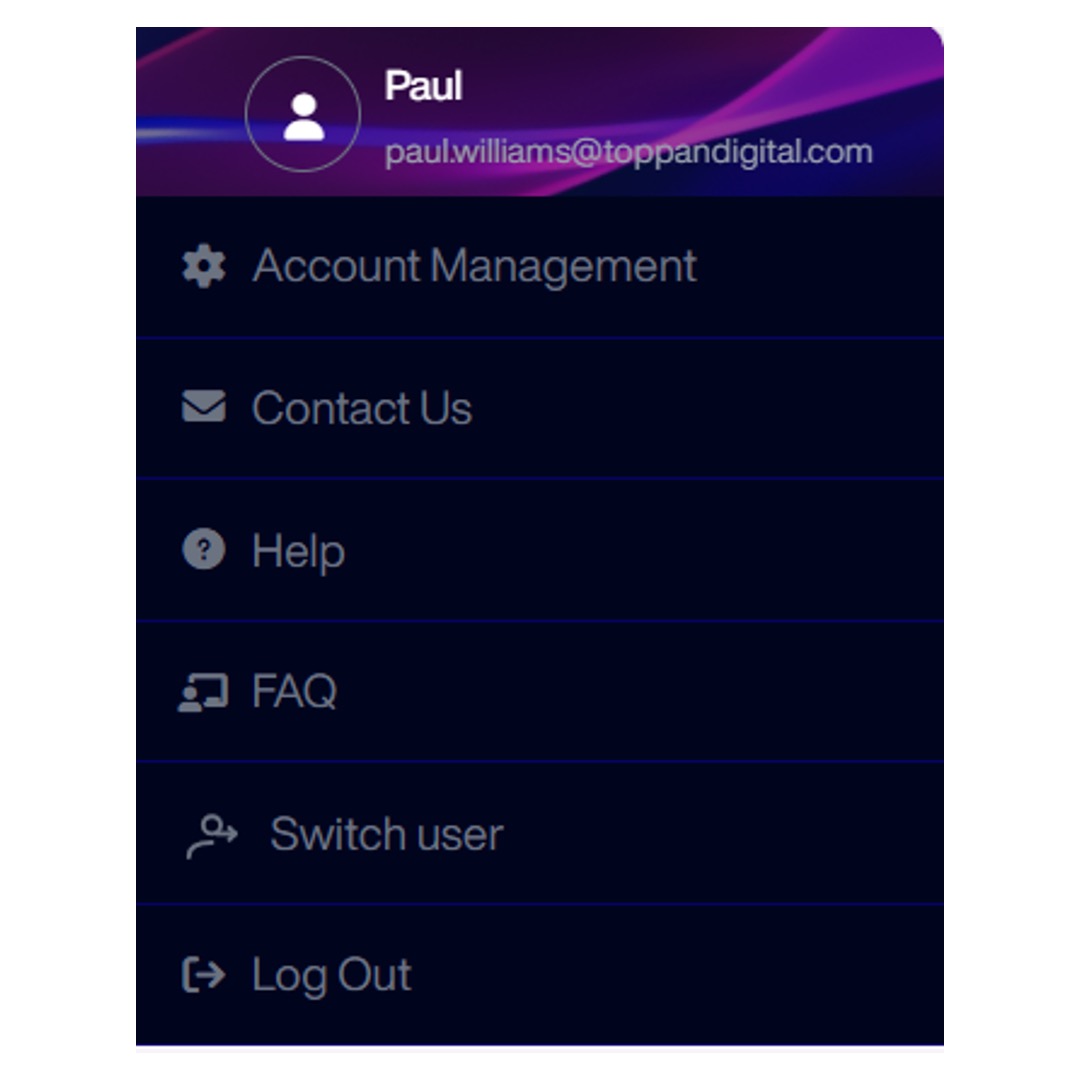
In-Platform Support
Click your profile icon in the top right corner, then select Contact Us from the Drop-down menu.
Account Management


You can choose to proceed with just translation or toggle the filing fees back on to include filing support directly from this page.

This section will explain how to update your account details, customise language and notification settings, and indicate filing preferences.
To access account management:
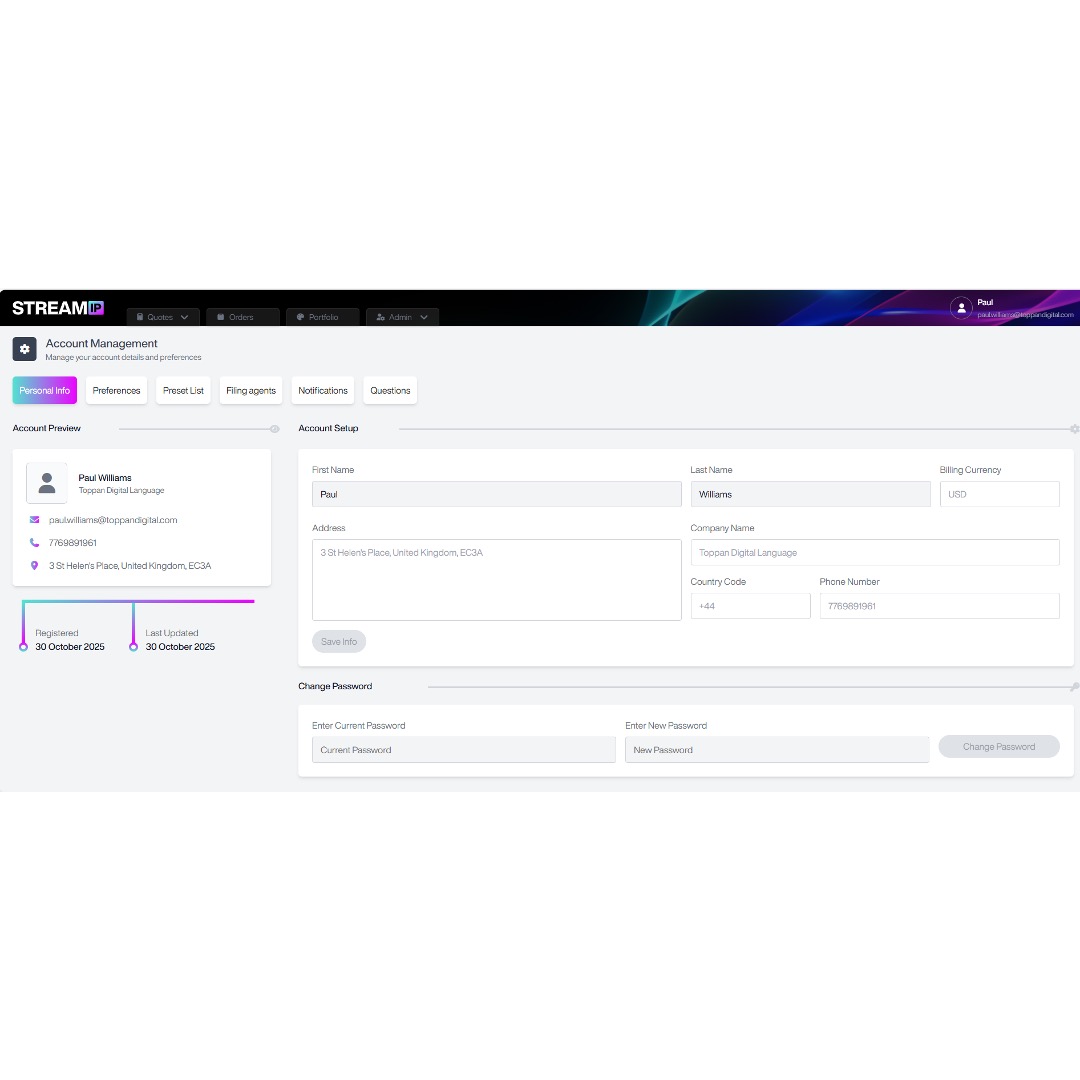
In Personal Info, you can update your personal information and view all account updates.
- Click your profile icon in the top-right corner.
- Select Account Management from the drop-down menu.
Personal Info
- Select Personal Info, and your screen will display the Personal Info page:
- Edit any fields (name, address, phone number, etc.).
- Click Save Info to apply changes.
- If you wish to change your password, scroll down to the Change Password section, enter your old and new password, and click Change Password.
- If any account updates look unfamiliar, this may indicate unauthorized changes. In such cases, we recommend changing your password immediately to protect your account.
Preference
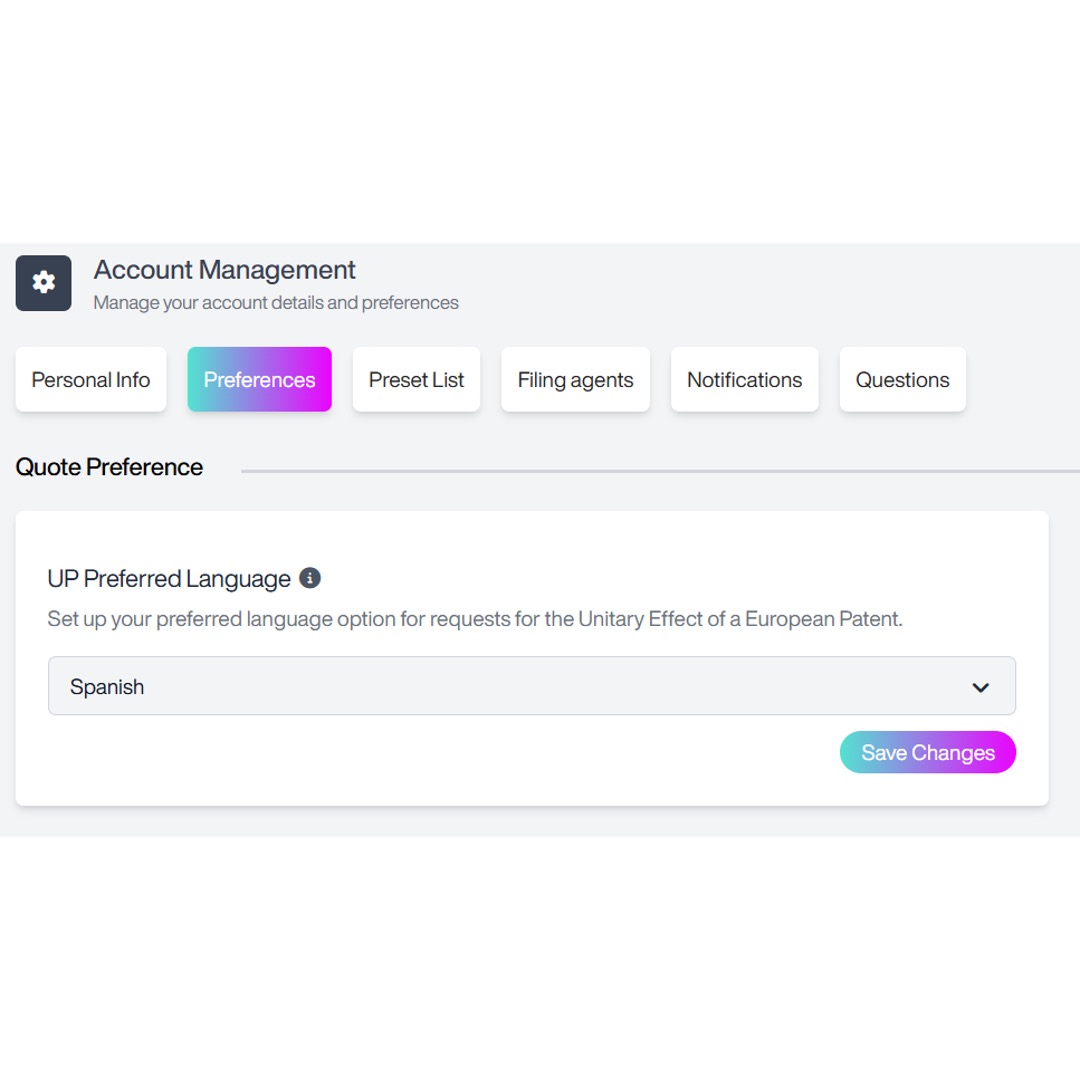
In Preferences, you can customise language settings for Unitary Patent requests.
- Select Preferences, and the following screen will appear:
- Select your preferred language for Unitary Effect requests from the drop-down menu.
- Click Save Changes.
Filing Jurisdictions
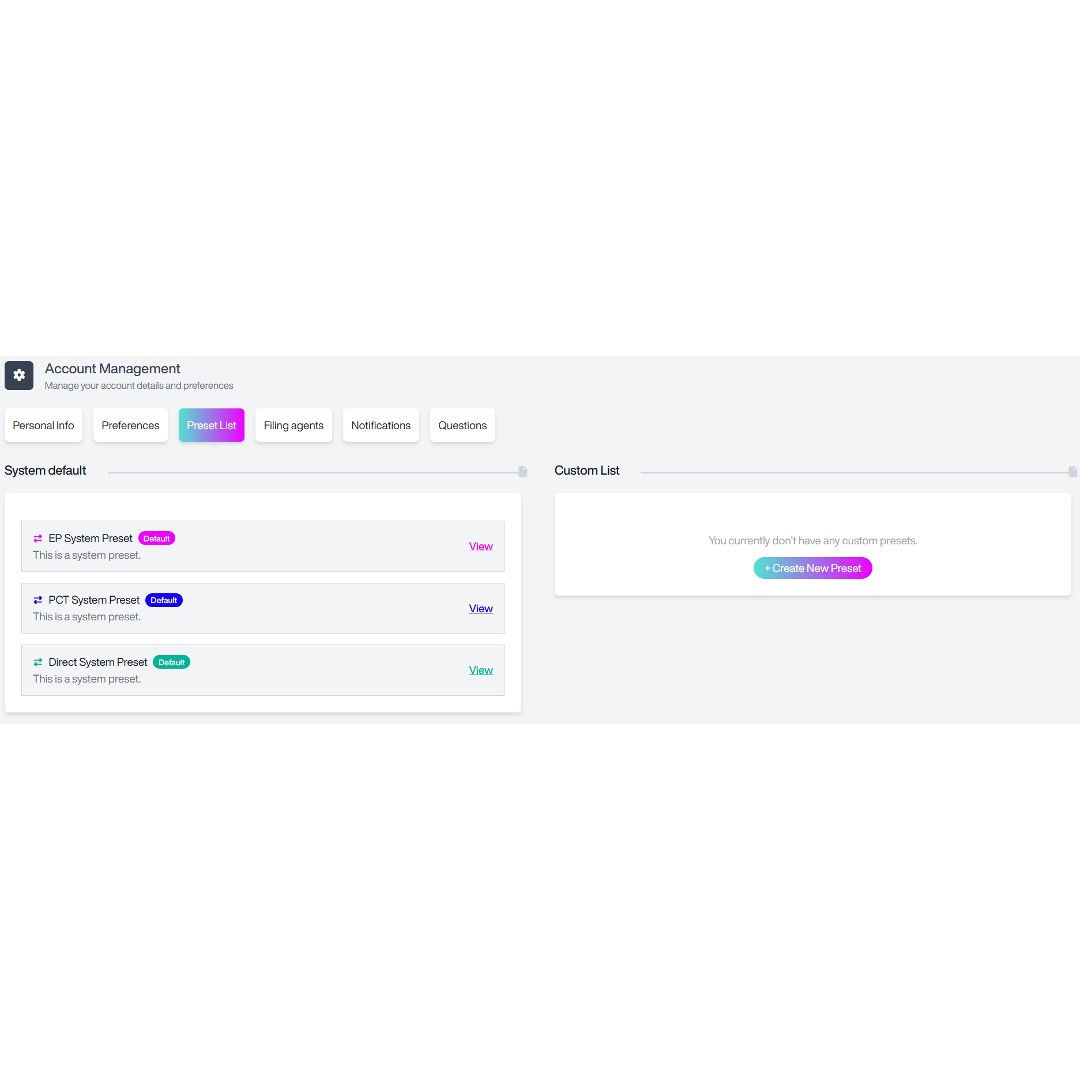
This feature will help you manage filing jurisdiction presets by use of system defaults or by creating custom presets. A preset is a saved list of countries used for EP, PCT, or Direct filings. It simplifies quote creation by pre-selecting jurisdictions based on your own requirements. You can create multiple presets.
Accessing Filing Jurisdictions
Select Filing Jurisdictions, and the following screen will appear.
System Default Presets
The system presets are displayed by default until custom presets are created. There are system presets for EP, PCT and Direct filing. Click View to see the list of states included in each preset.
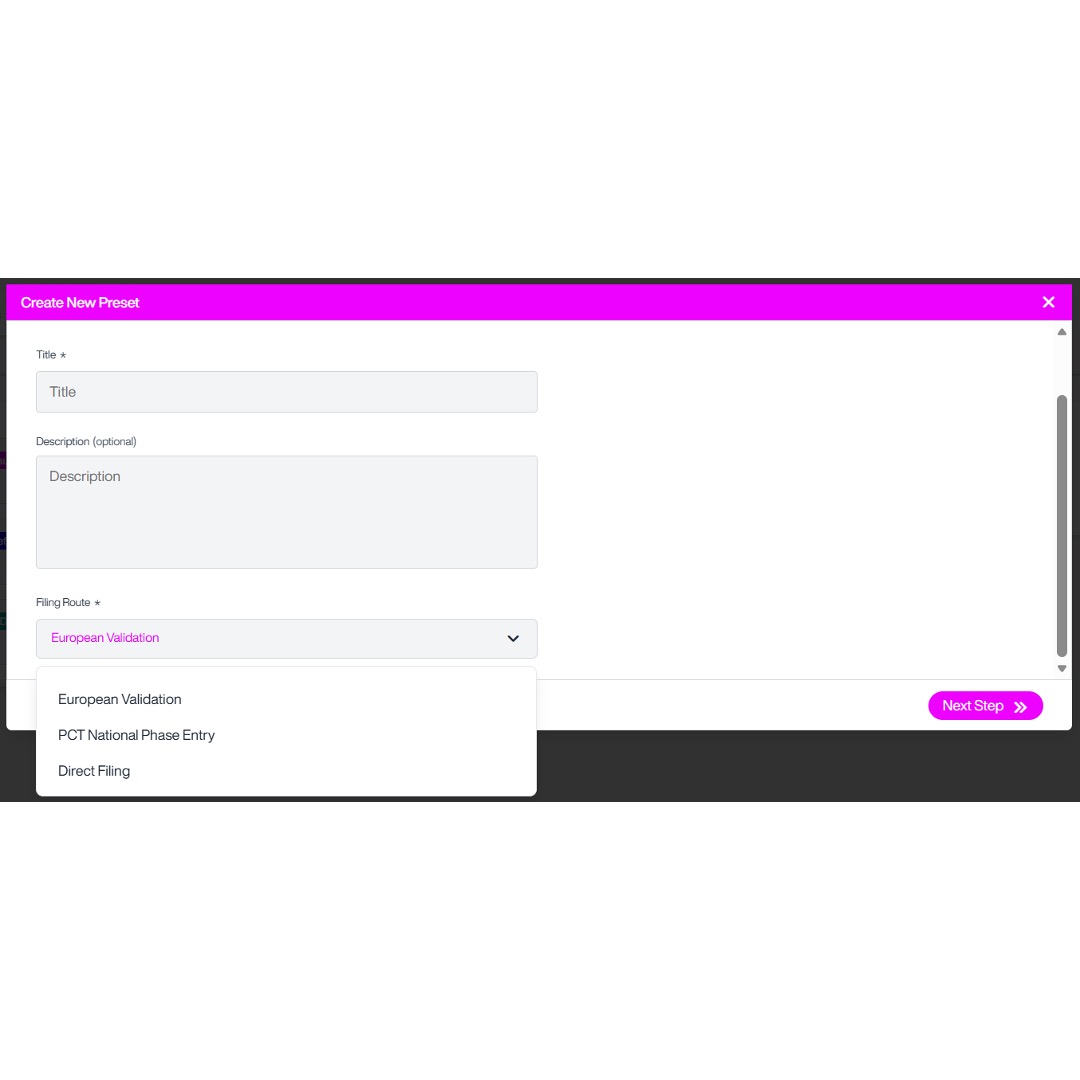
Creating a Custom Preset
- Optionally, add a description to clarify when or why to use this preset.
-
Select the filing route from the drop-down:
- European Validation
- Patent Cooperation Treaty
- Direct Filing
- Click Next Step, and the following screen will appear:
- If you wish to return to the previous step to revise the title, description, or filing route, click Return to Previous Step.
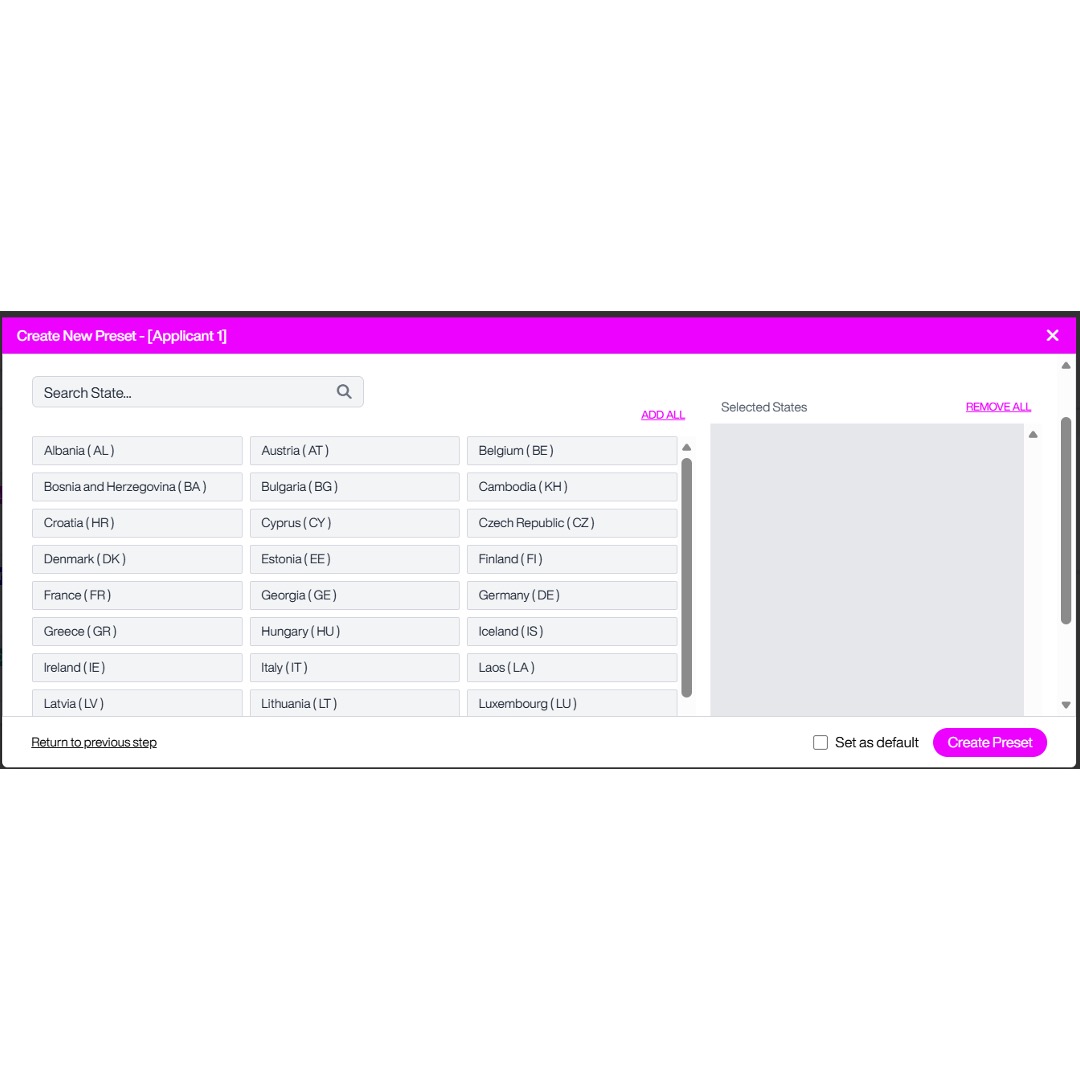
- Click on the states you wish to add into your preset, and your selections will appear in the Selected States box on the right.
- Optionally, add a description to clarify when or why to use this preset.
-
Select the filing route from the drop-down:
- European Validation
- Patent Cooperation Treaty
- Direct Filing
- Click Next Step, and the following screen will appear:
- If you wish to return to the previous step to revise the title, description, or filing route, click Return to Previous Step.
- Click on the states you wish to add into your preset, and your selections will appear in the Selected States box on the right.
- If you can’t quickly see the state, you can search by state name or state code.
- To include all available states, click Add All.
- To remove all selected states, click Remove All.
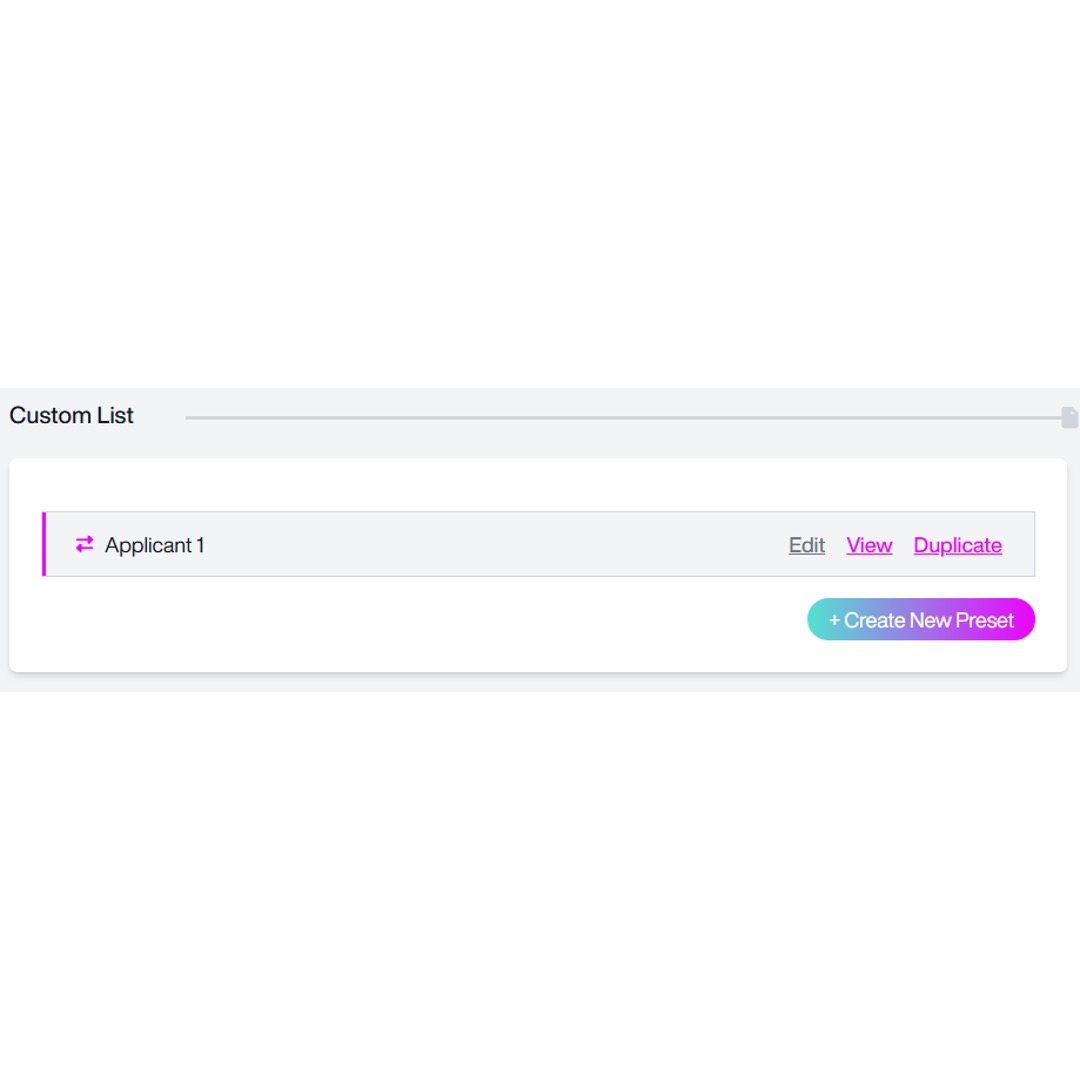
- To make this preset your default, check the Make as Default box.
- Your new preset will now appear under Custom List:
-
For any custom preset, you can:
- Edit - update the title, description, or filing route.
- Add or remove states.
- View - see the full list of included jurisdictions.
- Duplicate - create a copy to modify without changing the original.
- Delete - to remove a preset from your system, click the red bin icon next to the preset you want to delete. Then confirm by selecting Delete Preset.
- If you wish to revert to a system default, click Set as Default for that filing route.
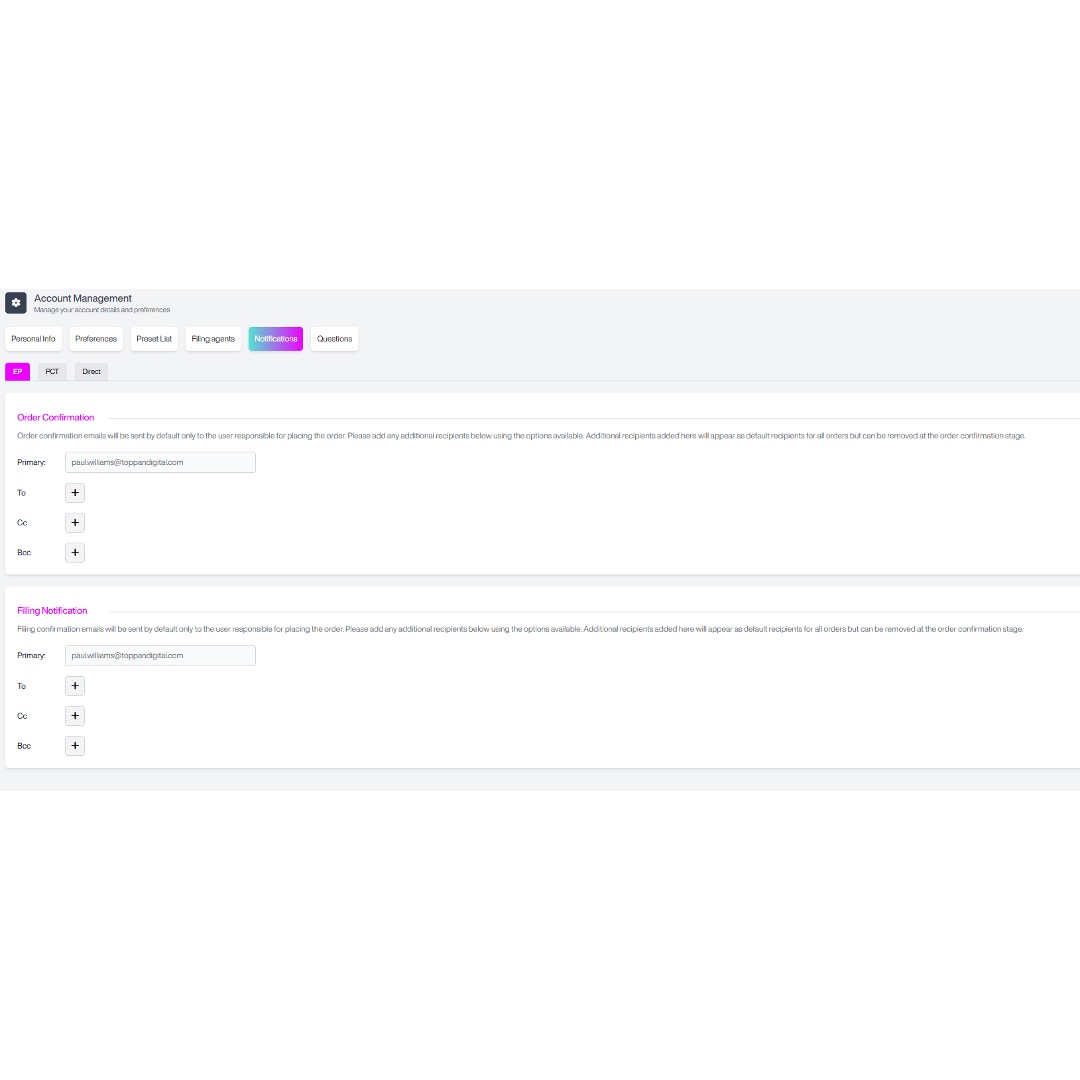
Notifications
This section explains how to customise email notification settings, and outlines when notifications will be sent.
Accessing Notification Preferences
- Select Notifications, and the following screen will appear:
- At the top of the Notification Preferences page, select the filing route you want to manage notifications for.
Set-up
- You will need to set up Notification Preferences for each filing route via the EP, PCT, and Direct tabs.
- Your primary email address is the one listed in your account. To update it, please contact support at TDIP@toppandigital.com.
- To add additional recipients, click the + button next to To, enter the email address, and click Create Email.
- To Cc someone, click the + next to Cc, enter their email, and click Create Email.
- To Bcc someone, click the + next to Bcc, enter their email, and click Create Email.
Notification Types
- This can be done separately for order confirmation and filing notification emails.
- Order Confirmation is sent immediately after placing an order and confirms what has been ordered.
- Filing Notification is sent when a country filing has been completed.
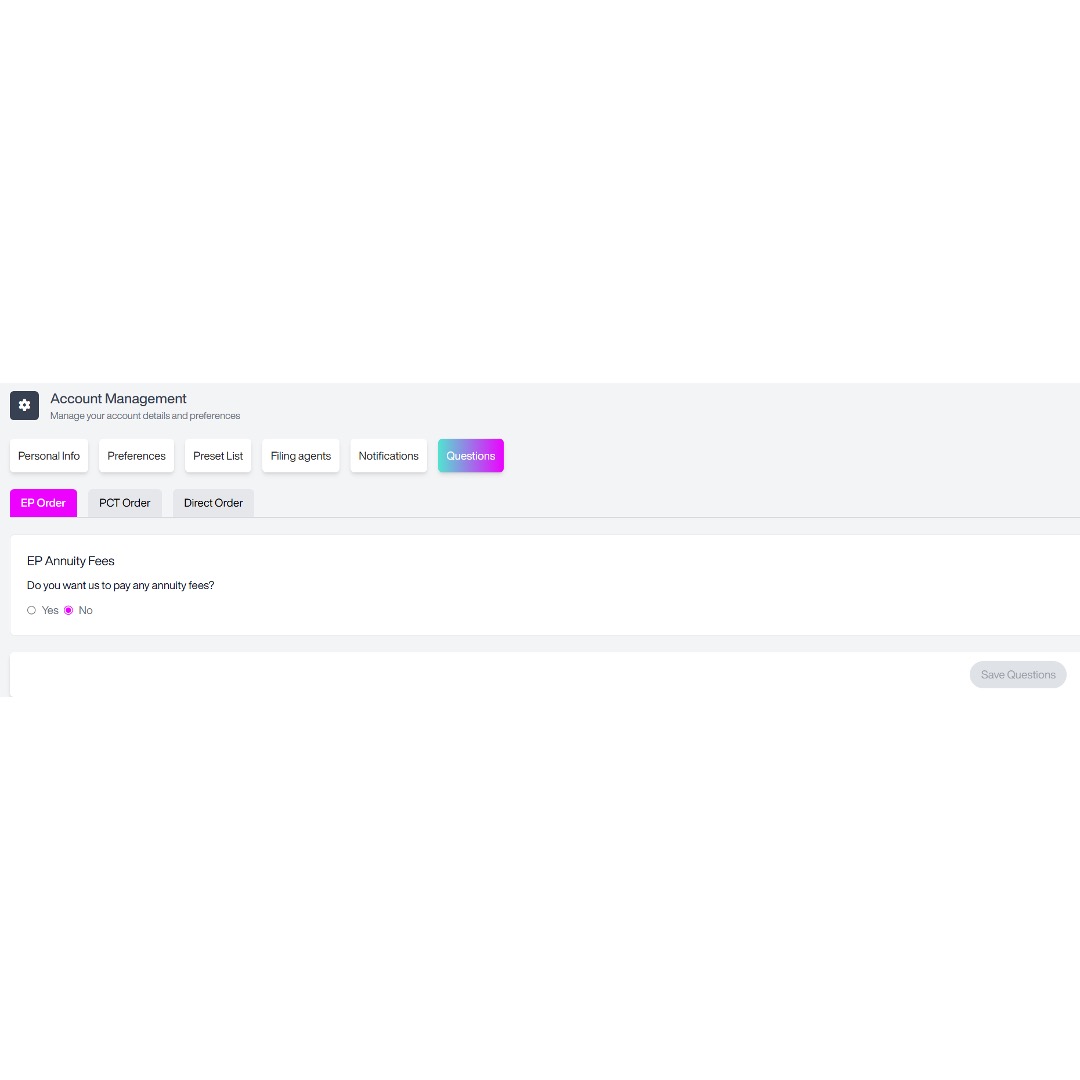
Questions
This section will guide you through answering filing-specific questions that help generate tailored quotes based on applicant details, jurisdictions, and disclosures.
You will be asked questions depending on your filing route, which will help generate a more accurate quote by factoring in variables such as company size.
You will be asked questions depending on your filing route, which will help generate a more accurate quote by factoring in variables such as company size.
EP Questions
- Select EP Order, and the following screen will appear:
- You’ll be asked about annuity fees, which keep your patent active over the patent’s lifespan.
-
Choose whether you want TOPPAN IP to manage any annuity payments. If you would like TOPPAN IP to manage annuity payments, select either:
- First annuities only.
- All annuity fees due for the lifespan of the patent.
- Click Save Questions to confirm your preference.
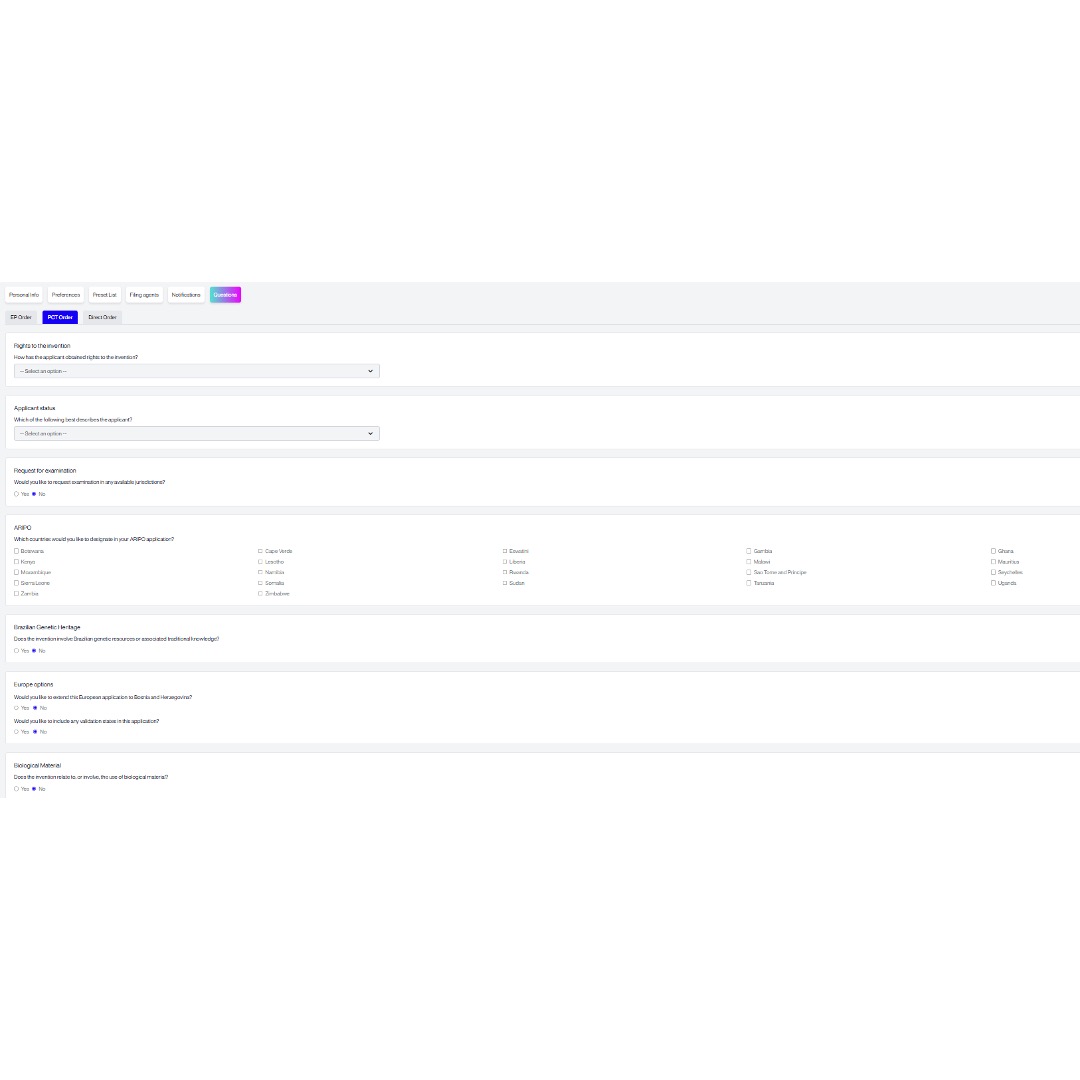
PCT Questions
- Select PCT Order, and the following screen will appear:
- Rights to the invention: select how the applicant obtained rights to the invention (assignment from the inventor, employment agreement, applicant is the inventor, or unknown).
- Applicant status: Is the applicant an individual/multiple individuals, a company with <500 employees, a company with >500 employees, a non-profit organisation, or unsure.
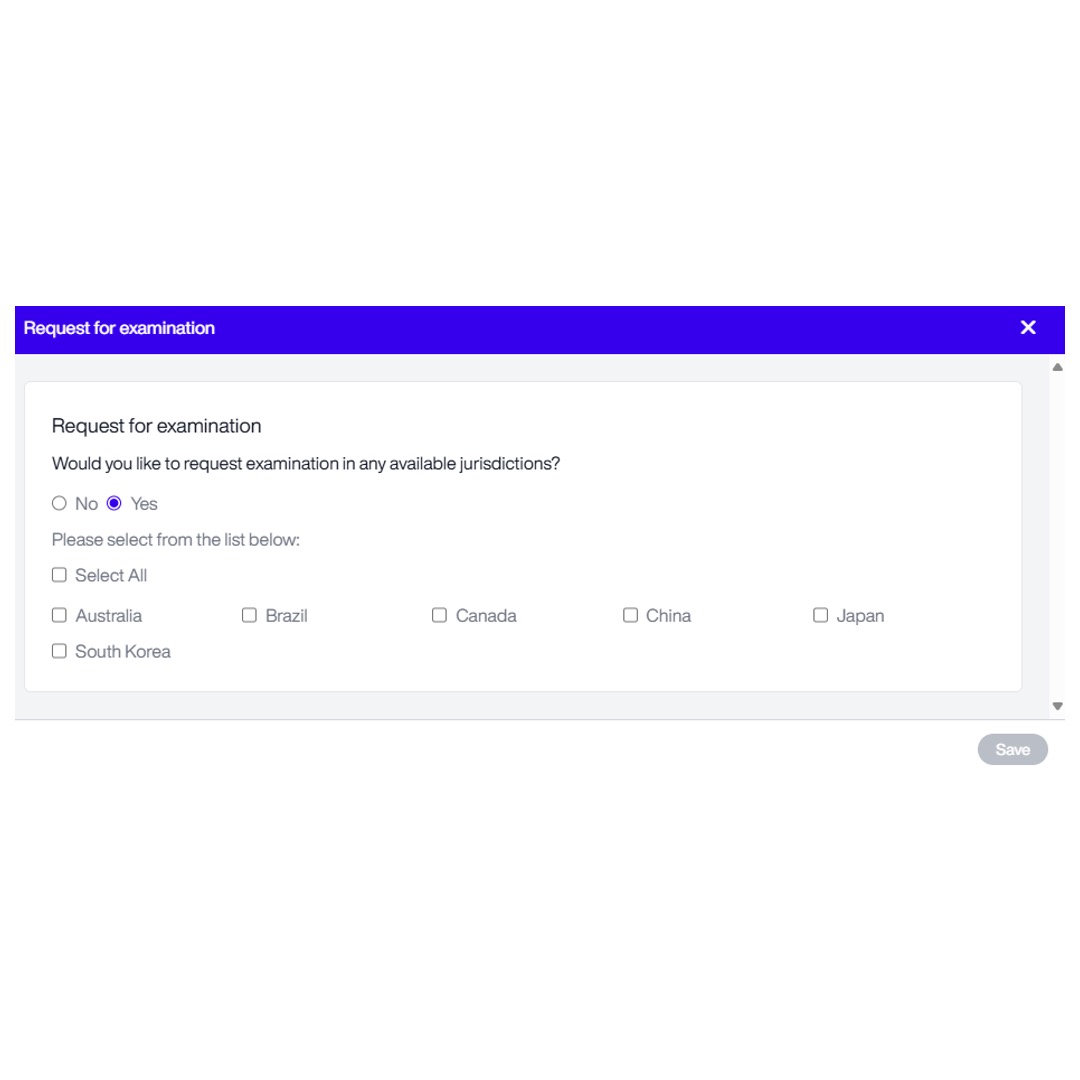
- Request for examination: Would you like to request examination in any available jurisdictions? If you select yes, you will be asked to select at least one option.
- ARIPO: Select which countries you would like to designate in your ARIPO application.
- Genetic Heritage Disclosures: Does the patent involve Brazilian genetic resources or associated knowledge, or relate to or involve the use of biological material?
- Extension of European Patent to Bosnia and Herzegovina: Select yes or no.
- Extension of European Patent to validation states: Select whether you’d like to include any validation states in the application. If you select yes, you will be asked to check which validation states to include.
- Biological Material Disclosures: Does the invention relate to, or involve, the use of biological material?
- Priority document: A full translation of the priority document is required. Do you instruct us to translate it? Please note that this will incur additional costs.
- Click Save Questions to confirm your answers.
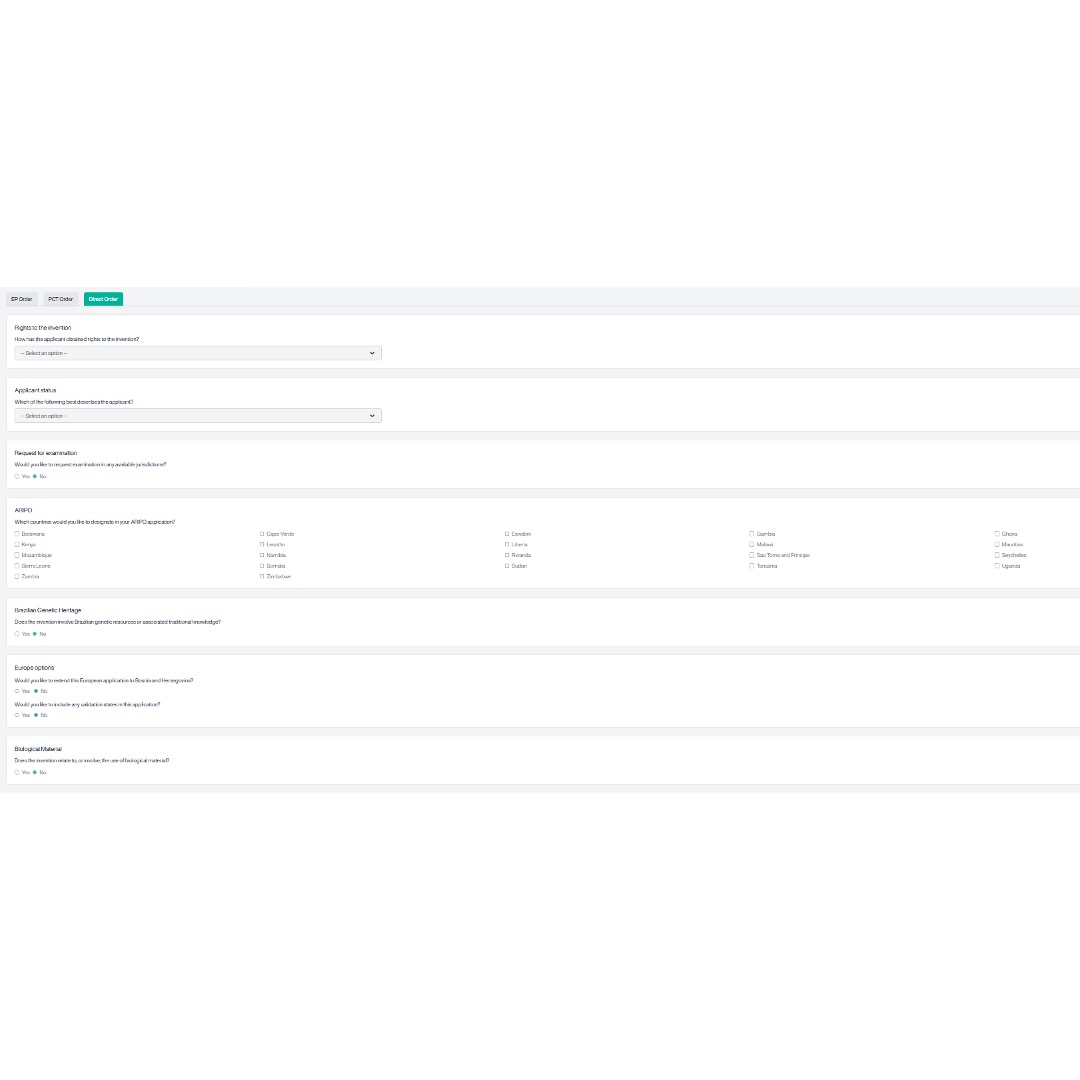
Direct Filing Questions
- Select Direct order questions, and the following screen will appear:
- Rights to the invention: select how the applicant obtained rights to the invention (assignment from the inventor, employment agreement, applicant is the inventor, or unknown).
- Applicant status: Is the applicant an individual/multiple individuals, a company with <500 employees, a company with >500 employees, a non-profit organisation, or unknown.
- Request for examination: Would you like to request examination in any available jurisdictions?
- ARIPO: Select which countries you would like to designate in your ARIPO application.
- Genetic Heritage Disclosures: Does the patent involve Brazilian genetic resources or associated knowledge, or relate to or involve the use of biological material?
- Extension of European Patent to Bosnia and Herzegovina: Select yes or no.
- Extension of European Patent to validation states: Select whether you’d like to include any validation states in the application. If you select yes, you will be asked to check which validation states to include.
- Biological Material Disclosures: Does the invention relate to, or involve, the use of biological material?
- Priority document: A full translation of the priority document is required. Do you instruct us to translate it? Please note that this will incur additional costs.
- Once you have completed the questions, click Save Questions to confirm your answers.
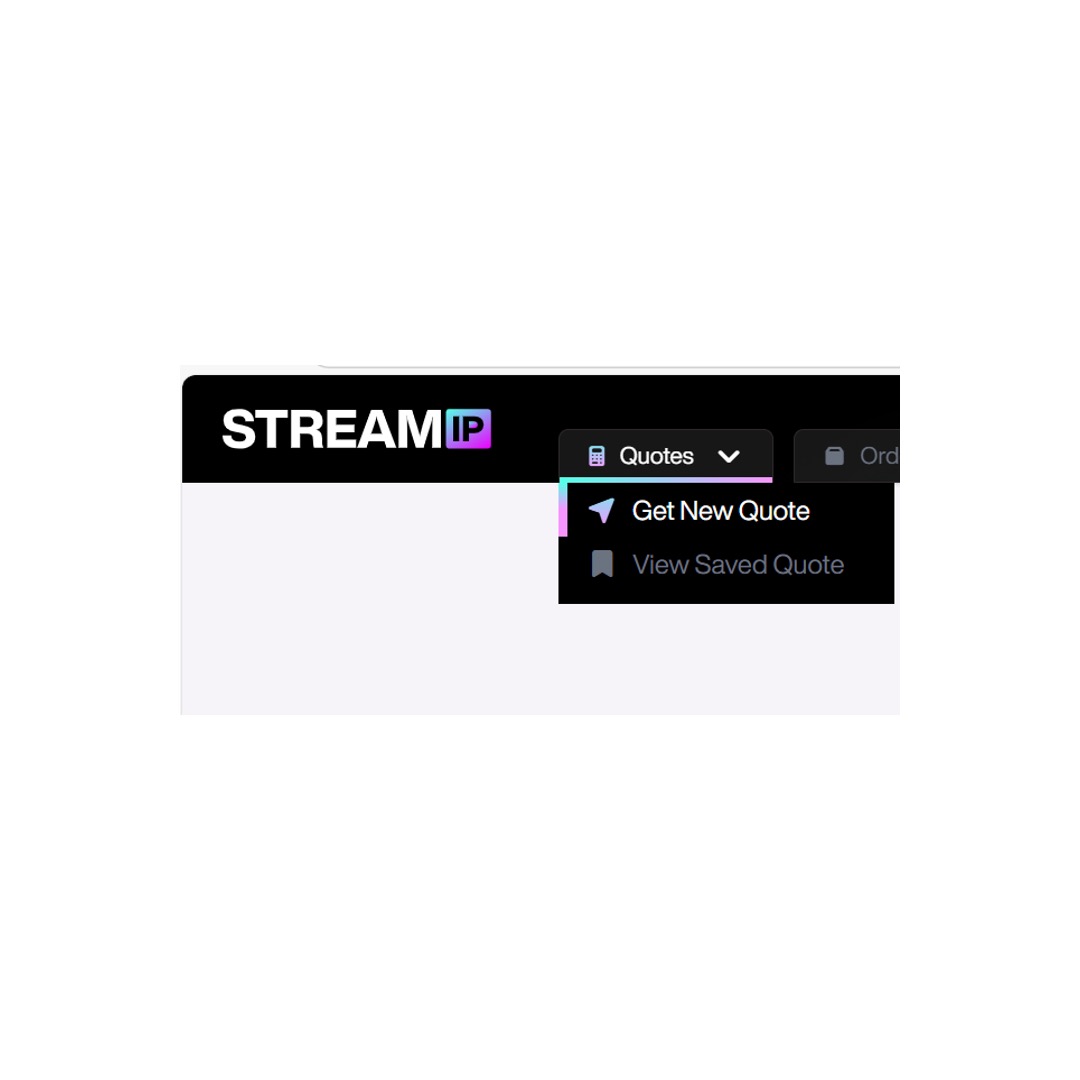
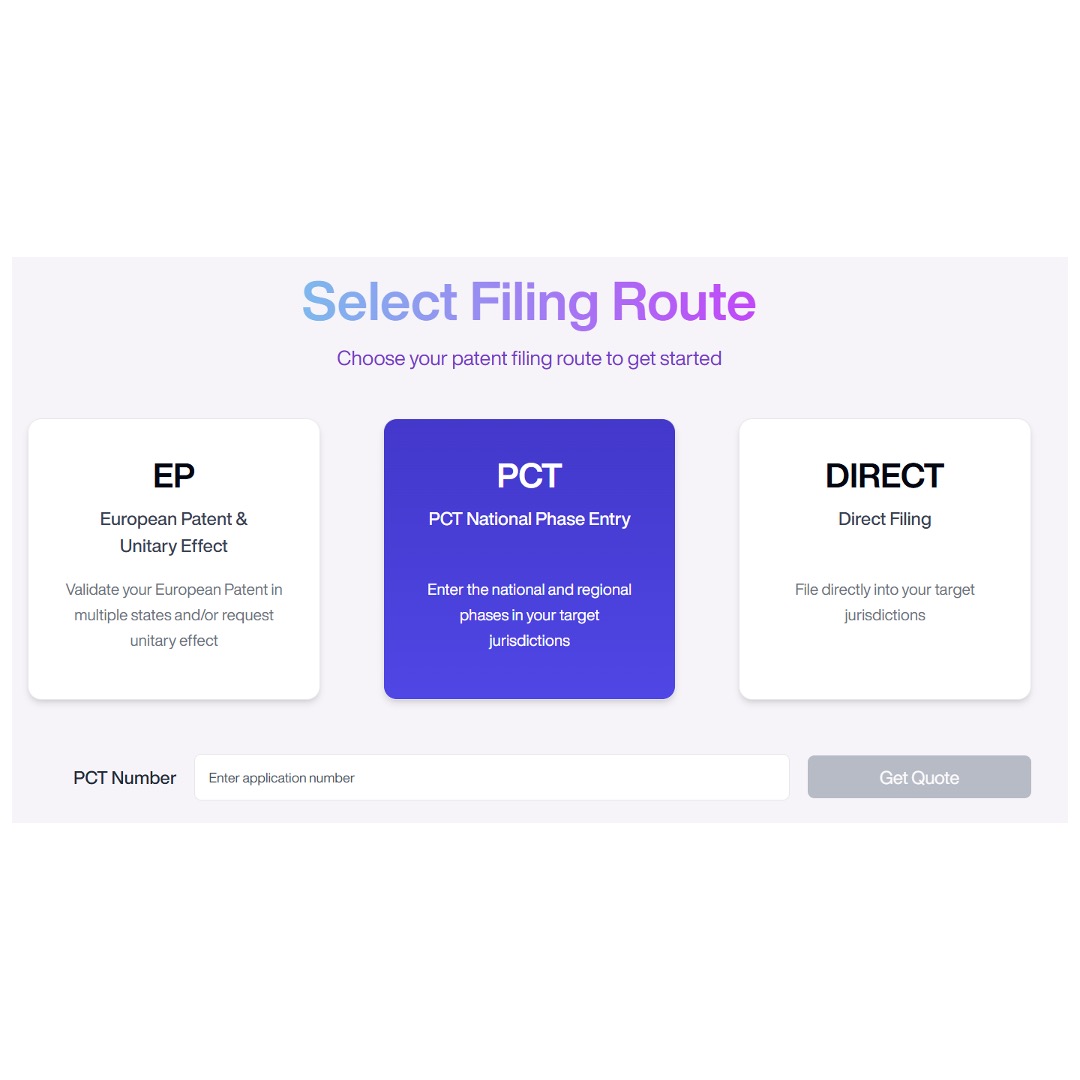
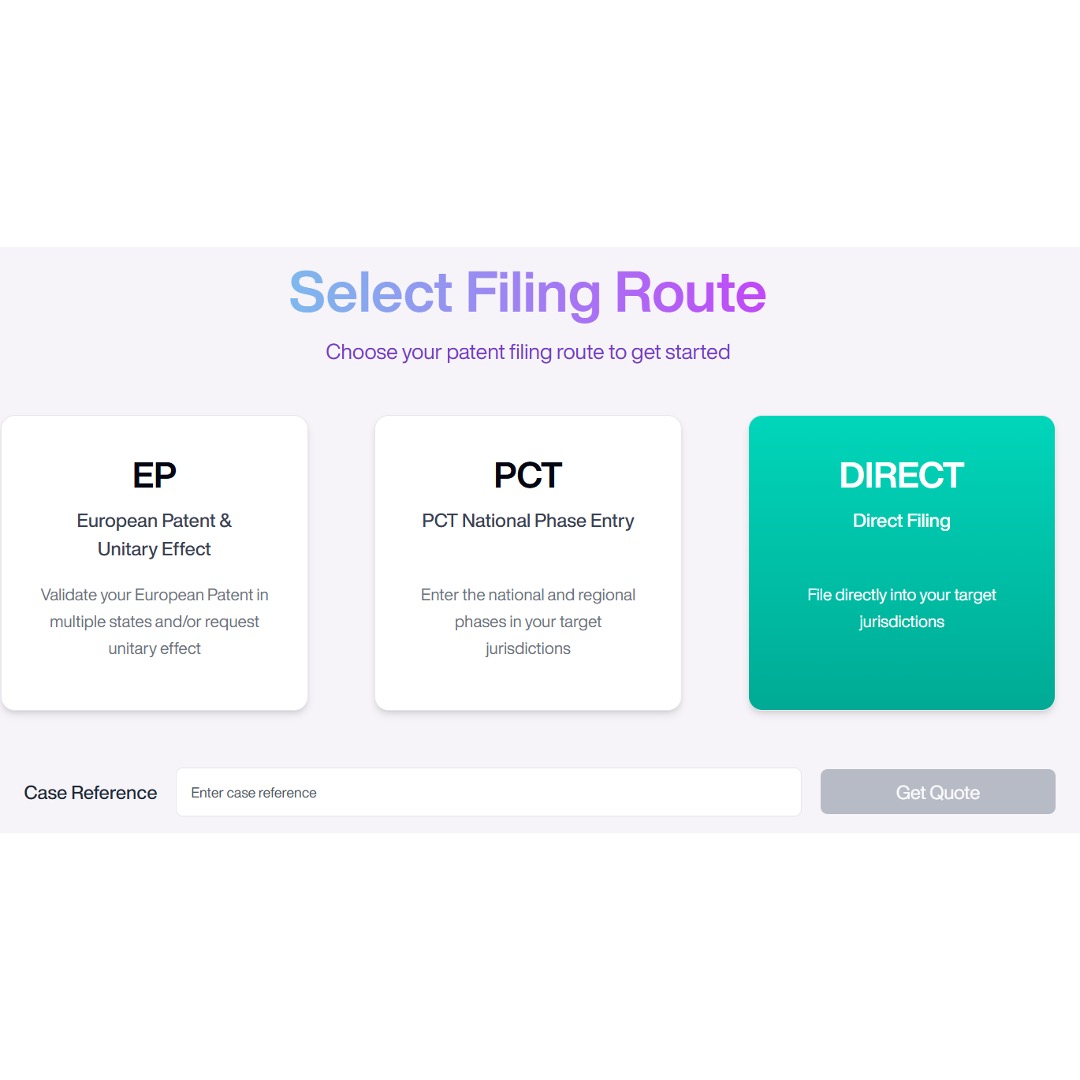
Get New Quote
This section will guide you through the steps to generate a quote for each of the filing routes.
Getting to the New Quote page.
Select Get New Quote from the drop-down box on Quote
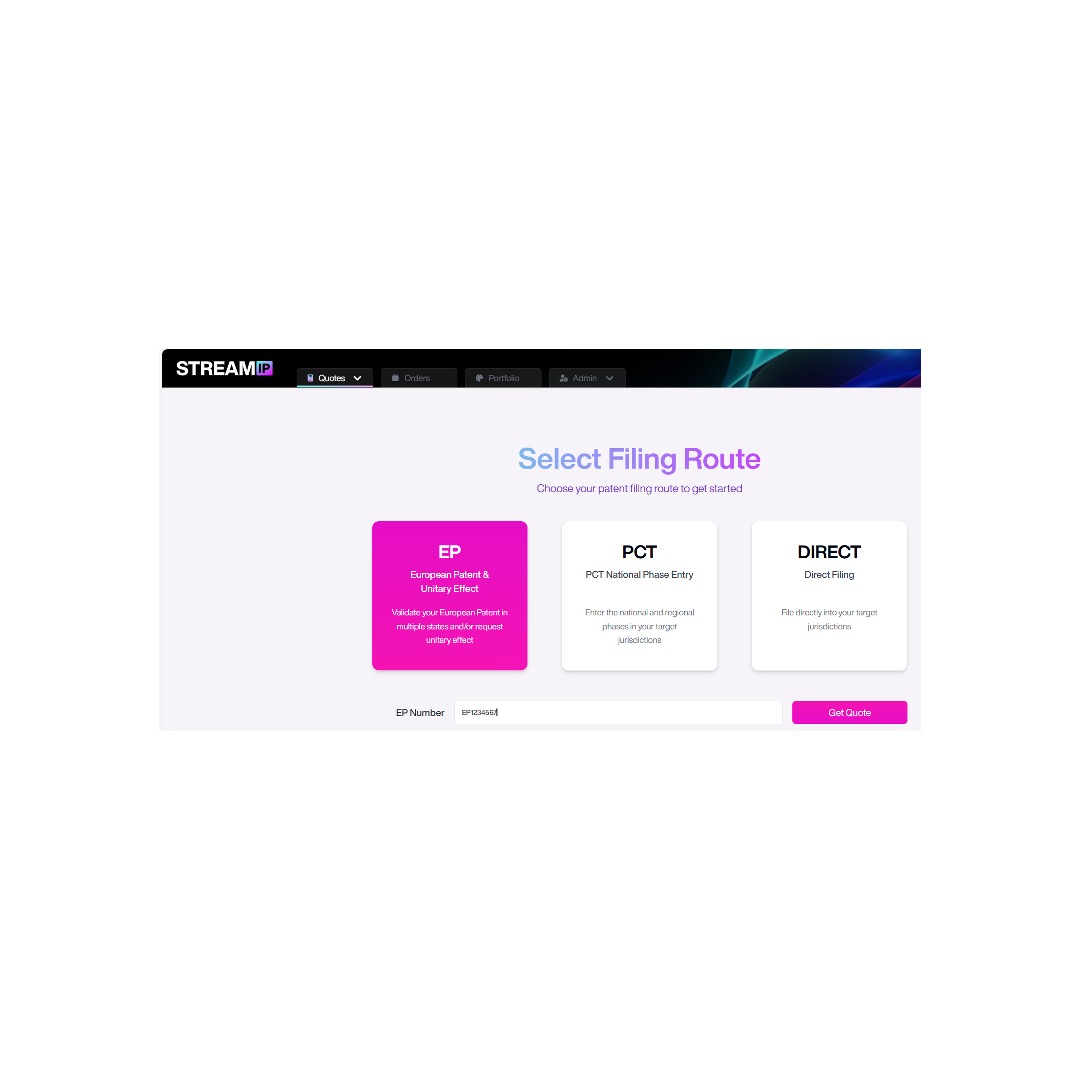
Get New Quote- EP
- Click the (EP) European Patent & Unitary Effect button, and an input box appears to enter the EP Number:
- Enter your EP number. Your EP number can be a publication number (e.g., EP1234567) or an application number (EP12345678.9). You can input your number with or without the EP prefix.
- Click Get Quote, and the following screen will appear:
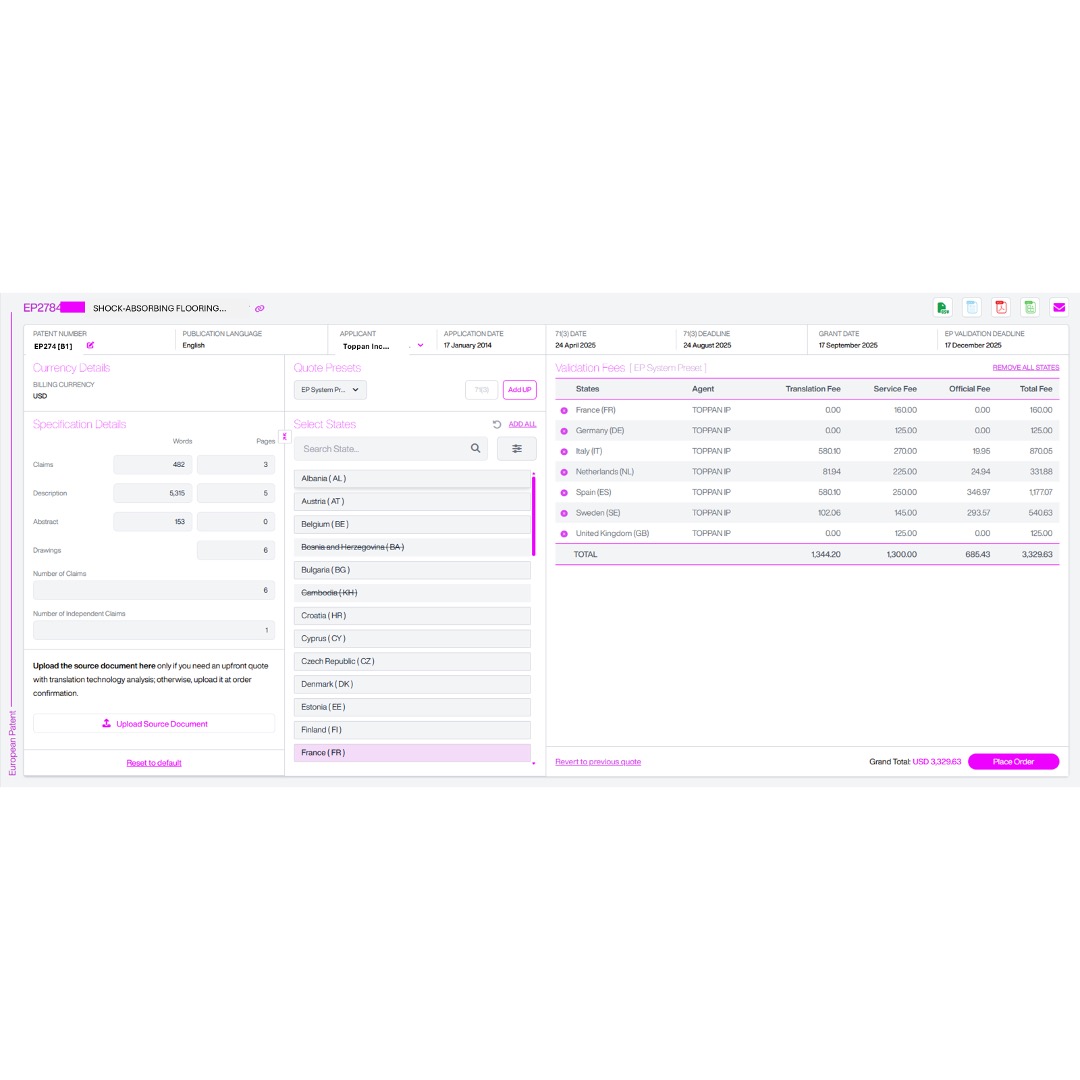
- Your EP number and patent title display at the top.
- Click the link beside the title to open the record in the European Patent Register.
-
In the row beneath the patent number and title, you’ll see:
- Patent number and publication language.
- Applicant and application date.
- Article 71(3) date and 71(3) deadline.
- Grant date.
- EP validation deadline.
- Under Specification Details, you can view page counts, word counts, and claim counts. If you wish to update these details, click any field to overwrite it with your latest numbers.
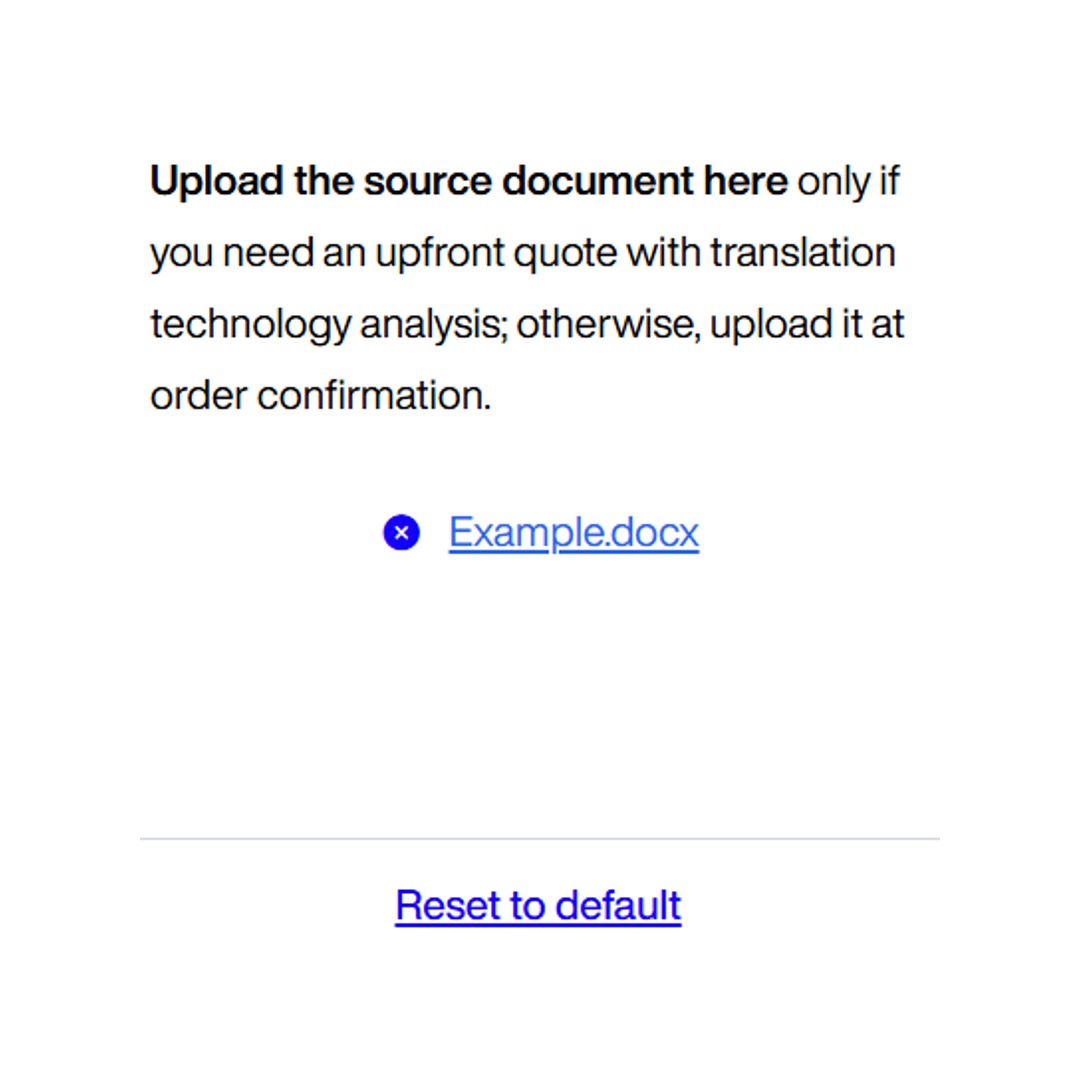
- You can choose to upload a source document. Uploading a source document allows us to calculate potential translation memory savings.
- To upload your source document, click the Upload Source Document button to open your file browser. Select the desired file and click Open. Once uploaded, the document will appear at the bottom of the Specification Details section:
- To remove a source document from the platform, click the X next to the document name.
- To revert the Specification Details to their original settings, click Reset to Default, then confirm by selecting Yes.
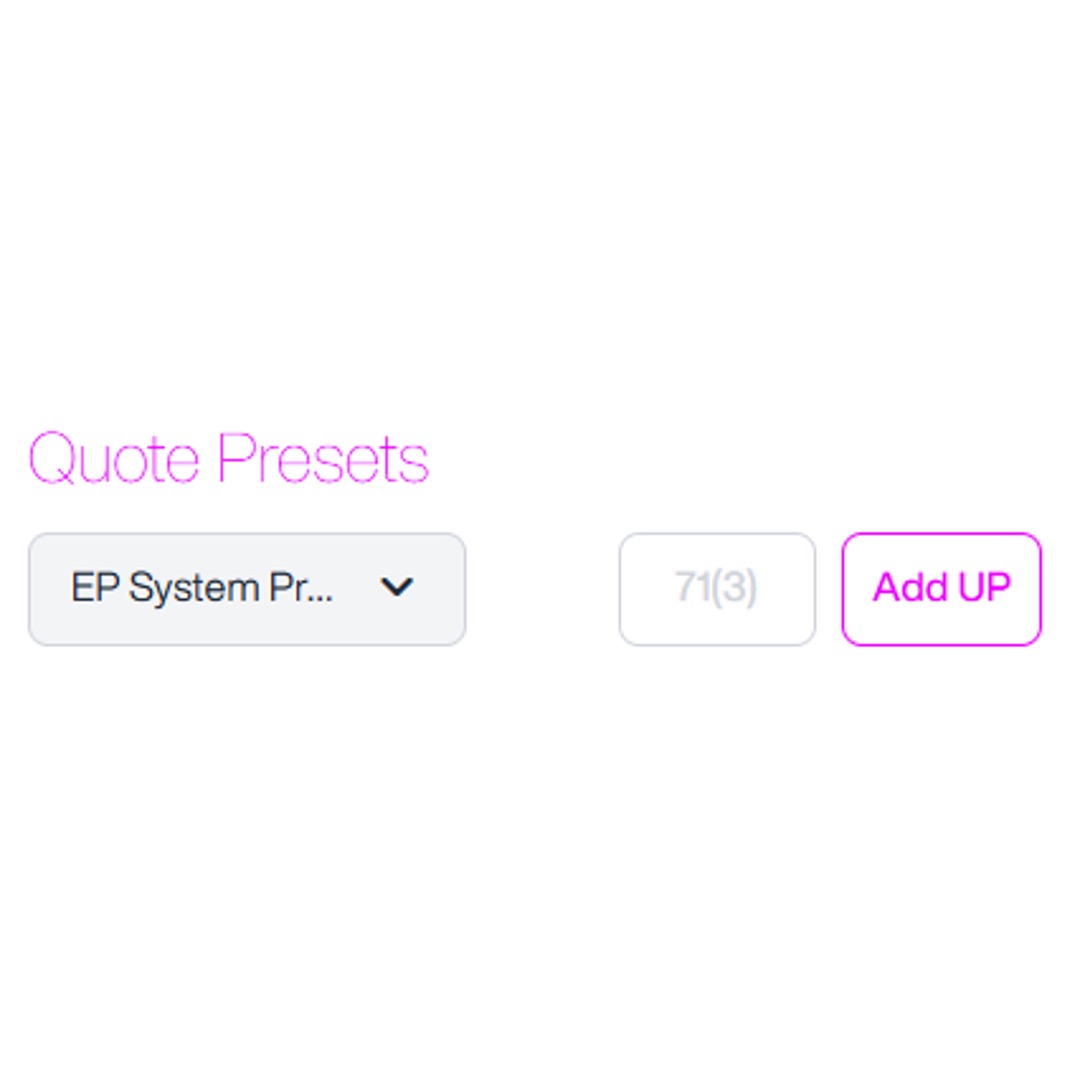
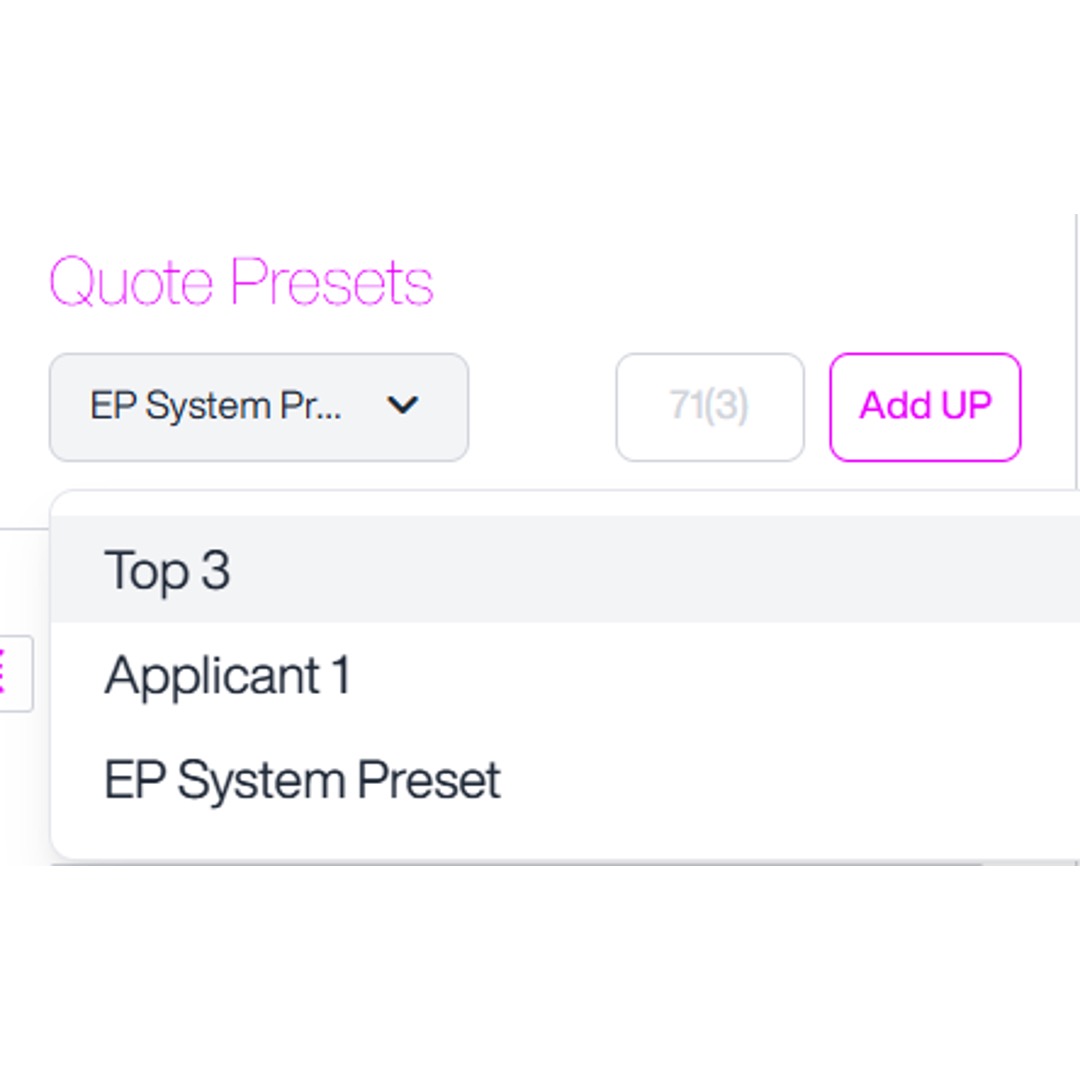
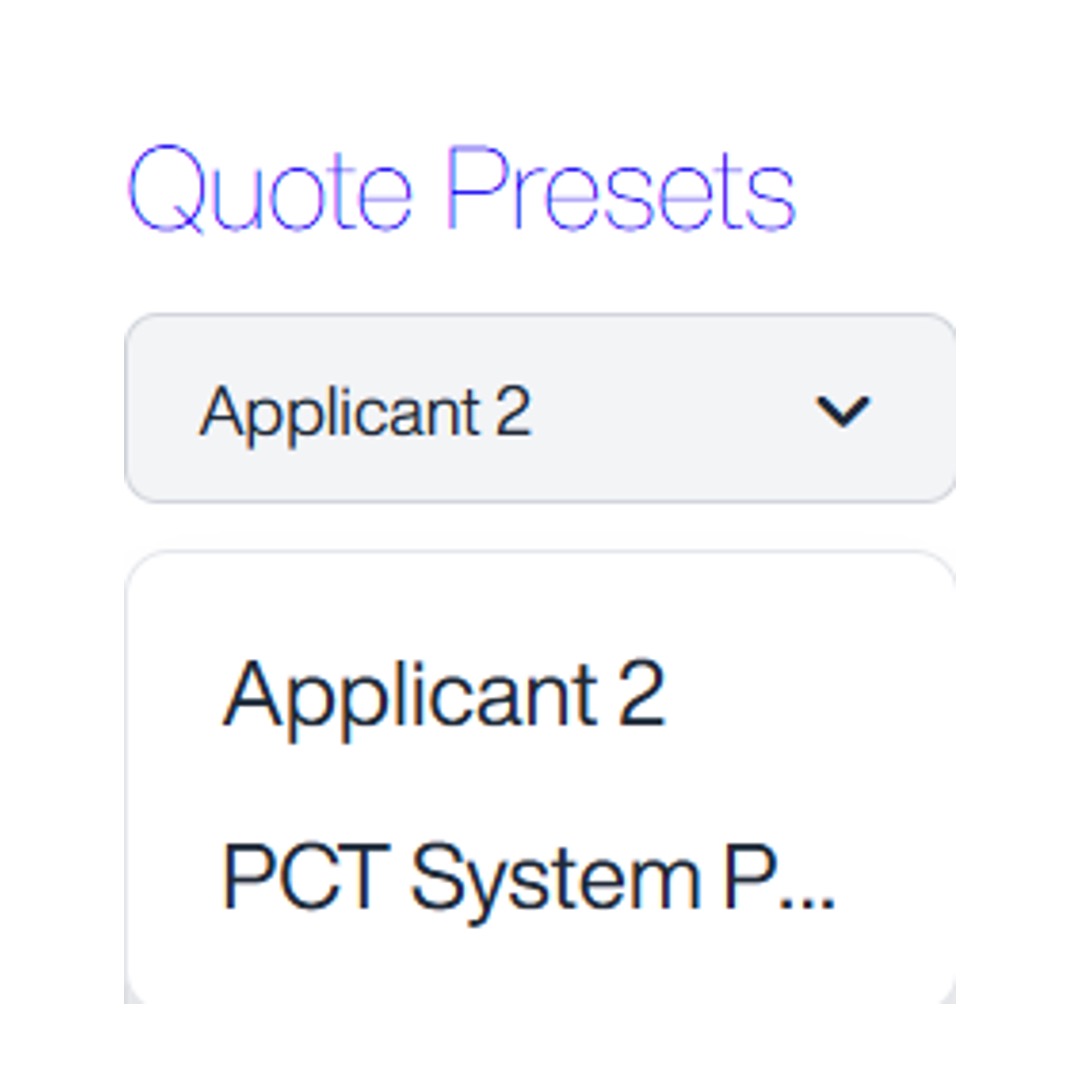
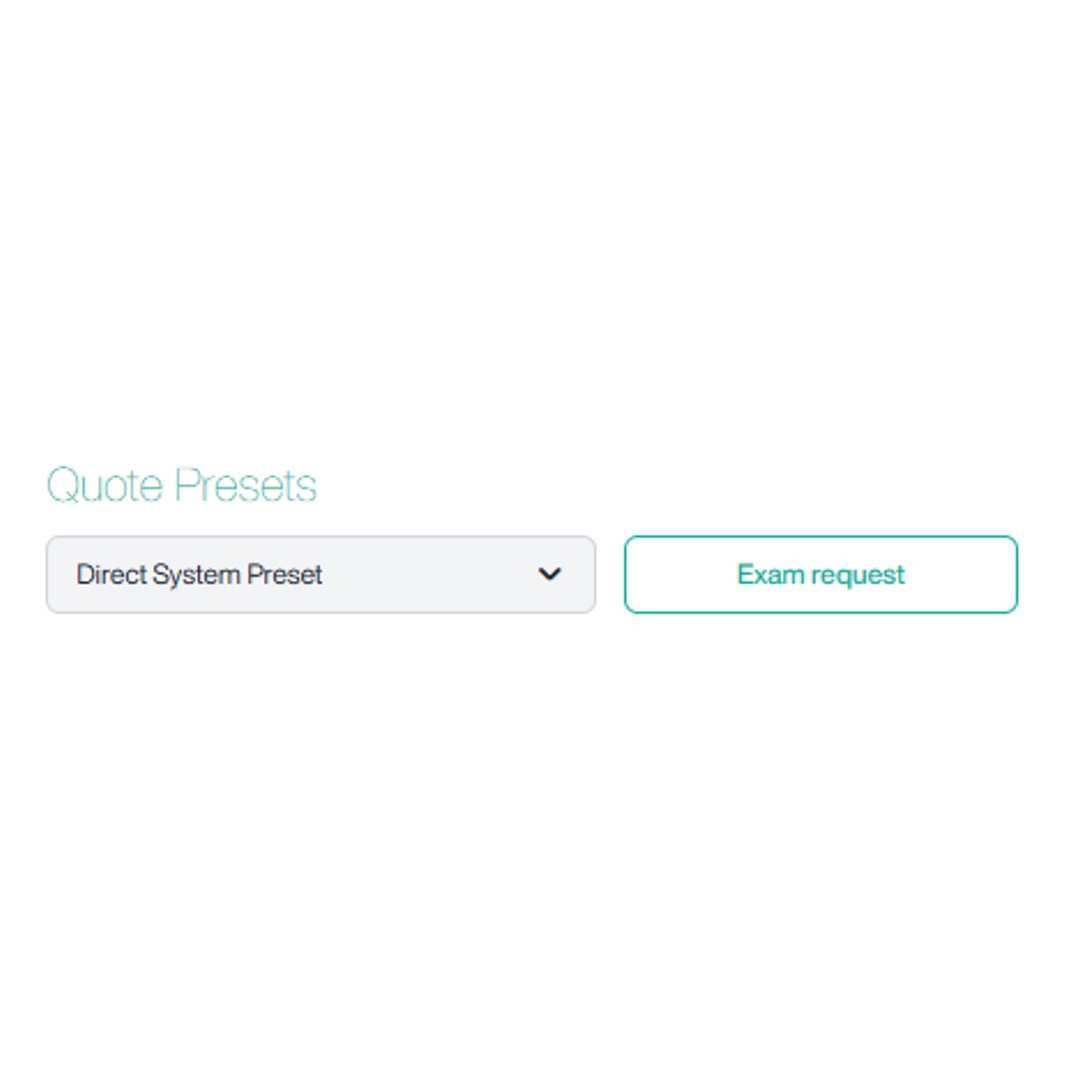
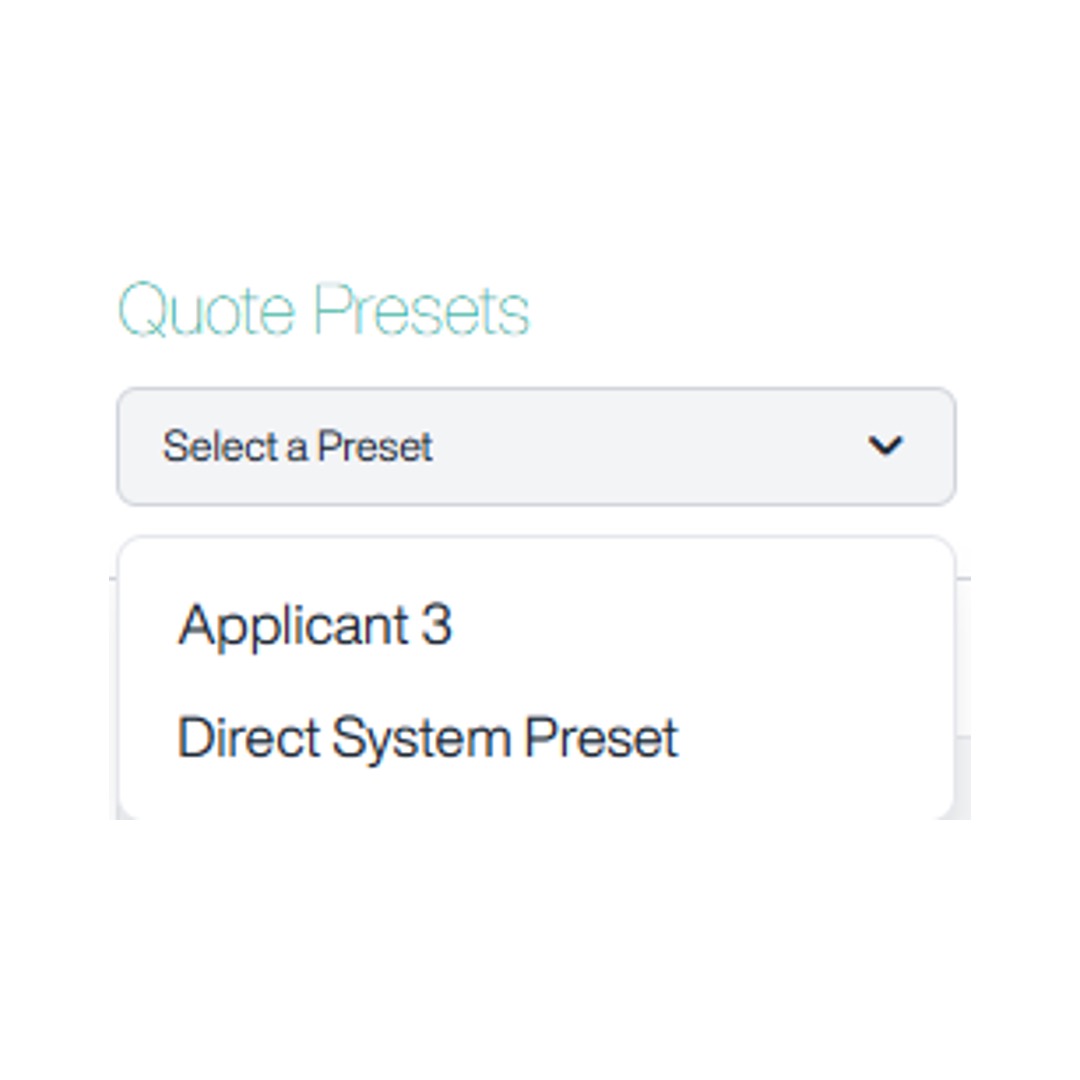
- If you’ve already created a preset which you’d like to use to select the states included in the quote, go to the Quote Presets section:
- Click the drop-down menu and select the preset you want to apply to your quote:
- For help with setting up a preset, please refer to section 3.3.2 Creating a Custom Preset of this guide.
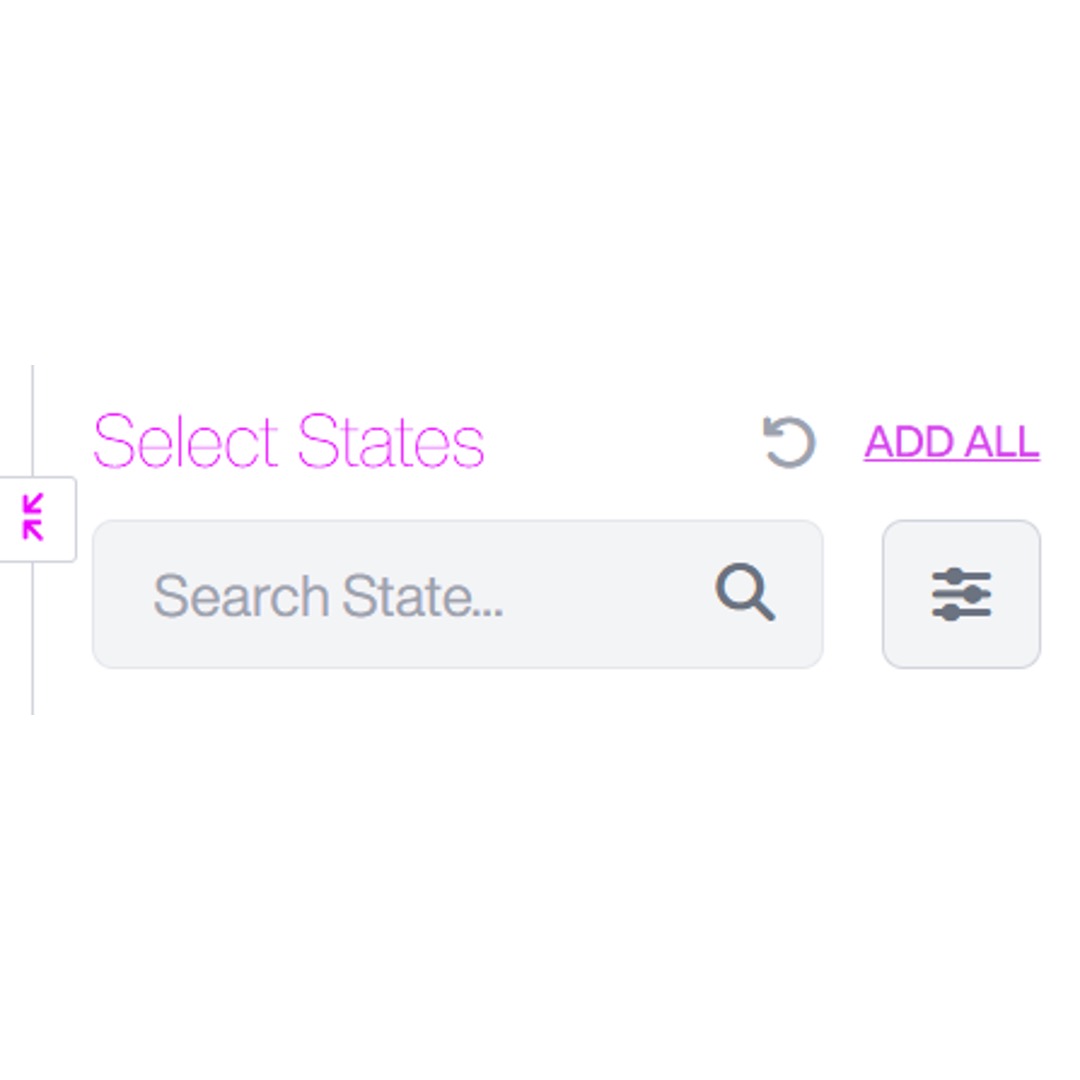
- If you do not want to use a default or custom preset for the states included in the quote, you can either click Remove All States or click on a highlighted state to remove it.
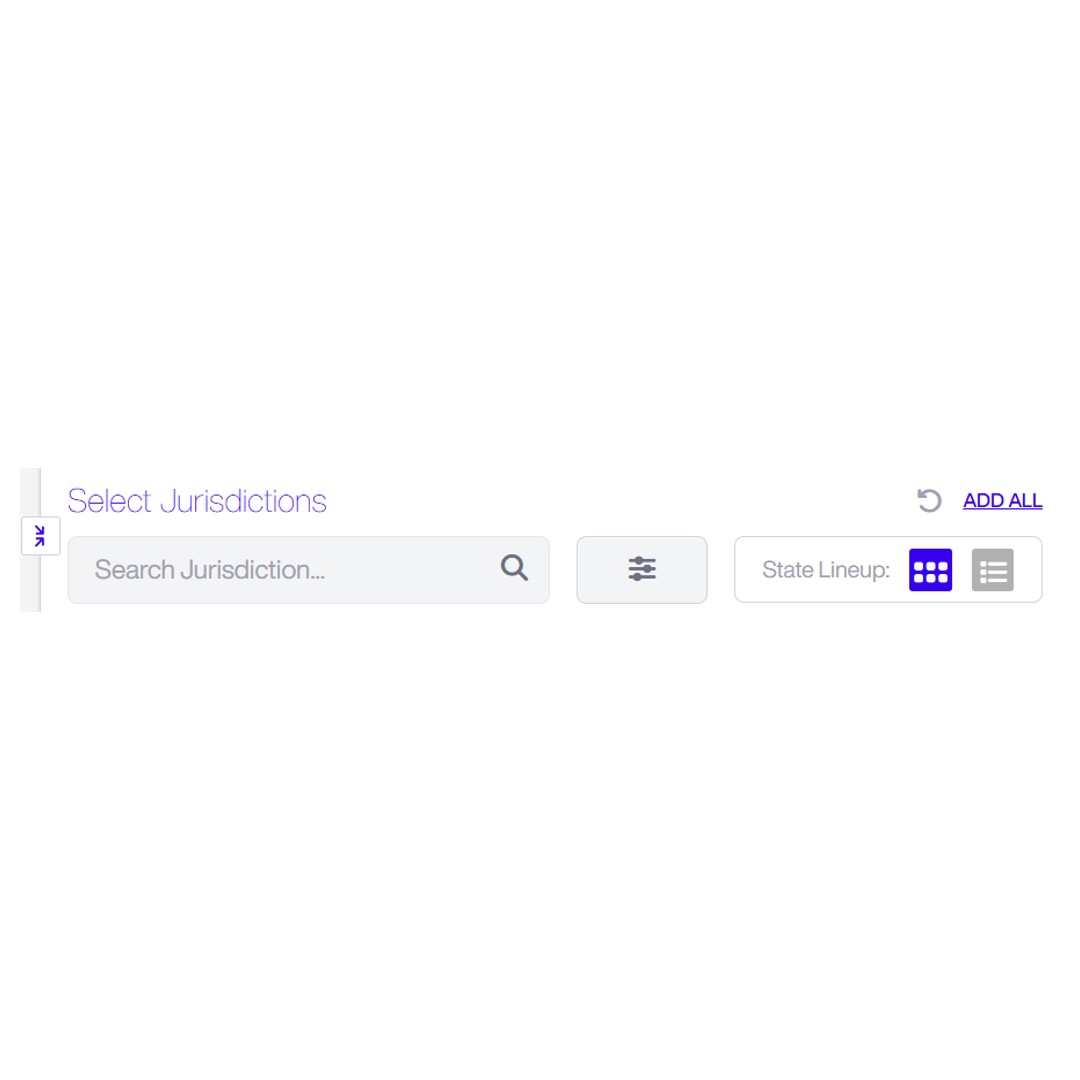
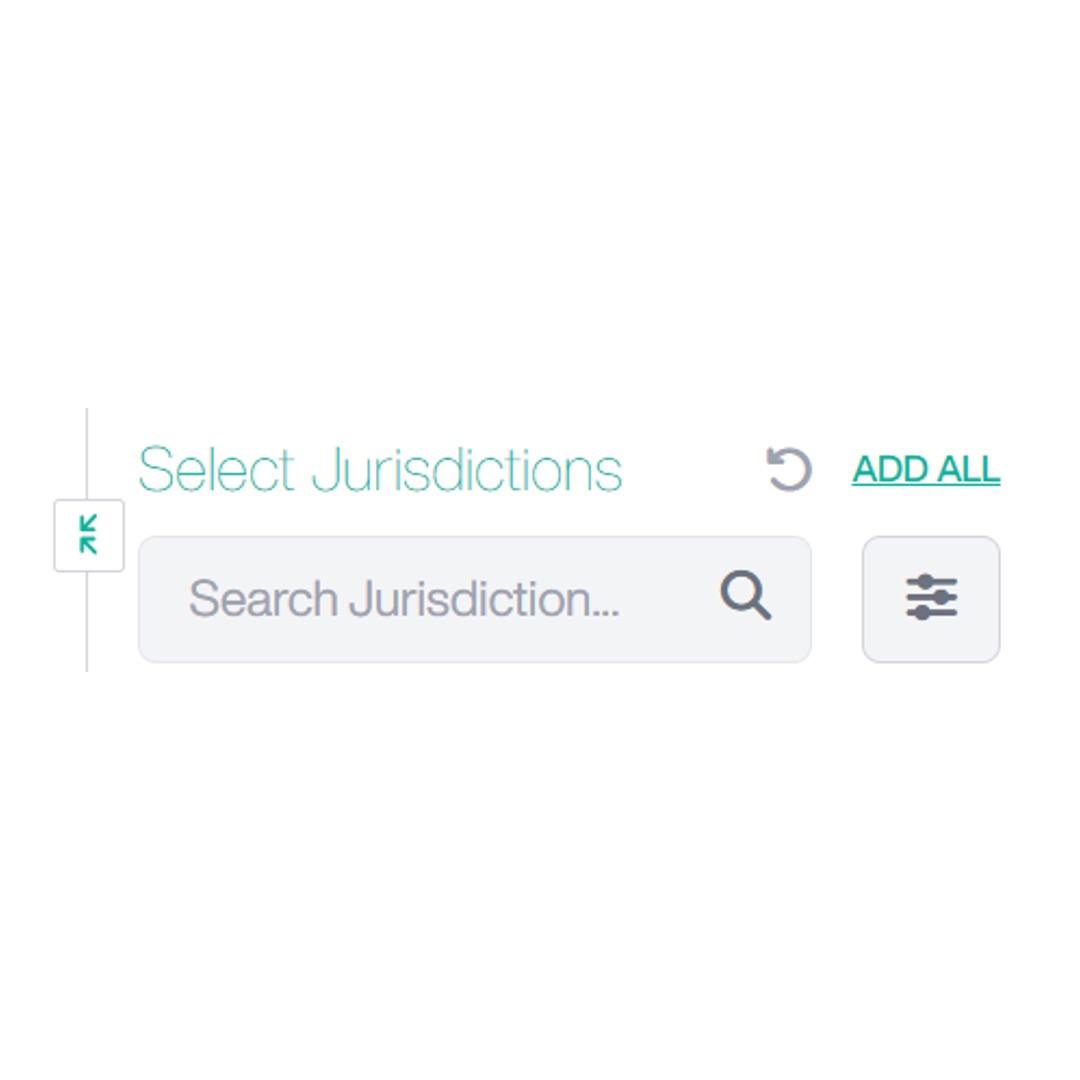
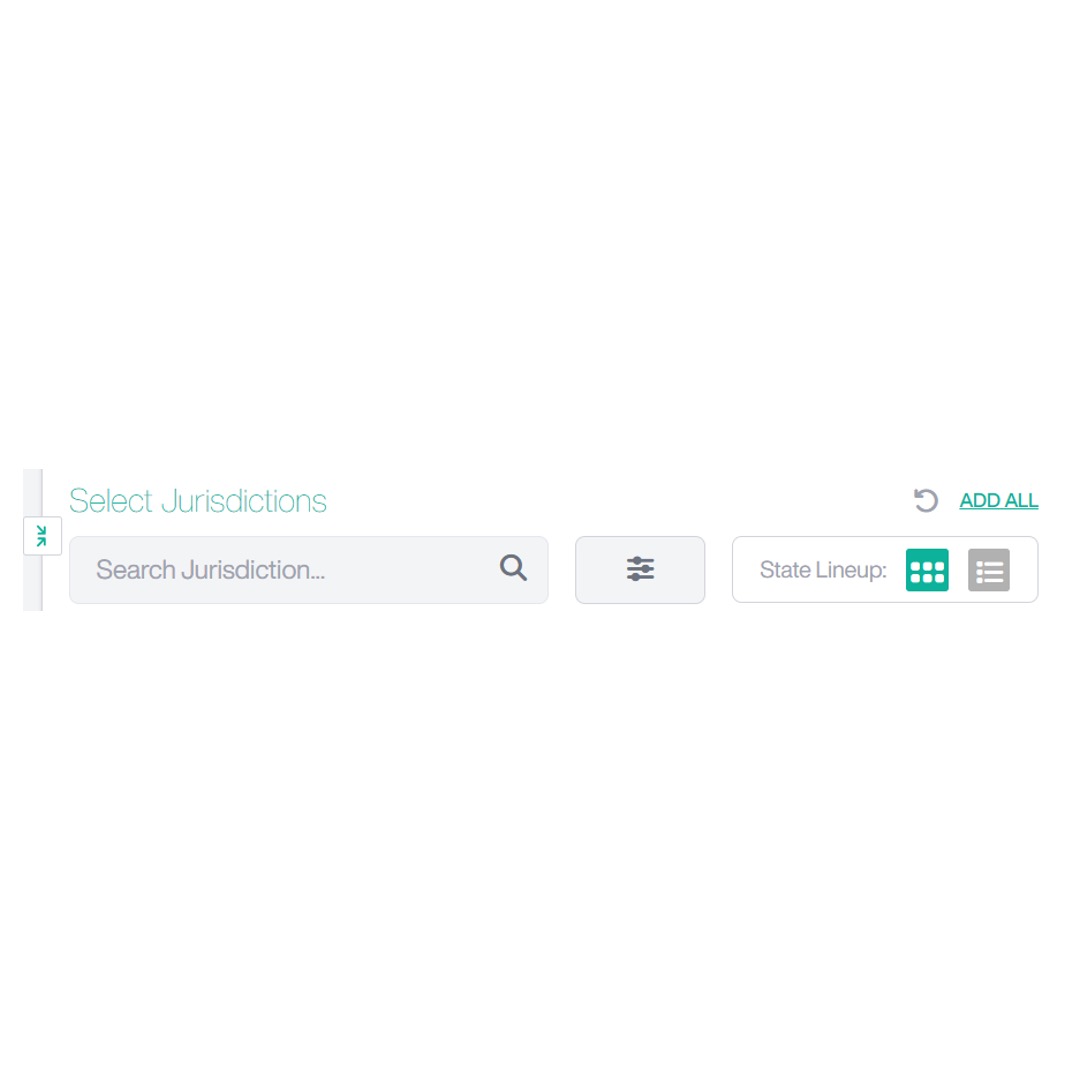
- In Select States, search or scroll to find states.
- You can expand the view of the state list by clicking the button with two diagonal arrows to the left of Select States:
- This will open a pop-up displaying the full list of states:
- Use the search bar to search for a state using code or name.
- Click the filter icon next to the search bar to apply filters or change the sorting method.
-
To change how the state list is displayed, use the State Lineup option to the right:
- The left button displays a left-to-right view, where the list is sorted alphabetically across rows.
- The right button displays a top-to-bottom view, where the list is sorted alphabetically down columns.
- Click a state to add it to Validation Fees or click Add All if you want all available states to appear in your quote.
- Click Recalculate to refresh the fee breakdown.
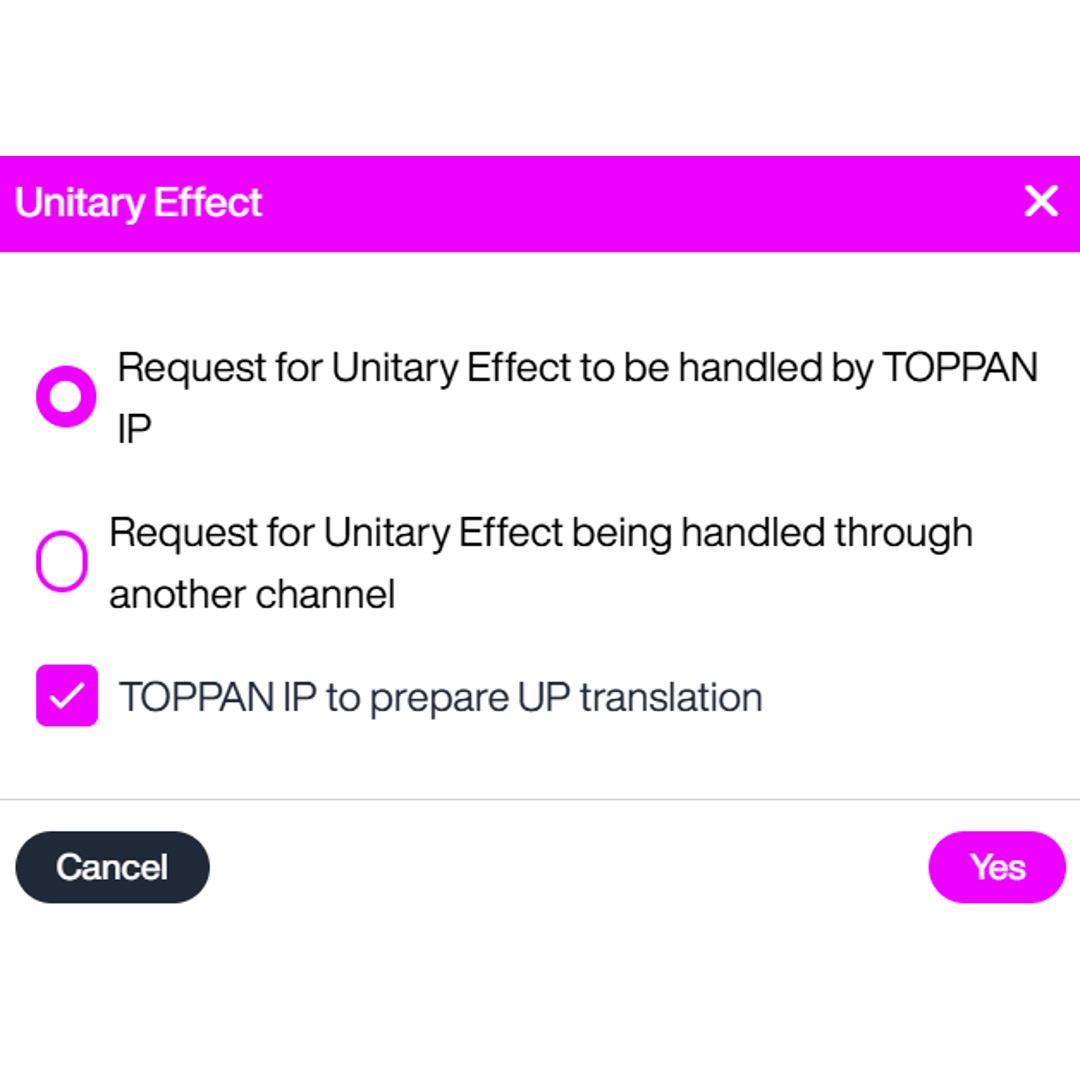
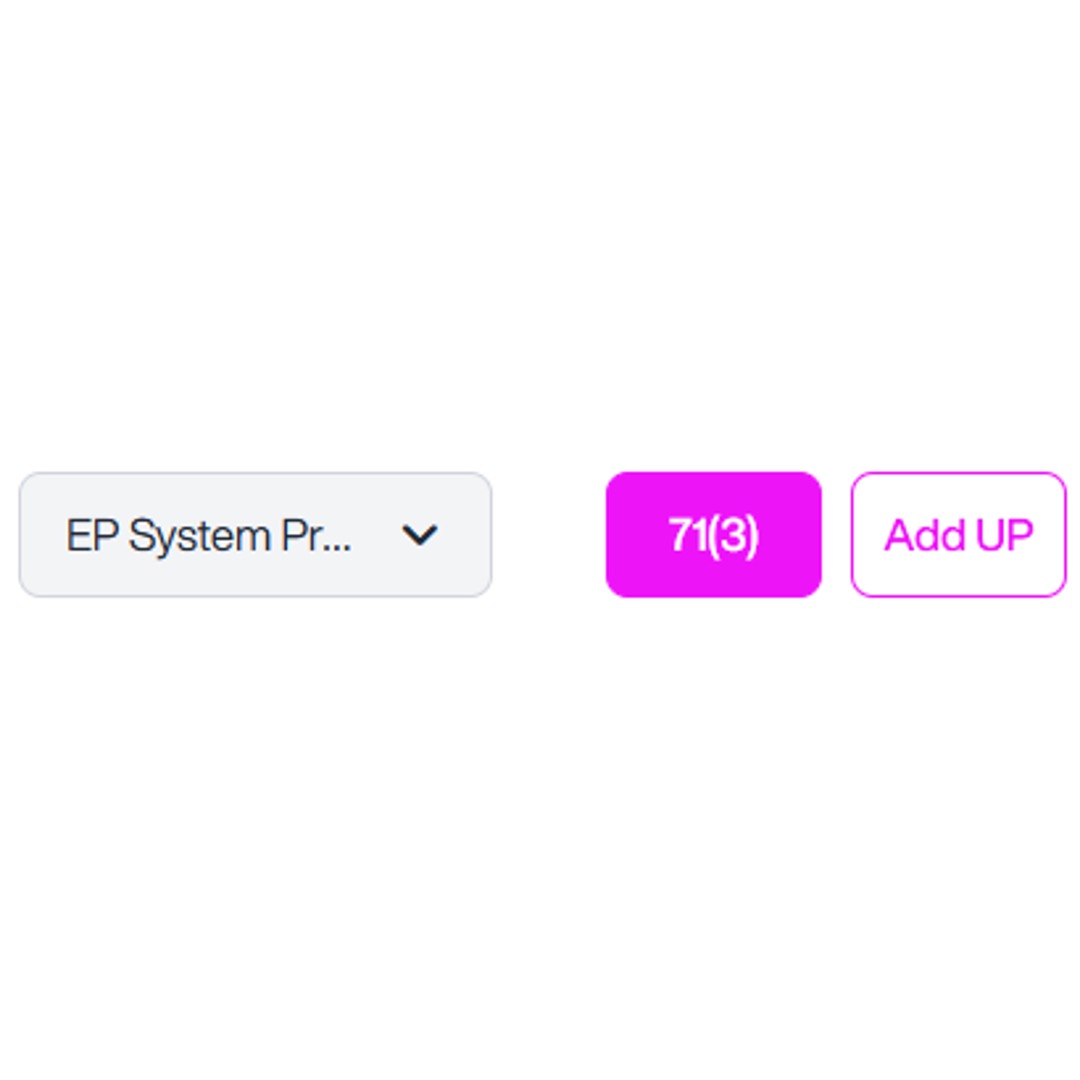
- If you want to add a Unitary Patent quote, click Add UP, and the following screen will appear:
-
Choose whether you’d prefer to use TOPPAN IP or add UP via another channel.
- Using TOPPAN IP creates a fully integrated experience, with end-to-end support. This will default to TOPPAN IP also preparing the UP translations. If you do not want TOPPAN IP to prepare the UP translations, please uncheck the ‘TOPPAN IP to prepare UP translation’ box.
- Use another agent if you need local representation, if you require advice beyond standard filing, or you prefer to use an agent with an established relationship. This will default to TOPPAN IP not preparing the UP translations. If you want TOPPAN IP to prepare the UP translations, please check the ‘TOPPAN IP to prepare UP translation’ box.
- Click Yes to save these changes.
- If 71(3) formalities have not been completed in full or in part by your EP attorney, you can request them by clicking 71(3):
-
You can request:
- A translation of the claims into one or both other official languages.
- EPO filing formalities via our EPO representative network agent.
- Click Yes to save these changes.
-
Under Validation fees you’ll see per-state information:
- States included
- Agent name
- Translation fee
- Service fee
- Official fee
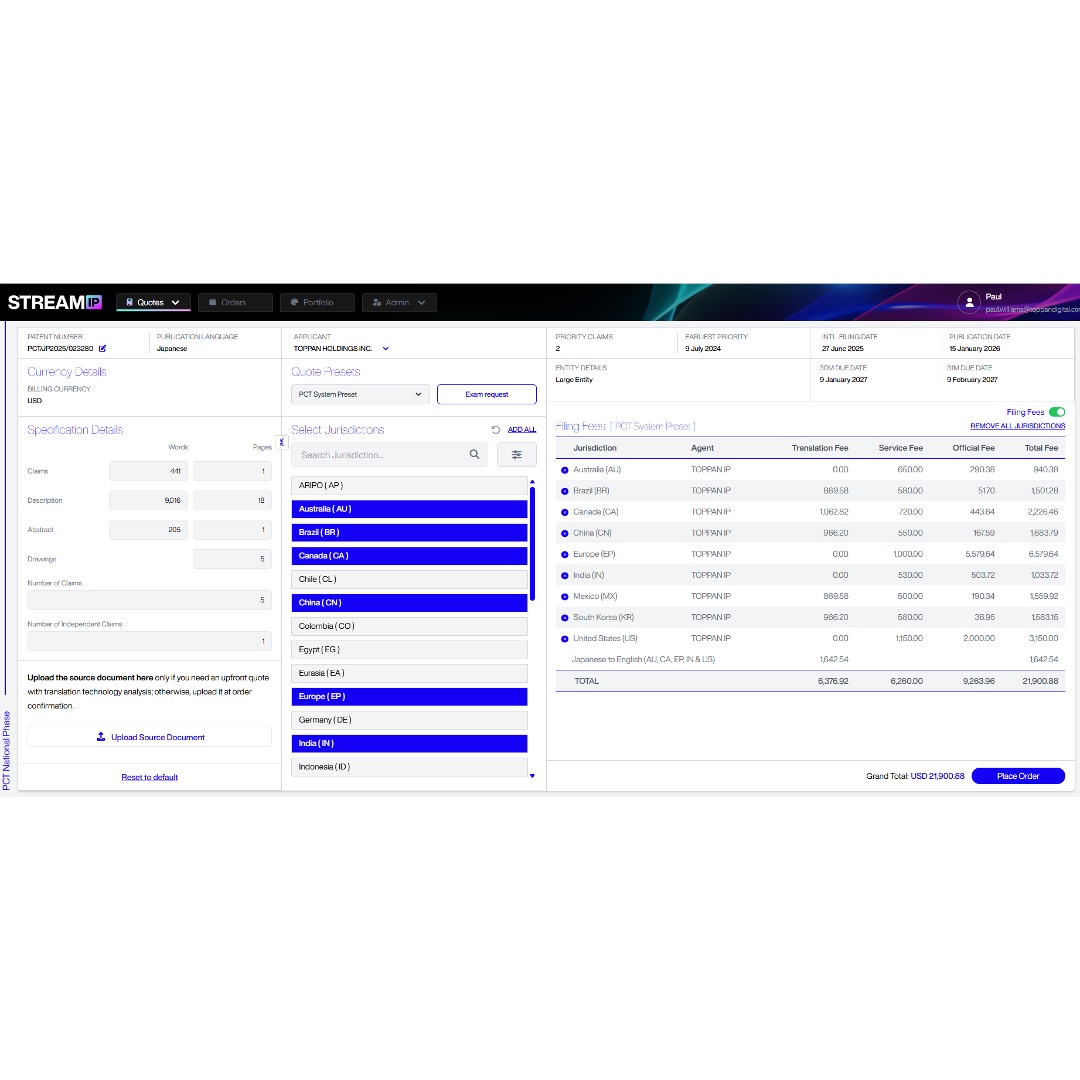
Get New Quote- PCT
This section will guide you through the steps to generate a quote to file a patent via PCT National Phase.
Get New Quote- PCT
- Select Get New Quote from the drop-down box on Quote:
- Click the PCT button and an input box appears for your PCT number:
- Enter your PCT number. It should follow the format PCT/AA0000/000000, then click Get Quote.
Filing + Translation (PCT)
- Click Get Quote, and the following screen will appear:
- Your EP number and patent title display at the top.
- Click the link beside the title to open the record in the European Patent Register.
-
In the row beneath the patent number and title, you’ll see:
- Patent number and publication language.
- Applicant and application date.
- Article 71(3) date and 71(3) deadline.
- Grant date.
- EP validation deadline.
- Under Specification Details, you can view page counts, word counts, and claim counts. If you wish to update these details, click any field to overwrite it with your latest numbers.
- You can choose to upload a source document. Uploading a source document allows us to calculate potential translation memory savings.
Translation-Only (PCT)
- Your PCT number and patent title display at the top.
- Click the link beside the title to open the record in the WIPO Register.
-
In the row beneath the patent number and title, you’ll see:
- Patent number and publication language.
- Applicant.
- Priority claims and earliest priority.
- International filing date and publication date.
- Entity details.
- 30M due date and 31M due date.
- Under Specification Details, you can view page counts, word counts, and claim counts. If you wish to update these details, click any field to overwrite it with your latest numbers.
- You can choose to upload a source document. Uploading a source document allows us to calculate potential translation memory savings.
- To upload your source document, click the Upload Source Document button to open your file browser. Select the desired file and click Open. Once uploaded, the document will appear at the bottom of the Specification Details section:
For the Translation element of the quote:
- Your PCT number and patent title display at the top.
- Click the link beside the title to open the record in the WIPO Register.
-
In the row beneath the patent number and title, you’ll see:
- Patent number and publication language.
- Applicant.
- Priority claims and earliest priority.
- International filing date and publication date.
- Entity details.
- 30M due date and 31M due date.
- Under Specification Details, you can view page counts, word counts, and claim counts. If you wish to update these details, click any field to overwrite it with your latest numbers.
- You can choose to upload a source document. Uploading a source document allows us to calculate potential translation memory savings.
- To upload your source document, click the Upload Source Document button to open your file browser. Select the desired file and click Open. Once uploaded, the document will appear at the bottom of the Specification Details section:
If you’ve already created a preset which you’d like to use to select the jurisdictions included in the quote, click the drop-down in the Quote Presets section.
- From the drop-down, select the preset you would like to apply to the quote.
- For help with setting up a preset, please refer to the Creating a Custom Preset section of this guide.
- If you do not want to use a default or custom preset for the jurisdictions included in the quote, you can either click Remove All Jurisdictions or click on a highlighted jurisdiction to remove it.
- This will open a pop-up displaying the full list of filing jurisdictions:
- Use the search bar to search for a jurisdiction using code or name.
- Click the filter icon next to the search bar to apply filters or change the sorting method.
-
To change how the state list is displayed, use the State Lineup option to the right:
- The left button displays a left-to-right view, where the list is sorted alphabetically across rows.
- The right button displays a top-to-bottom view, where the list is sorted alphabetically down columns.
- Click a jurisdiction to add it to the quote or click Add All if you want all available jurisdictions to appear in your quote.
- Click Recalculate to refresh the fee breakdown.
If you have selected filing services as well, this further information is required.
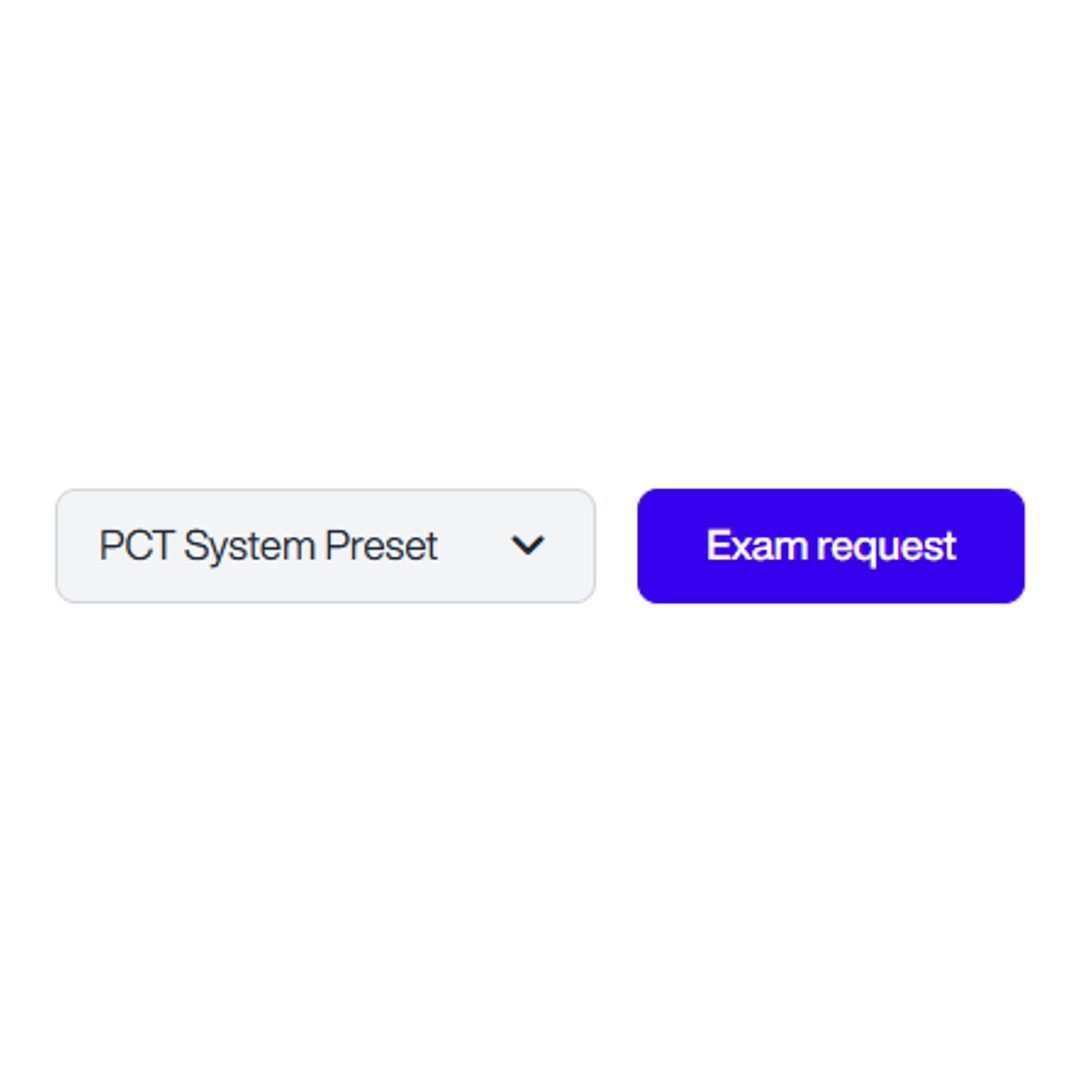
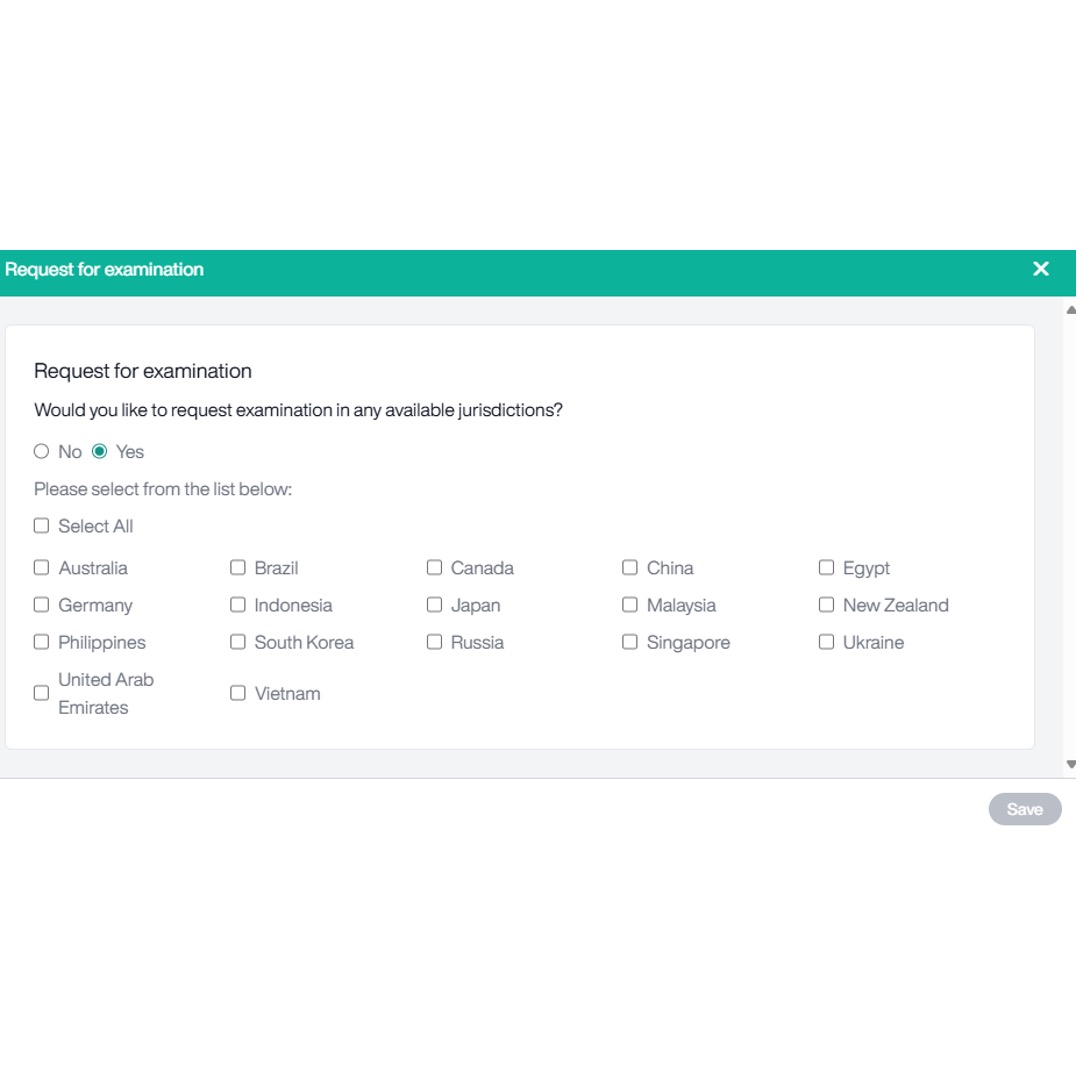
- To request an examination, click Exam Request:
- Check the box next to each state where you want to request examination.
- Alternatively, click Select All to request examination in all available jurisdictions.
- Click Save to confirm your request for examination.
-
Under Filing fees you’ll see per-jurisdiction information:
- Jurisdictions included.
- Agent name.
- Translation fee.
- Service fee.
- Official fee.
- At the bottom, a summary row shows totals for translation, service, official fees, and the grand total.
- Click Place Order to place your order with TOPPAN IP.
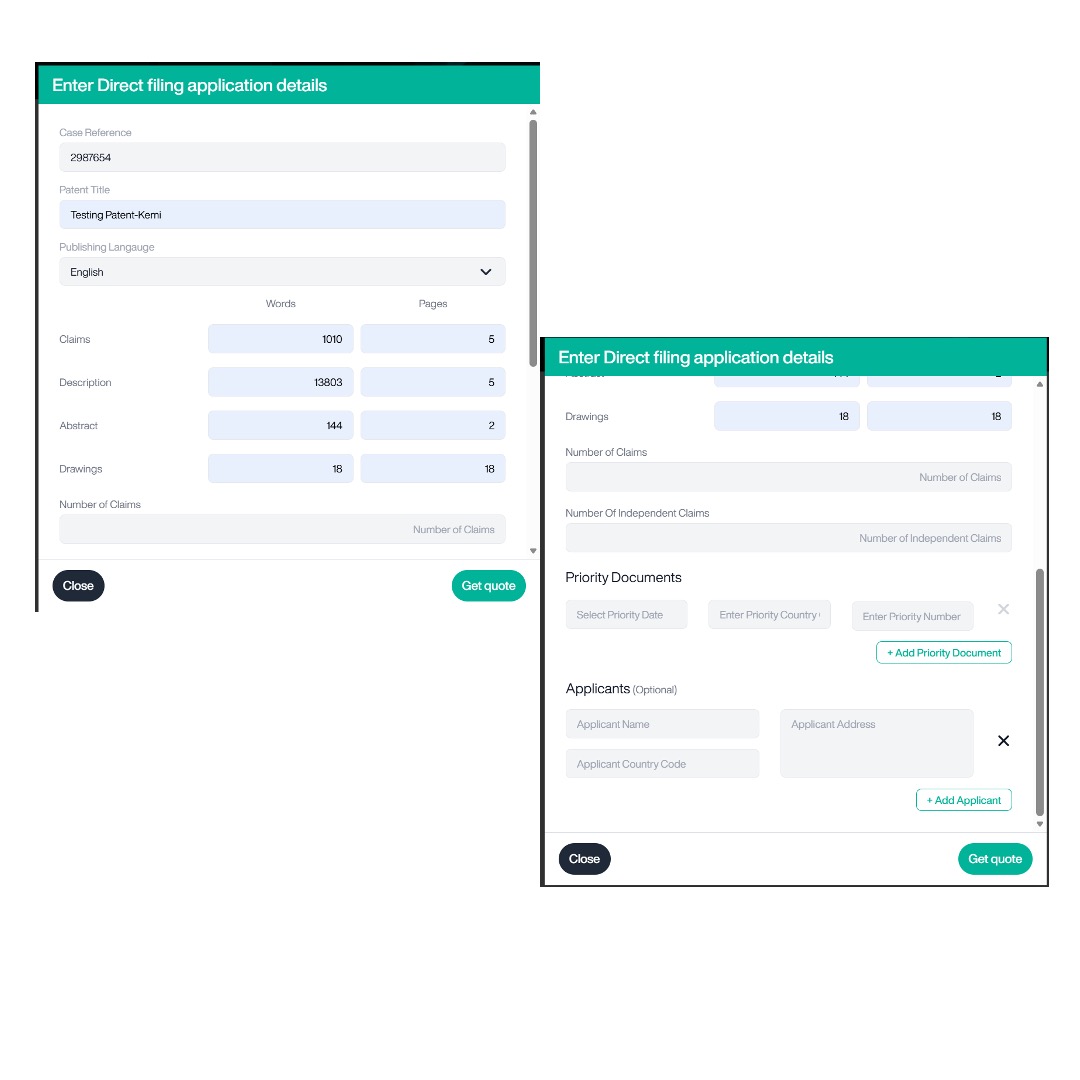
Get New Quote- Direct Filing
This section will guide you through the steps to generate a quote to file a patent via Direct Filing.
Get New Quote- Direct Filing
This section will guide you through the steps to generate a quote to file a patent via Direct Filing.
- Select Get New Quote from the drop-down box on Quote:
- Click the Direct Filing button, and an input box will appear for your case reference:
- Enter the case reference. This becomes the unique identifier due to the absence of a published patent number.
- Click Get Quote and the following screen will appear:
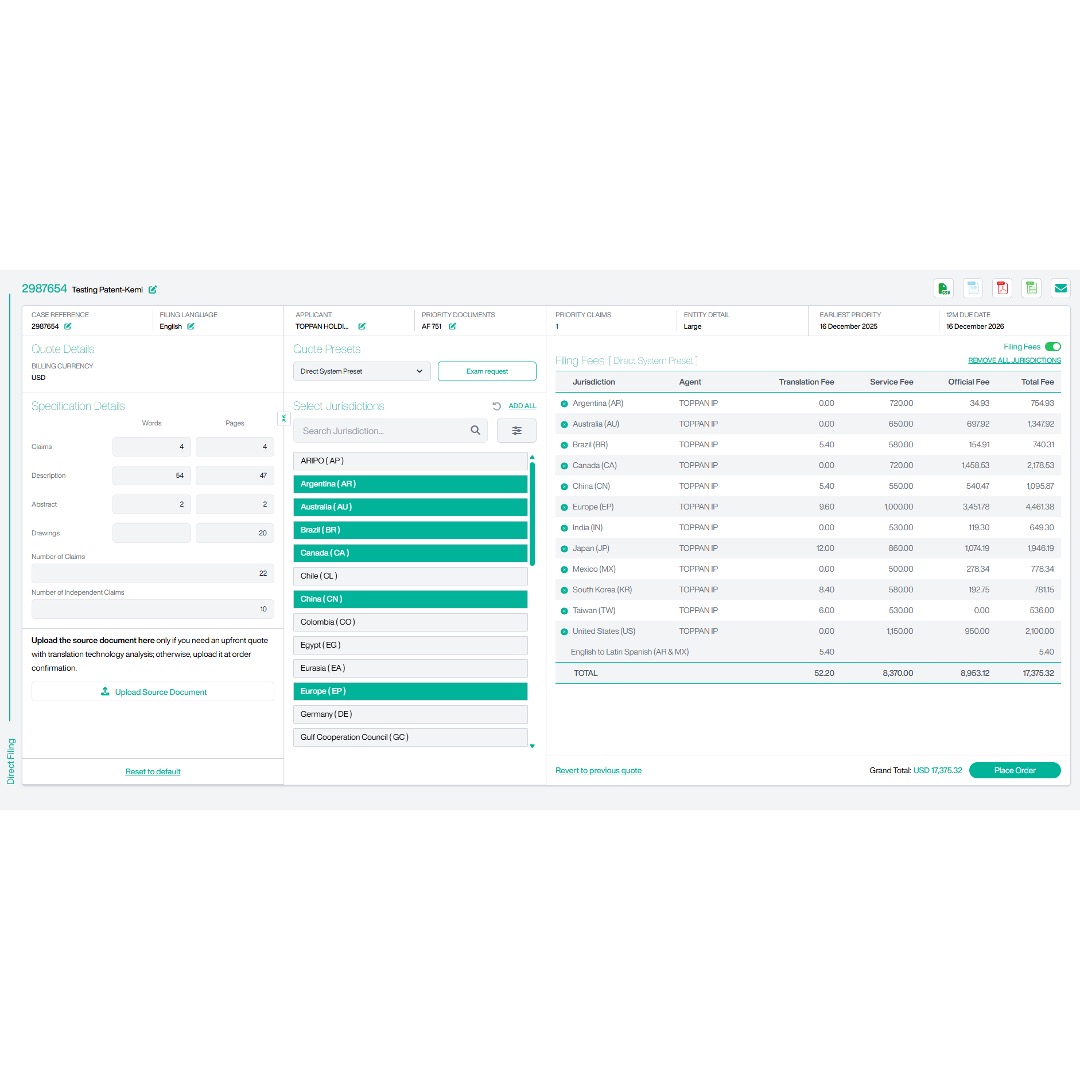
Filing + Translation (Direct)
Filing + Translation provides a combined quote that includes the cost of translating your documents and handling the filing process in selected jurisdictions.
The quote will display translation fees alongside official and service fees for filing. If your account is configured for filing with translation, the following screen will appear:
The quote will display translation fees alongside official and service fees for filing. If your account is configured for filing with translation, the following screen will appear:
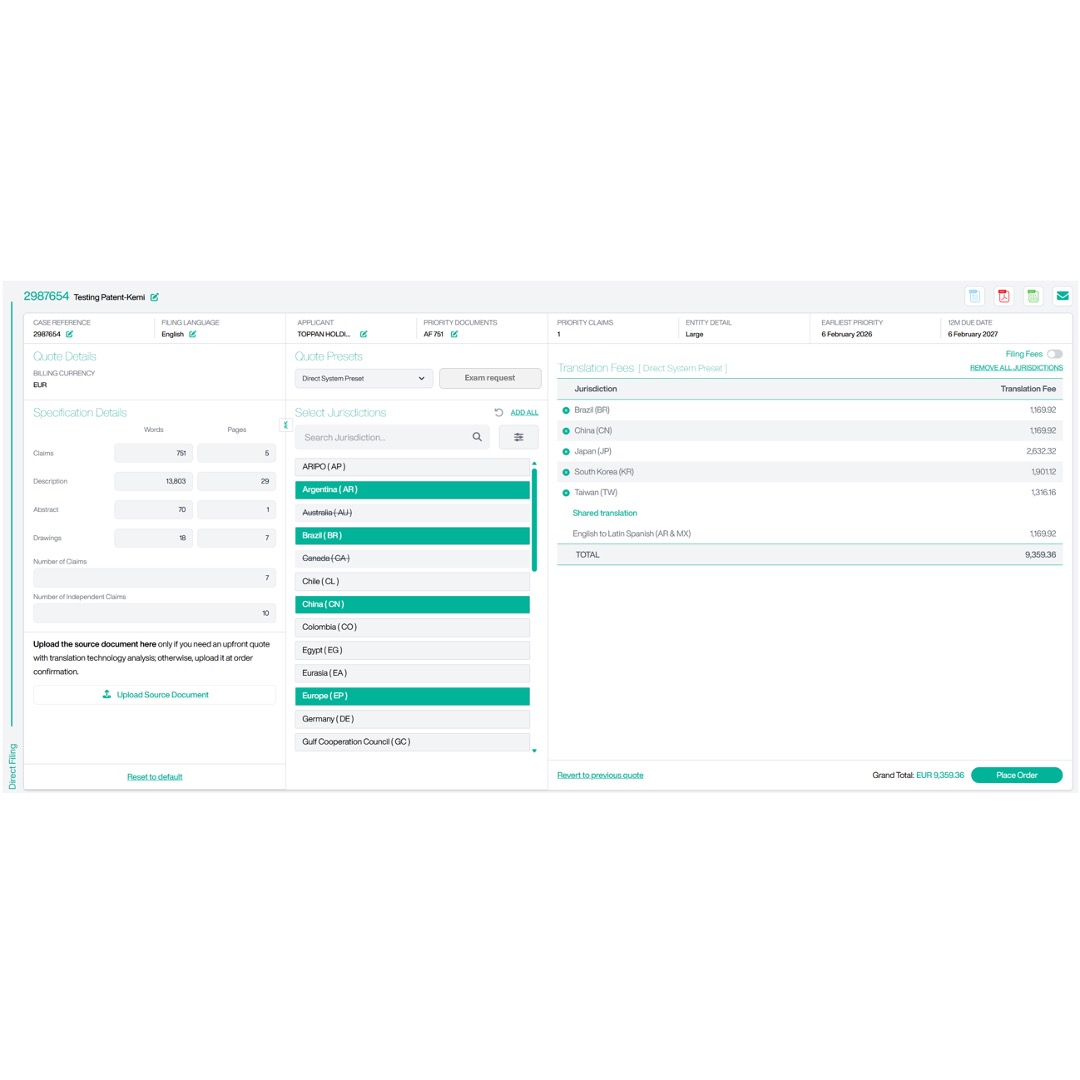
Translation-Only (Direct)
Translation Only provides a quote for translations intended for filing, without TDIP managing the filing process. If you require a Translation Only quote, turn off the Filing Fees toggle button located at the top-right corner of the Fees table. You will then see a Translation Only quote:
You can choose to proceed with just translation or toggle the filing fees back on to include filing support directly from this page.
For the Translation element of the quote:
- The case reference and patent title display at the top.
- Click the Edit button next to the title to amend the title.
-
In the row beneath the title, you’ll see:
- Case reference and filing language.
- Applicant and priority documents.
- Priority claims and entity detail.
- Earliest priority and 12M due date.
- Under Specification Details, you can view page counts, word counts, and claim counts. To update these details, click any field to overwrite it with your latest numbers.
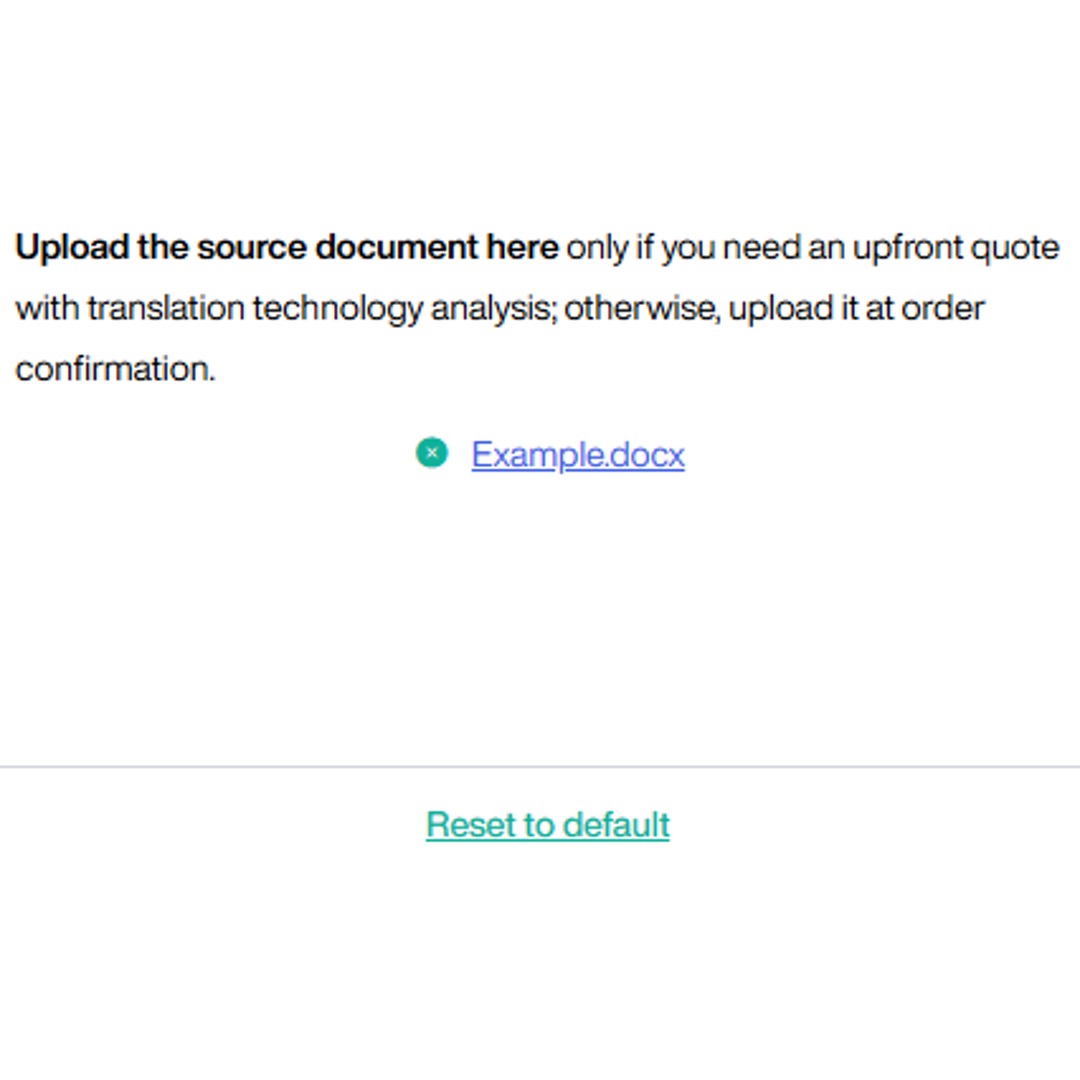
- You can choose to upload a source document. Uploading a source document allows us to calculate potential translation memory savings.
- To upload your source document, click the Upload Source Document button to open your file browser. Select the desired file and click Open. Once uploaded, the document will appear at the bottom of the Specification Details section:
- To remove a source document from the platform, click the X next to the document name.
- To revert the Specification Details to their original settings, click Reset to Default, then confirm by selecting Yes.
- To request an examination, click Exam Request:
- Select Yes to request examination in available jurisdictions, and the following screen will appear:
- Check the box next to each jurisdiction where you want to request examination.
- Alternatively, click Select All to request examination in all available jurisdictions.
- Click Save to confirm your request for examination.
- If you’ve already created a preset which you’d like to use to select the jurisdictions included in the quote, click the drop-down in the Quote Presets section:
- From the drop-down, select the preset you would like to apply to the quote.
- For help with setting up a preset, please refer to the Creating a Custom Preset section of this guide.
- If you do not want to use a default or custom preset for the states included in the quote, you can either click Remove All Jurisdictions or click on a highlighted jurisdiction to remove it.
- In Select Jurisdictions, search or scroll to find jurisdictions.
- You can expand the view of the state list by clicking the button with two diagonal arrows to the left of Select Jurisdictions:
- This will open a pop-up displaying the full list of filing jurisdictions:
- Use the search bar to search for a jurisdiction using code or name.
- Click the filter icon next to the search bar to apply filters or change the sorting method.
-
To change how the jurisdiction list is displayed, use the State Lineup option to the right:
- The left button displays a left-to-right view, where the list is sorted alphabetically across rows.
- The right button displays a top-to-bottom view, where the list is sorted alphabetically down columns.
- Click a state to add it to Filing Fees or click Add All if you want all available states to appear in your quote.
- Click Recalculate to refresh the fee breakdown.
-
Under Filing fees you’ll see per-jurisdiction information:
- Jurisdictions included.
- Agent name.
- Translation fee.
- Service fee.
- Official fee.
- At the bottom, a summary row shows totals for translation, service, official fees, and the grand total.
- Click Place Order to place your order with TOPPAN IP.
Confirm Order
This section explains how to place an order on STREAM IP.
- Once you have generated your quote, ensure all order details are correct before proceeding, then click Place Order:
- Depending on the filing route, you will be asked to confirm specific information. If you have already provided these details in Account Management > Questions, they will be automatically applied.
-
For EP, confirm:
- Case reference.
- Representative name.
- EP annuity options.
-
For PCT, confirm:
- Case reference.
- Request for International Preliminary Examination, with details of any amendments filed.
- Applicant status.
- Request for examination.
- Amendments at filing.
- Whether the invention involves Brazilian genetic resources or associated traditional knowledge.
- Europe options.
- Whether the invention relates to the use of biological material.
- Applicant and inventor names for China.
-
For Direct Filing, confirm:
- Case reference.
- Rights to the invention.
- Applicant status.
- Request for examination.
- Whether the invention involves Brazilian genetic resources or associated traditional knowledge.
- Europe options.
- Whether the invention relates to the use of biological material.
- Applicant and inventor names for China.
- Click Continue.
- Optionally, attach supporting documents with a brief description.
- Specify additional recipients for order confirmation and filing notifications.
- Add any special instructions related to filing, translation, or invoicing requirements.
- Click Confirm Order. Your order confirmation will display, along with navigation to your Order Status page.
View Saved Quotes
This section explains how to access, review, and edit your saved quotes.
Accessing Saved Quotes
This section explains how to access, review, and edit your saved quotes.
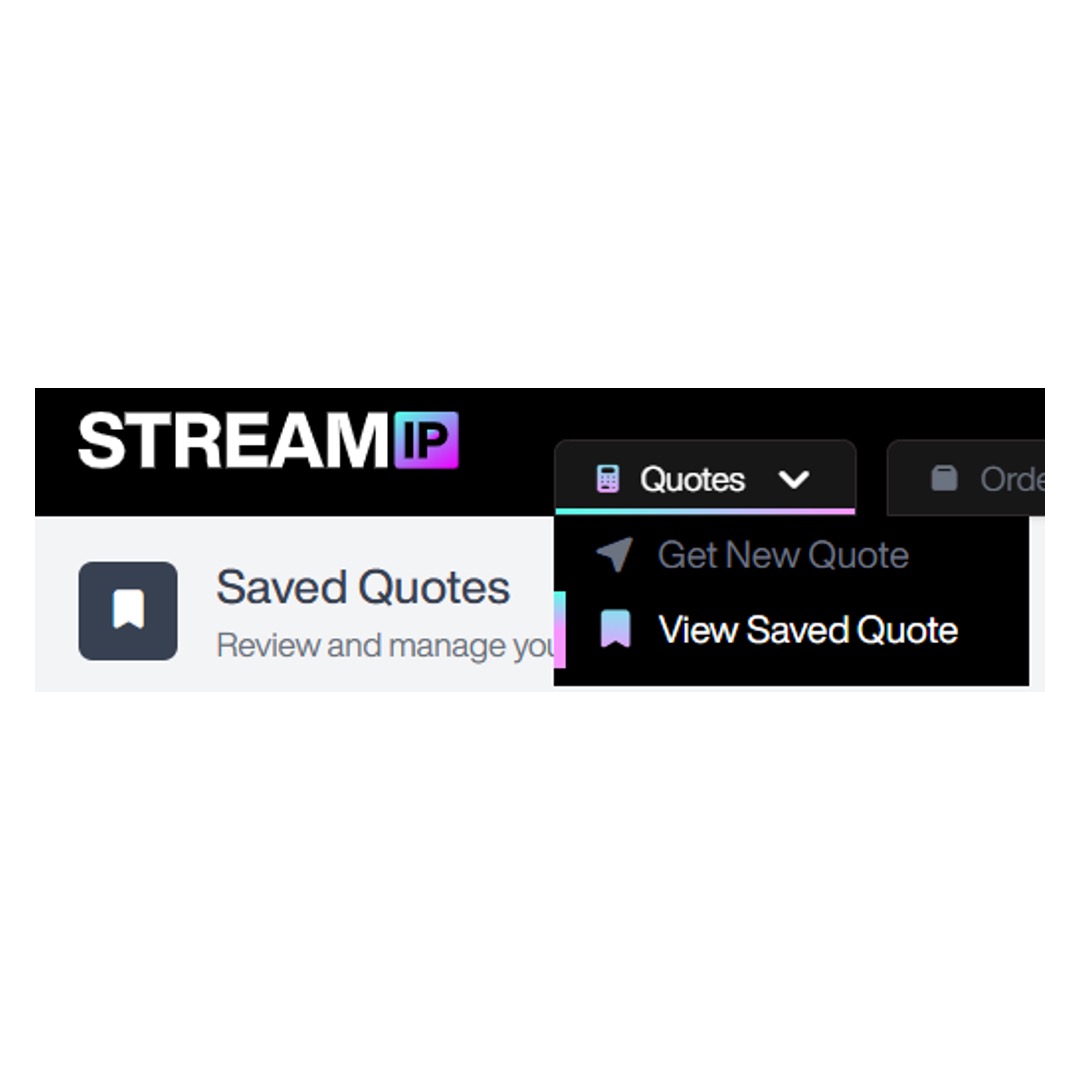
- Click the drop-down menu of the Quote tab at the top of the page, and select View Saved Quotes:
- A list of your saved quotes will appear.
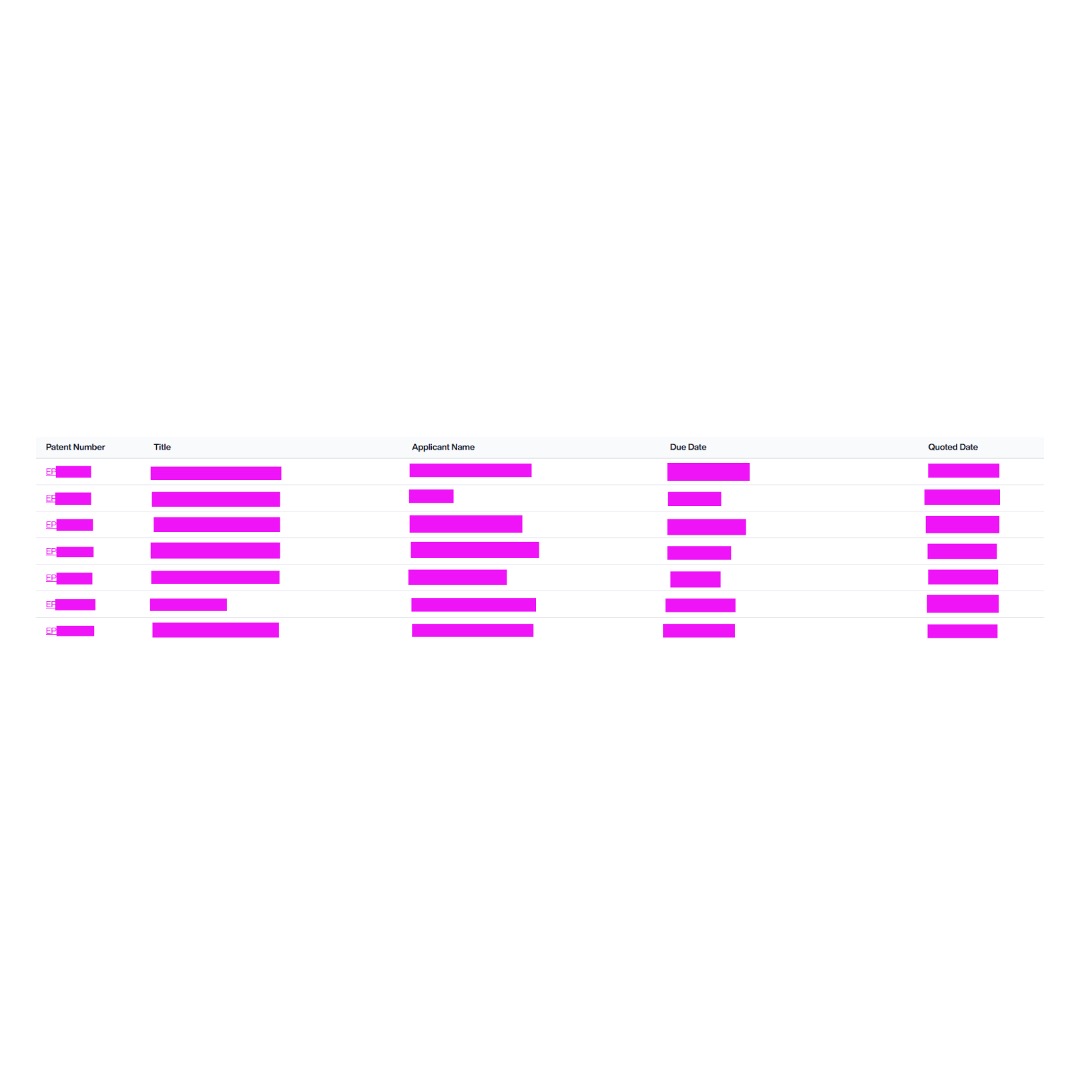
- There are separate tabs for EP, PCT, and Direct Filing saved quotes. The system will default to the EP tab. To view quotes from another category, simply click the corresponding tab to switch between them. The following screen will appear:
-
Each entry displays:
- Patent number.
- Title.
- Applicant name.
- Due date.
- Quote date.
- To view the full quote, or make edits, click on the patent number. This will open the quote in the standard quote view. Once the quote is open, you can make changes just as you would when creating a new quote.
Orders
This section will show you how to view all your filing and validation orders.
Accessing Orders
This section will show you how to view all your filing and validation orders.
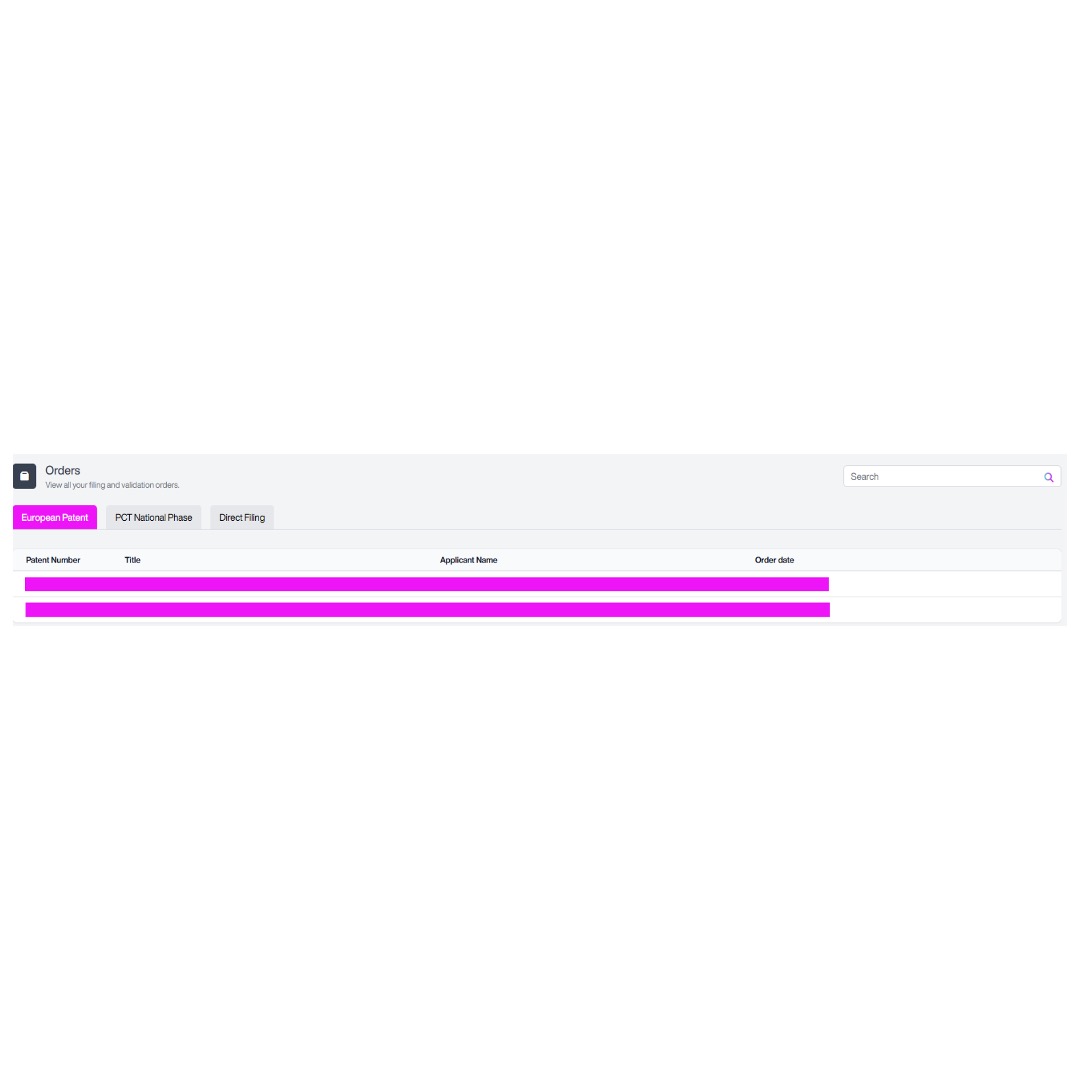
- To access the orders section, select Orders from the menu at the top of the screen, and the following screen will display:
- Orders are separated based on filing route. To switch between them, select the filing route at the top.
- Use the search bar at the top right to search for an order.
- A list of your orders will appear.
-
You will be able to see these details:
- Patent Number.
- Title.
- Applicant Name.
- Order Date.
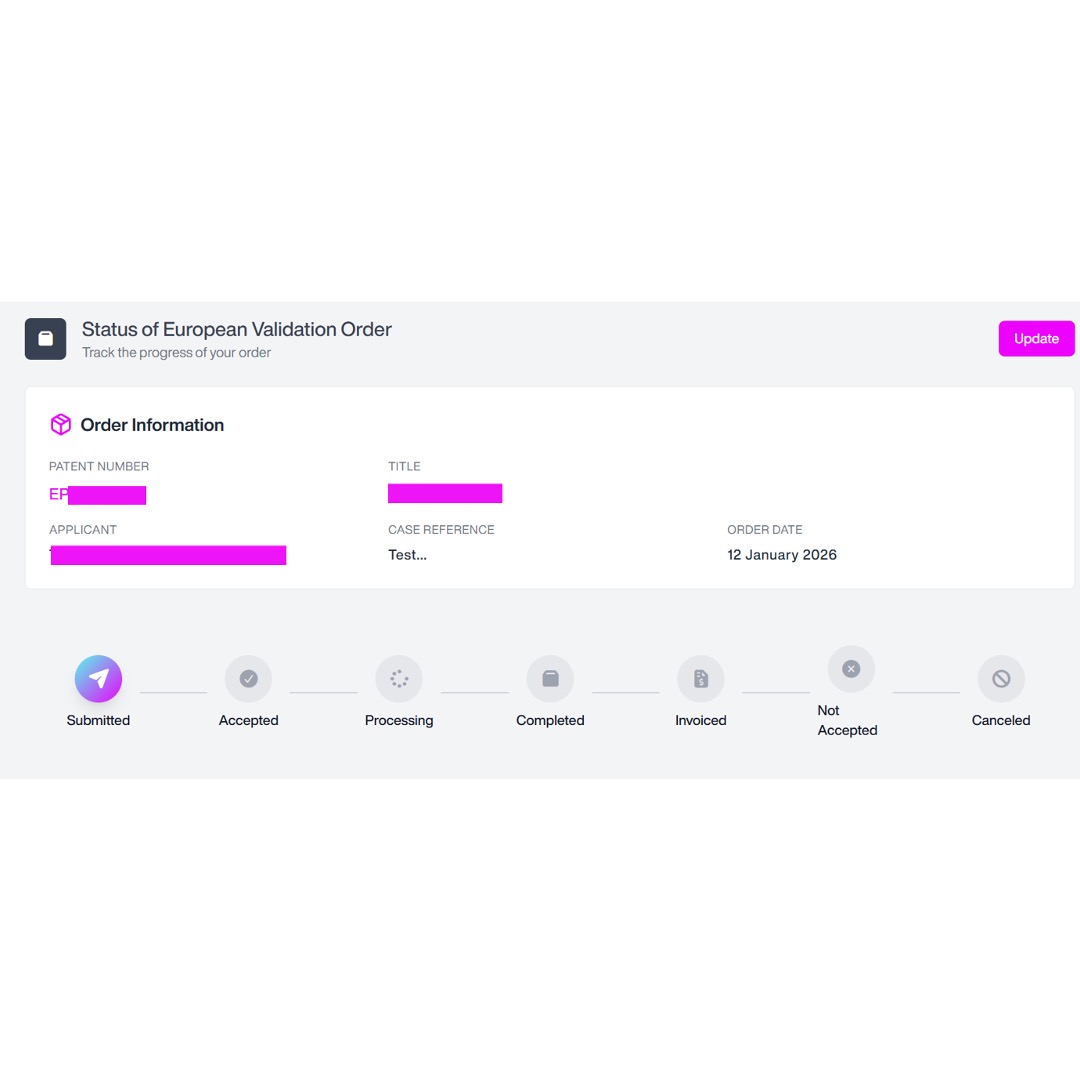
- Click on the patent which you want to view the status of, and the following screen will display:
-
This will show:
- Patent Number.
- Title.
- Applicant.
- Case Reference.
- Order Date.
-
Furthermore, the status of your order will be visible, from stages:
- Order submitted.
- Order accepted.
- In progress.
- Completed.
- Invoiced.
- Not accepted.
- Cancelled.
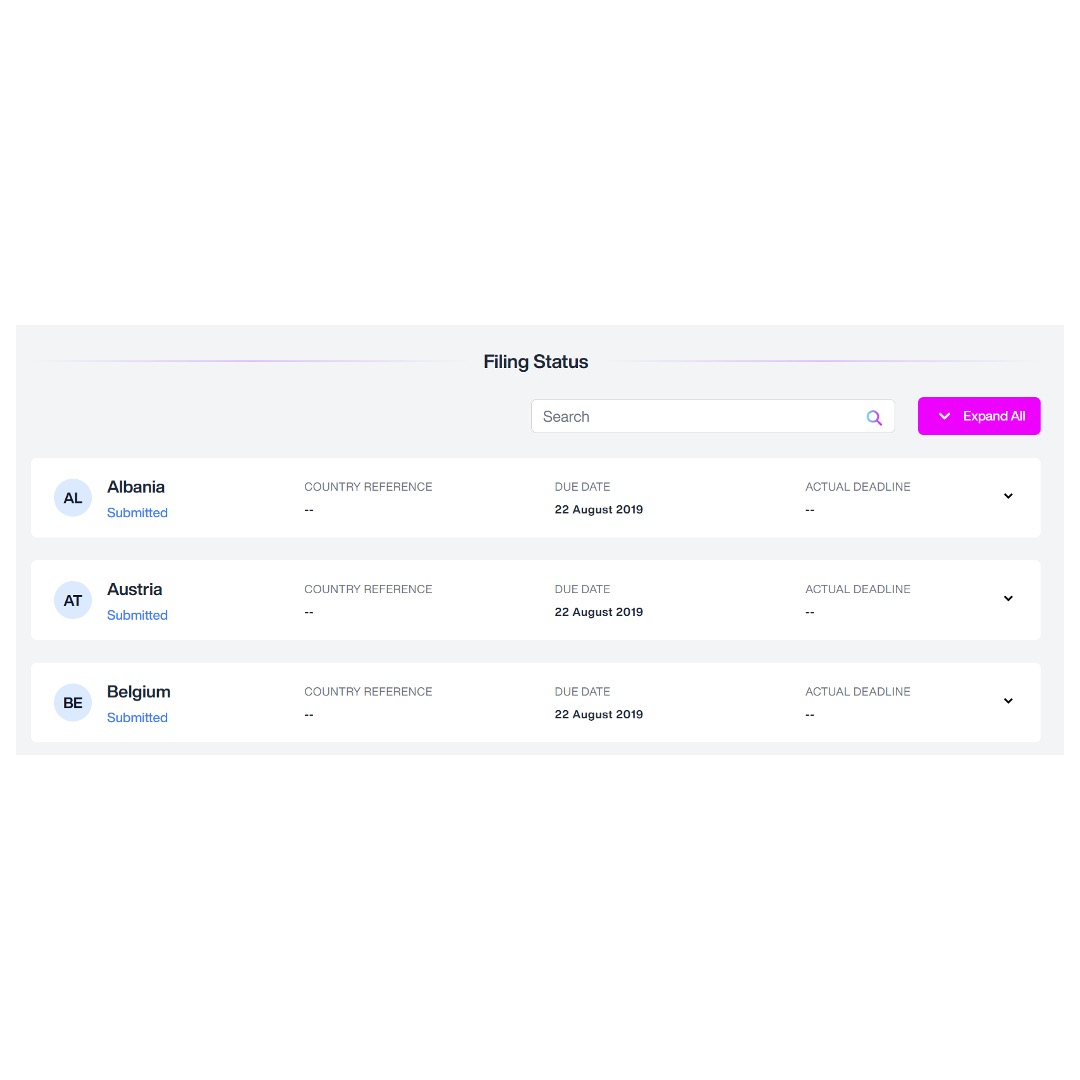
- Scroll down to the Filing Status section to view the status of your patent filing in each individual state, and the following screen will show:
- Use the search bar to search for a specific state by state code or state name.
- Click Expand All to view full details for every state.
-
Next to each state, you will see:
- Country Code/Name.
- Client Reference.
- Due Date.
- Actual Deadline.
- Use the drop-down icon v button to the right to see full details for each state, and the following screen will show:
-
This will show:
- Country Reference.
- 31 Month Deadline.
- Actual Deadline.
- Filing Language.
- TDIP Reference.
- Amendment at Filing.
- Examination Request.
- Agent.
- Agent Reference.
- Local Patent Number.
- Local Filing Date.
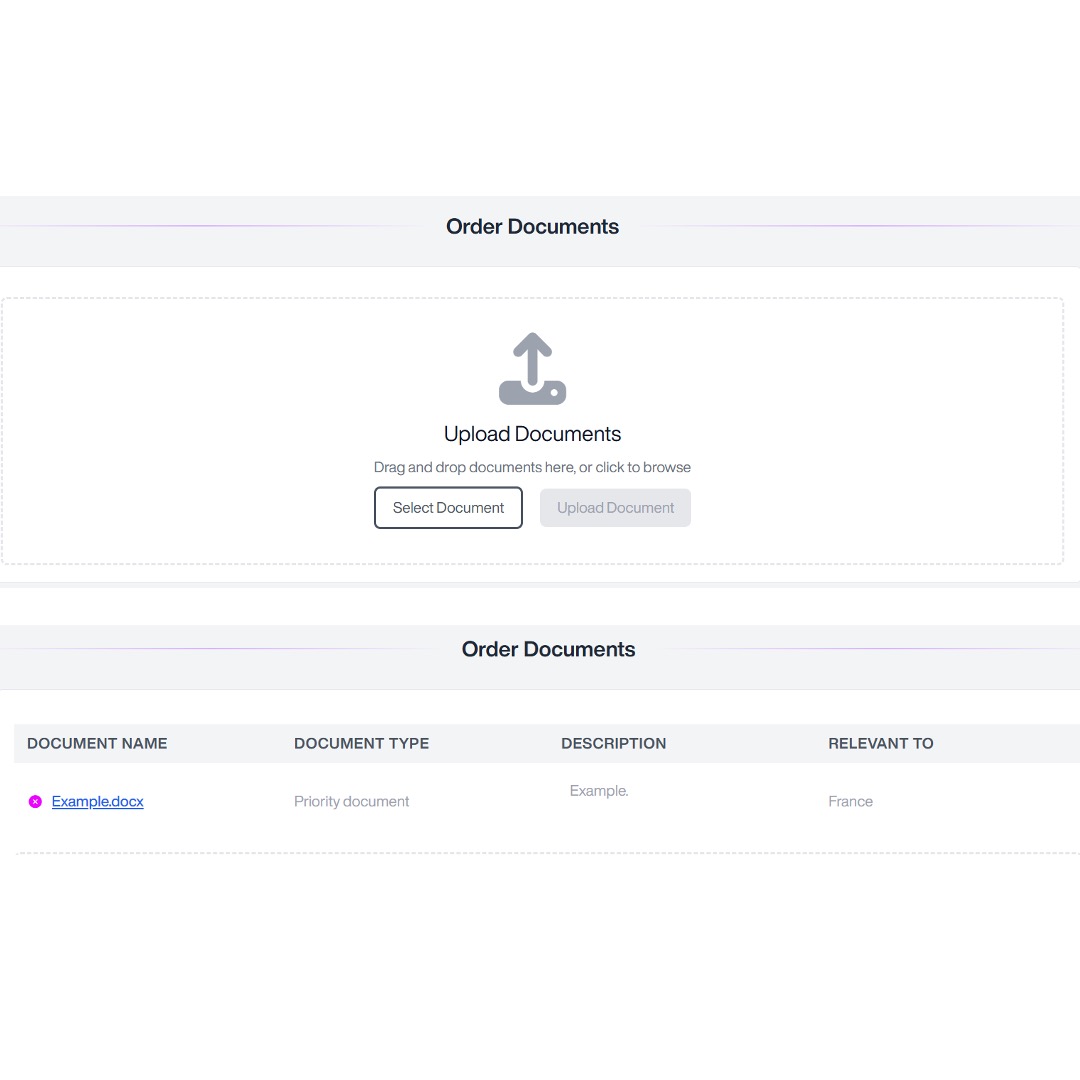
- You can upload additional documents here, such as completed Powers of Attorney. Scroll down to the Order Documents section, and the following screen will appear:
-
Click Select Document to add an additional document. Then, input the following details:
- Document type (choose from the drop-down: Filing Forms, Specification, Amendment (Amended Claims), Priority Document, or Other).
- Description.
- Relevant to (select the states which the additional document relates to).
- Click Upload Document. The additional document will then be visible under Order Documents: