WordPress is the world’s most popular web content management system (CMS) and millions of businesses use it to power their websites.
As these businesses expand, rather spending significant time and resources on redeveloping their websites, they often look to localizing their existing WordPress site in order to reach and engage with new audiences globally.
Machine translation tools such as Google Translate or Bing Translator have come a long way in recent years, but it’s widely accepted that machines perform significantly worse than humans and particularly bad compared with professional linguists and multi-lingual copywriters when it comes to translation. Often texts derived from machine translation are laughably bad and for this reason, international brands avoid the use of machine translation for their web and marketing copy.
There are a lots of multi-language WordPress plugins available that use machine translation to translate content but very few that help you integrate professional human translation to ensure the highest quality and allow for the efficient management of content during the translation process.
The best of these WordPress multi-language plugins is undoubtedly WPML (WordPress Multi-Language Plugin). So we’ve teamed up with the developers of the plugin, OnTheGoSystems, to integrate our translation management platform, STREAM, with WPML. This provides a seamless end-to-end solution allowing you to quickly launch your international website into over 250 languages without having to speak any foreign languages or import, export, copy or paste any content.
Below is a quick tutorial on how you can localize your WordPress website easily and effectively with tips and advice on best practice approaches in various different markets around the world.
Installing WPML
To use WPML you’ll need to have WordPress installed. We recommend upgrading to the latest version of WordPress if you haven’t done so already. Ensure that you back up your site and database before doing so to avoid any issues.
To install WPML, simply visit the WPML website, create an account and download the latest versions of the WPML Multilingual components.
If you decide to use TOPPAN Digital Language as your localization provider, the team at WPML will happily guide you through the process of installing and setting up your multi-language website. However, if you’d prefer to try it yourself, simply follow the steps in this guide.
WPML core components
The core components required to allow for seamless integration with TOPPAN Digital Language’s STREAM platform are:
WPML Multilingual CMS
The core plugin makes your WordPress website multilingual. It adds the basic translation controls and allows for your existing content to be translated.
WPML String Translation
The String Translation plugin allows to translate user interface text and hard coded strings directly from within WordPress without having to use .mo files. It also lets you translate user-generated texts and other elements such as call-to-actions, header and footer text.
WPML Translation Management
In order to manage your translation requirements, you’ll need to download and install the Translation Management plugin. This plugin can turn normal WordPress users into translators and allow you to send them pages to be translated or, importantly, can be configured to integrate with TOPPAN Digital Language’s STREAM translation management platform – allowing you to send all your content for professional translation by a native, in-country linguist, keep control of costs, ensure quality and track the progress of your translation jobs.
Once all of these plugins have been downloaded – log into your WordPress site, visit the plugins page and upload the new plugins. Once all the plugins have been uploaded, activate them by clicking on the “Activate” text next to each plugin. Activate the WPML Multilingual CMS first, then do the same for all the other plugins.

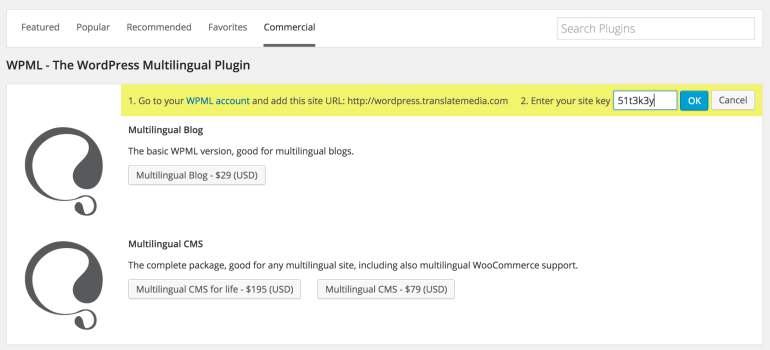
Once activated, the plugin will prompt you to purchase a subscription or enter an existing key.

The site key can be found by logging into your WPML account, visiting the ‘Sites’ section and clicking on ‘show key’.

You’ll be presented with your site key which can then be entered into WordPress to register your WPML plugin.

Once you’ve registered WPML for your site, a new option will appear against your plugins which allows you to configure option. Firstly, select the ‘Configure’ option for ‘WPML Multilingual CMS’.

Configuring WPML
Setting languages
The first step in the configuration process allows you to set the source (current content) language.

Secondly, you’ll need to set your target language(s).

Language switcher
The next step allows you to configure your language switcher. Here you’re presented with a range of options that allow you to display the language switcher in an existing widget or provides some PHP code which you can paste into your header.php or sidebar.php file – depending on where you’d like the language switcher to appear.
Other options include allowing you to display the text ‘Languages’ – or the equivalent word for each language (langues, sprachen, etc.) next to the language switcher. It’s also possible to display the language switcher in your WordPress navigation menu.

The style of the language switcher can also be configured here. WPML allows a number of different styles including the ability to include a dropdown menu or list, to display horizontally or vertically, to display a flag or have the language label in the users native language.

Another option exists to allow you to decide to exclude a language where the translated content is unavailable or simply link to the appropriate language’s homepage.

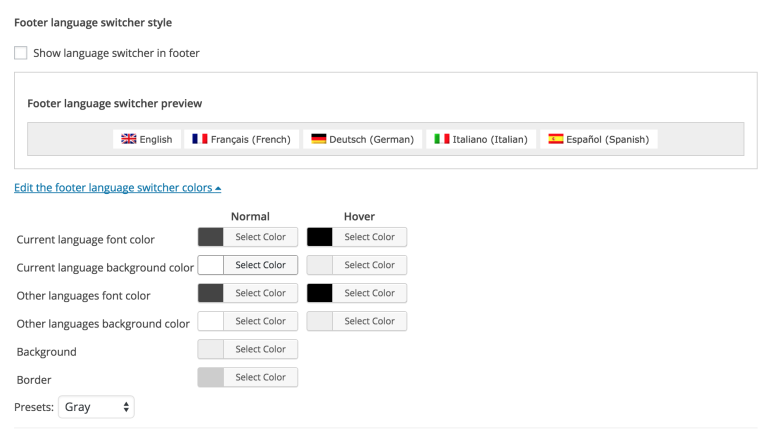
Further options exist to automatically add the language switcher to your site’s footer. This section even allows you to change the colours of the text, backgrounds and links – without having to know any HTML or CSS.

Lastly, you can select whether to include static links to each different version of each page in the various languages that these exist and add any optional CSS classes to allow for you to tweak the display of your language switchers or other elements.

If you’re working on a live website, we recommend hiding the languages that are currently in development. You can do this by visiting the ‘Languages’ page in the WPML menu and selecting ‘Hide languages’ and the languages you’d like to be hidden.

This will mean that the additional languages will only be visible to users that are logged into WordPress. This will make the process of setting up and launching your multi-language website that much easier.
Translation Management
The translation management plugin is really where TOPPAN Digital Language can add value and you can start realizing the potential of WPML to manage your multi-language content.
Before you start, you need to sign up for an API key with TOPPAN Digital Language. Once you’ve received your key, simply visit the ‘Translators’ tab within the Translation Management section and click on ‘click here to authenticate’.

You’ll be presented with a popup window where you can enter your username and API key.

Once you’ve successfully authorized your site using the username and API key provided, you’ll be presented with a popup to state that activation has been successful.
And a message will appear on screen to state that you site has been authorized.

Sending content for translation
You’re now ready to send content to TOPPAN Digital Language for translation. To do this, simply visit the ‘Translation Dashboard’ tab within the ‘Translation Management’ section of WPML.
At the bottom of this page you’ll see all of your pages and posts. Next to these, you’ll see the flags related to the languages you’ve set up in the previous steps. Content that has been translated and is up-to-date (i.e. has not changed since the last time it was translated) will show a green tick.
An orange triangle with an exclamation mark will appear against content that has yet to be translated. Here you simply need to select the content that requires translation.

Beneath this table, you’ll receive an estimated word count and more options to allow you to specify which languages you’d like to translate your content into.

Once your languages have been selected, simply ‘Add to translation basket’ and these items will appear in the ‘Translation Basket’ tab. You can keep adding items to the basket as you see fit until you’re ready to send all the content for translation.
Below this you’re presented with some additional translation options such as the ability to alter the batch name and select local translators for some of the languages. When you’re ready to send the content for translation – simply click ‘Send all items for translation’.

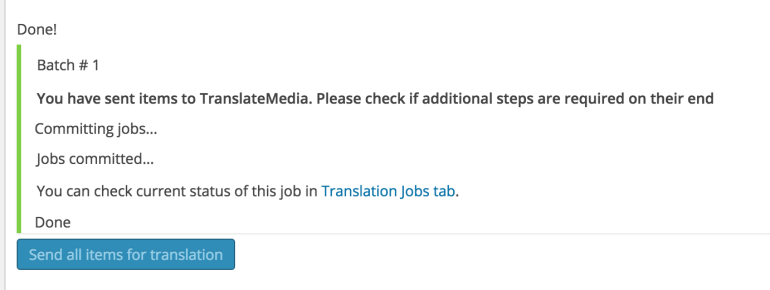
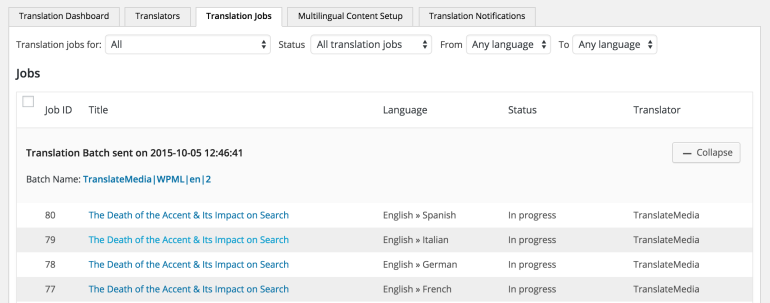
If the delivery has been successful, you’ll receive a confirmation message to state that the batch has been delivered. Within the message you’ll see a link to the ‘Translation jobs‘ tab from where you can check all the jobs which have been sent for translation.

Finally, by clicking on the ‘Batch Name’ link just below the date stamp as shown below you’re redirected to TOPPAN Digital Language’s STREAM translation management portal where you can receive a quote, submit the project for translation and check the progress of your live translation jobs.

Receiving a quote and estimated turnaround time
Once you’ve submitted your content for translation, it will be sent to STREAM and you’ll be able to obtain costs and turnaround times for each batch of content. By logging into your STREAM account and visiting your dashboard, you’ll be able to see all the jobs sent for translation along with a button labelled ‘Obtain Quote’ allowing you obtain a quote.

The system will automatically identify the content sent, source and target languages. By clicking on ‘Get Quote’ you’re able to check pricing, view any translation memory discounts for content that has previously been translated and get turnaround times for translation services.

The next page will display the costs for different types of translation and show any translation memory discounts to be applied due to repetition from previously translated work. Once you’ve selected the appropriate translation service you can press ‘Proceed‘.

The next page will display the cost and turnaround times for your translation job. If you’re happy with the costs and turnaround times then you can launch the job by clicking on ‘Submit Request’ on the next page.

Submitting content for translation
All your quotes will be presented in the WPML request manager for you to check the prices and turnaround times so that the relevant person can approve or reject the quote by simply clicking on ‘Approve’ or ‘Reject’.

You can now monitor the progress of your translation job in real time by visiting the ‘Job History’ tab in STREAM.

And once your translation is complete, you’ll be notified on the ‘Job History’ screen and be allowed to ‘Download’ your translated content to check it before importing it into WordPress.

Importing translated content back into WordPress
Depending on your configuration, WPML either delivers the translations automatically or you must fetch them manually.
To check your configuration, open the WPML->Translation Management and switch to the ‘Multilingual Content Setup‘ tab. Locate the ‘Translation pickup mode‘ section and check the appropriate option for the delivery method.

If you have selected the option ‘Translation Service will deliver translations automatically using XML-RPC‘ when the translation is ready in TOPPAN Digital Language, it will be delivered to your website automatically. This means you are not required to click anything, simply wait until the translation is complete.
If you have selected the option The site will fetch translations manually, each time you want to download translations you must first open Translation Dashboard (WPML->Translation Management), then scroll down and click the ‘Get completed translations‘ button.

Once the translation has been completed, you’ll receive a message by email to state that the translation has been completed.
You’ll then see green ticks for each target language that has been completed next to the relevant item in the ‘Translation Management’ dashboard.
![]()
By hovering over the relevant post or page and selecting edit and then selecting the appropriate language from the right-hand menu, you’re able to see the translated article before it’s published.

Once published your page or post will go live and be accessible from the main content by selecting the appropriate language in the language switcher. If you’ve hidden the language then this will only be available to logged in WordPress administrators.
Translating menus
If your site already has a menu implemented, once the pages that are featured in your menu are translated, these will automatically appear against the appropriate language in the menus section of WordPress.

If you’d like to add additional pages to the menu in an alternative language, you can simply drag and drop these into position and similarly, if you need to remove any, these can simply be deleted without affecting the menu structure in the source language. Therefore, each language can contain it’s own menu – with the pages that are most relevant for local audiences.
Translating static text
Anything that isn’t a post, page or taxonomy element is translatable via the ‘String Translation‘ plugin. This includes the site’s tagline, general texts in admin screens, widget titles, call-to-actions, error and confirmation messages and many other types of text available on your site’s front end.
These strings can be added to a translation basket and sent for translation in much the same way as your static pages and posts.
Simply visit the ‘String Translation’ page in WPML->String Translation and select the items you’d like to translate.

Once selected, you can choose to translate them into any of the languages you’ve set up in the previous steps.

These will appear in your translation basket, ready for you to approve and deliver to TOPPAN Digital Language for translation.
And once translated, you’ll be notified and the items will be available against your source language text on the ‘String Translation‘ page, ready for you to approve and publish to your site.

Once all of your content has been translated for each language, you can simply unhide the relevant language in the ‘Hide Languages‘ section in WPML -> Languages and your multi-language content will go live on your website.
What about SEO?
WPML integrates fully with the Yoast SEO plugin for WordPress which provides a full range of international SEO capabilities including everything from a snippet preview and page analysis functionality that helps you optimize your pages content, images titles, meta descriptions and more to XML sitemaps and loads of optimization options in between.
If you’re using the All in One SEO Pack, this is also fully compatible with WPML – allowing you to optimize pages on your site for users of international search engines.
Compatibility with other plugins
WPML is fully compatible with a huge range of other popular WordPress plugins – including WooCommerce, Visual Composer, Events Manager, Relevanssi, WPtouch Pro and lots of others. This page provides a complete list of fully compatible plugins. So, there are endless possibilities for how you can integrate your site with TOPPAN Digital Language to engage users in various regions around the world.


