
Last updated: October 2021
Introduction
When you are assigned a job that requires the use of the Online Editor, you will be emailed a link to log in. This link is also available in your TOPPAN Digital Language Translator Portal on the Job board screen.
Once you click on the link, the Editor will open. It mimics the standard source-target display used in other CAT tools. It looks like this:

Fig. 1 – Online Editor
On the top left of your window, you will see the features that were under the menu tab in the previous OE, along with three main buttons: the Briefing button, the Glossary button, and the Concordance button.

Fig. 2 – Top screen buttons
The Briefing button provides quick access to any special instructions that might be attached to a job. Following any special instructions specific to a job is mandatory. Please review the reference material enclosed before starting any job. By clicking on the button, a box with three different views will pop up, allowing you to access respectively:
- Briefing: brief information about the job, all special instructions, non-translatable terms.
- Documents: all briefing documents and all the documents coming from our Knowledge center.
- Details: additional information about the job and your contact person at TOPPAN Digital Language.
The Glossary button opens the Term Base lookup, which shows any matches from the TermBase (glossary) and non-translatable terms as you start typing in the space provided. To insert a TermBase match, click the Add Term button, or highlight a term in the source and right click on it, a popup box will appear. You will have the opportunity to not only insert the source term and its correct/recommended translation but also include a comment, which might be useful, for example, when you want to explain the context in which the specific translation of a term should be used. If a term within the segment you’re working on has an entry in the TermBase, it will appear highlighted in blue. Non-translatable terms will appear in yellow. Please add any useful terms, including context comments, to the TermBase as you translate.
The Concordance button allows you to scan through the Translation Memory for a specific term in the source language and find its relevant translation(s) within the memory. The ‘Case sensitive’ option will search only for matches in the exact same case (lowercase, uppercase, word starting with a capital letter, etc.). When searching for a number written in words, the ‘Numeric equivalence’ option will include results with numerical digits. The ‘Limit’ box controls the number of results displayed.
Located just above the mentioned buttons, you can find other tools and features, which will be examined in depth in a dedicated paragraph below.
On the left-hand side of your window, you will see the actual translation environment, spit into source text (left part), and target text (right part). The text is broken down into segments, which could be grouped or standalone: if some segments form part of a group, you can easily recognize them by looking at the colored bar on the right hand side – to recognize different groupings, we adopted two colours, light blue and yellow. If a segment does not show any colour, it means that it does not belong to any group.
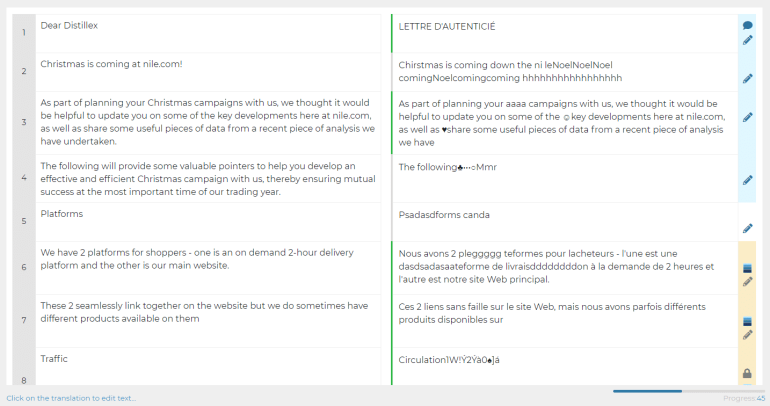
Fig. 3 – Editor view
On the right-hand side, you will see two boxes: the Translation Memory Matches at the top, and the Context/Preview/Concordance box at the bottom.
Please note that, instead of the two boxes just mentioned, RunQA box will appear in this space when the feature is enabled.

Fig. 4 – TM matches and context viewer
Translation Memory matches box: it shows the source and target text of matches from the Client’s Translation Memory.
To insert a match from the memory press Ctrl + the number that corresponds to the match OR (predictive typing).
In some cases, 100% and 101% matches will be inserted automatically – they have already been translated previously. Those matches will be labelled ‘Pre-translation’. Furthermore, if a target segment has a black padlock symbol against it, you do not need to work on these segments at all. These are locked for editing.
All the translations that you complete and confirm by pressing Ctrl + Enter will be added to the Translation Memory for future use.
You can also flag if a match is not appropriate for a given source, by clicking the thumb button close to the relative match.
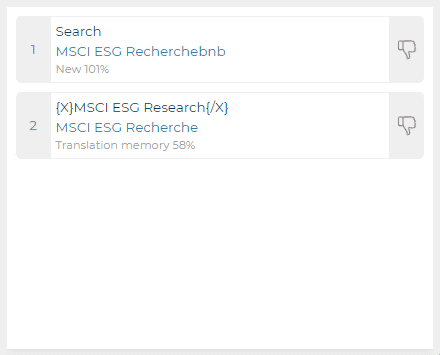
Fig. 5 – TM matches box
Context/Preview/Concordance box: context is key for translation, and therefore, wherever possible, we will include a visual reference that helps to better understand the text being translated. This might be an image of a product for an online retailer or a photo that is accompanied by a caption. In this box, you can also find the Concordance tab.
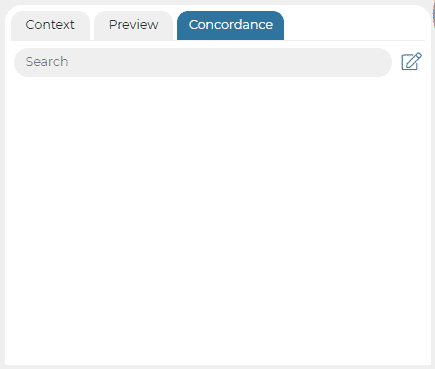
Fig. 6 – Context viewer box
Predictive Typing: one of the features introduced by the new version of the OE is the Predictive Typing. It will help to place words at the typist’s source, which derive from the matches. These can originate from either the Translation Memory or the Machine Translation.
Additional features and tools
In addition to the features mentioned above, by clicking on the menu button, you will have access to the following drop down menus:
- Projects: here you can submit your translation, download it or have an overview of the project.
- Files: here you can Export/Import your translation
- Tools: here you can find some of the features mentioned above (Term Base Lookup and Non-Translatable Terms) and other useful ones:
- Track Changes: it allows you to track changes made from a stage of the translation to another.
- Auto-Propagate: it allows you to select the preferred option when confirmed a repetition. (See the paragraph below for more information)
- Check Spelling: it allows you to spot misspelled words in the target language.
- Find and Replace: it allows you to find a specific term or pattern and Replace it with another term or pattern, if needed.
- Got to Segment: it allows you to directly go to a specific segment.
- Run QA: it allows you to run the Quality Assurance tool, as mentioned above, results will appear in a box on the right hand side of your window. If any problem is spotted, it will be listed for category, and the issues will directly appear in the relative target cell in red. You can opt for either Default or Strict QA. The report will list any potential errors that might need fixing before the job is submitted.
- View: here you can hide/unhide confirmed/locked segments, and repetitions and also display the character count and formatting. This is useful if you want to see if non-breaking spaces have been inserted in the translation, i.e.
- Help: here you can access to the TOPPAN Digital Language Project Manager’s contact details, a form to report bugs or errors that you experience and a direct link to this guide.
How to use the Online Editor
Translating
To begin translating, simply put your cursor into the target segment of the first line and once you have thought of a really good translation, type it in.
To confirm a segment and move onto the next one hit Ctrl+Enter. This will save the translation in the memory and move the cursor to the next segment so you can begin translating again, and the confirmed segment will show a green bar on the left part of it. In case of a repetition, by confirming a segment, you will also activate the auto-propagation function, which allows you to automatically populate all the repetitions of an active segment with its current translation. You will find the function in the Online Editor under the ‘Tools’ menu. By default, the function is set to ‘Always ask’. This means that when you click on a segment that is repeated throughout the text, you will need to decide how you want its repetitions to be translated. You will be able to choose from four options:
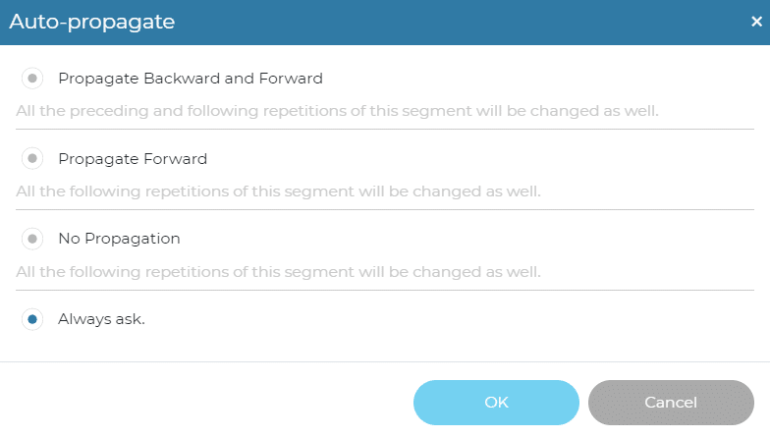
Fig. 7 – Auto-propagation
- Propagate backwards and forward
- Propagate forward
- No propagation
- Always ask
If you don’t want to save the translation in the memory, for instance, if you want to re-draft it later, just use CTRL + up or down arrows to navigate up and down through the document. You can go back and edit your translations at any time before delivering the document. You can also copy the content of the source segment into the target segment by pressing Alt + right arrow. Use the keyboard shortcuts to insert Translation Memory and TermBase matches that you want to use, and add any useful Terms to the TermBase as you work. IMPORTANT: Please note that if you choose to work on the XLF export of the file in your own CAT tool rather than work directly in the Online Editor, you should not join or split any of the segments in your CAT tool, as the XLF file will not import back into the Editor.
Revising & Editing
This works exactly the same way as the translation – you work through revising the translation and editing what you feel needs to be edited. The colouring of the segments is slightly different for revisers than it is for translators. Any segments that are not locked and the reviser needs to work on will display in bold and in blue. As the reviser works through the document, any confirmed segments and their repetitions (subject to auto-propagation settings) turn green. This system allows for the reviser to quickly assess their progress and the amount of work that they still need to complete.
Returning a job
Before returning a job, whether it’s a translation or revision, please make sure to run a QA report first. ‘Run QA’ function is available from the menu at the top under ‘Tools’. Please make sure to address any relevant errors before submitting any job. Equally, we ask all our linguists to run a spell check before returning any job. The spell checking tool is available from the top menu under ‘View’.
To return a job you need to go to ‘Project’ from the menu at the top of your window and select ‘Submit job’. If you were revising and editing a translation, you will be asked to fill out a short revision checklist when returning the job. ‘Download Translation’ allows you to download the translation complete so far in the original file format.
FAQ
Does this mean that I can’t use my own translation memory tools and I should use the Online Editor?
We usually encourage our linguists to work in our Online Editor as it allows us to monitor the workflow as well as the technical aspects of a project more efficiently. However, if you prefer to use your own tools, you can ask to receive the TMX file and the source file in XLF format, and work inside your own tools in the usual way. We use our Online Editor with over 80% of the work we do and its use is mandatory for certain clients.
What if I do not have a quick enough (broadband) internet connection?
You can ask to receive the TMX and source file in XLF format if you prefer to work offline. We understand that many translators work on computers that are not connected to the internet for security reasons, and so we accommodate this.
If I refuse to use the Online Editor, will I still be able to work with TOPPAN Digital Language?
Yes. You do not always have to use the Online Editor. Whilst the vast majority of the projects we do requires the use of the Online Editor, we also occasionally process jobs that can be done directly in text editors such as MS Word.
Can I use the Online Editor for other work?
No. At the moment the Online Editor is only available for use with TOPPAN Digital Language work and we do not offer the ability for you to load in your own projects.
Can I use keyboard shortcuts like 0+160 for a non-breaking space, etc.?
Yes – the Online Editor supports the standard keyboard shortcuts for special characters. There are also other keyboard shortcuts, which are listed at the bottom of this document.
View
All major browsers support the zoom function to change the view. In some cases, because of the way that the matches are presented, you may find you cannot fit everything onto the page in a format that would be easy to view.
Try hitting Ctrl+- to zoom out one step. This will make the text smaller, but it will help create space in the layout for you to view everything.
We use analytics to track the screen resolutions that users of the Online Editor have and we optimise the view and settings for the majority, but we are aware that there are a huge number of different types of devices connecting, with different screen sizes.
List of useful shortcuts
Navigate through segments: CTRL + ↑ or CTRL + ↓, Page Up or Page Down
Go to a specific segment: Ctrl + G
Perform concordance search for the active segment: Ctrl + Q
Insert Translation Memory match: CTRL + TM match number
Insert Term Base match: CTRL + SHIFT + TB match number
Copy Source text into Target Column: ALT + →
Confirm Segment: CTRL + ENTER
Find and replace options: Ctrl + F


